Introduction
Heavy-duty semi-trucks and haulage vehicles work under extreme conditions every single day. They carry heavy cargo, climb steep roads, and run for hours at high speeds. Constant engine heat and chassis vibration wear down key turbo system parts over time.
Among these wearable components, the intercooler pipe is one of the most overlooked yet critical parts. Most fleet drivers and owners only notice issues when serious damage occurs. Early pipe wear rarely shows obvious warning signs.
Simply put, the truck intercooler pipe acts as a bridge. It connects the turbocharger to the intercooler core. Its main job is to carry high-pressure compressed air for engine combustion.
A fully sealed intercooler pipe is non-negotiable for turbo system health. Even tiny cracks or loose clamps cause boost leaks. These small leaks snowball into major performance and mechanical issues over time.
In addition to weak engine power, faulty pipes raise fuel consumption dramatically. If left unfixed, boost leaks wear out turbo bearings and cause engine carbon buildup. In worst-case scenarios, trucks stall mid-drive and create safety risks.
The biggest issue with intercooler pipe failure is its gradual progression. Minor aging does not affect driving performance noticeably. By the time you feel power loss, secondary engine damage has already taken place.
For this reason, every fleet manager and truck mechanic should master basic pipe inspection and replacement skills. Timely repairs cut downtime and avoid expensive turbo overhauls later on.
This practical, field-tested guide breaks down every part of intercooler pipe replacement. It covers core functions, failure signs, diagnosis, step-by-step installation, and long-term maintenance. For reliable OEM-grade truck pipeline parts, check out our truck system parts catalog.
What Is a Truck Intercooler Pipe? Basic Function & Structure
Before you start any disassembly work, it helps to understand what the intercooler pipe does. Basic structural knowledge helps you avoid installation mistakes and spot abnormal wear quickly.
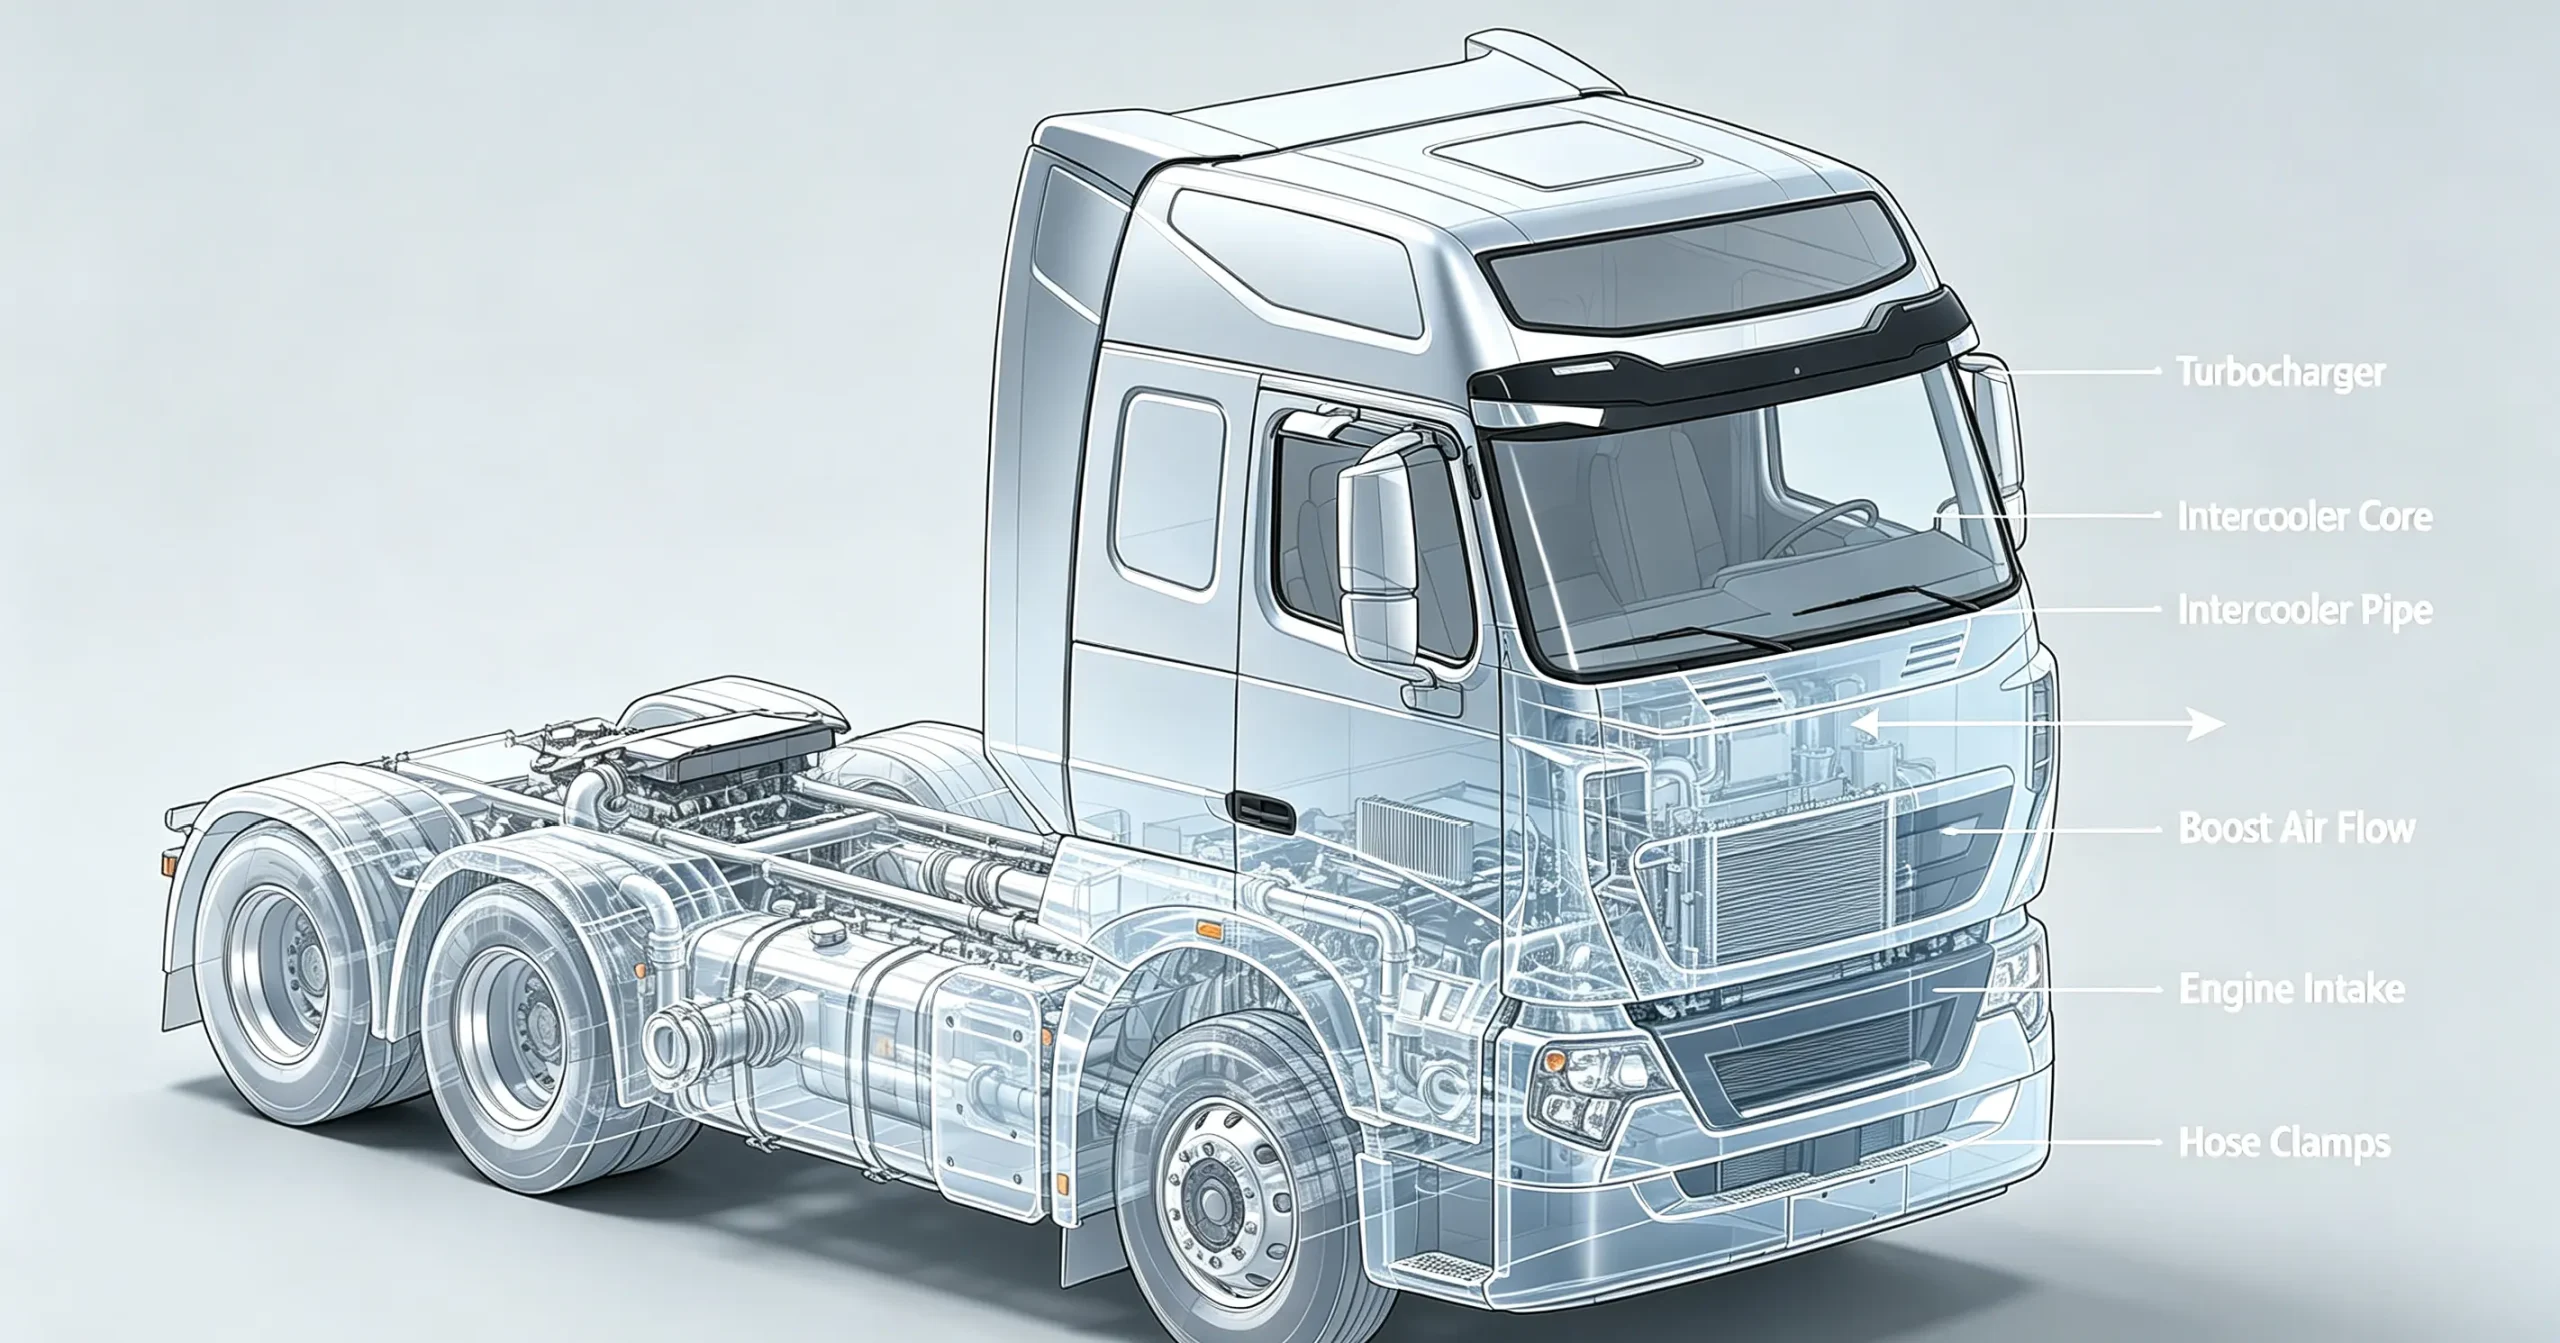
A truck intercooler pipe is a high-pressure resistant pipeline built for heavy-duty diesel turbo engines. It links the turbocharger outlet to the intercooler inlet. Some models feature a secondary pipe leading to the intake manifold.
This pipe is far more durable than standard engine rubber hoses. It must handle extreme boost pressure, high under-hood heat, and continuous chassis vibration. OEM manufacturers use composite structures to meet these tough demands.
Generally, two pipe types are common on modern heavy-duty trucks. The first is an all-rubber reinforced hose with internal fiber layers. The second is a hybrid design with metal hard pipes and flexible rubber hose segments.
Fiber reinforcement inside rubber pipes prevents expansion and deformation under high boost pressure. The outer rubber layer uses heat-resistant materials to withstand high engine compartment temperatures.
Hybrid metal-rubber pipes balance stability and flexibility. Metal sections fix the pipeline layout and prevent bending. Rubber segments absorb vibration and avoid pipe cracking during engine operation.
Each pipe end comes with high-strength hose clamps. These industrial-grade clamps maintain steady tension under heat and vibration. They stop joint loosening and air leakage during long-haul runs.
Functionally, the pipe delivers hot compressed air from the turbo to the intercooler core. The intercooler cools down the high-temperature air quickly before it enters the engine.
Cooler intake air has higher density. Denser air mixes better with diesel fuel. This improves combustion efficiency, boosts pulling power, and lowers exhaust emissions.
In short, the intercooler pipe controls air delivery for the entire turbo cooling system. Its sealing quality directly impacts boost stability, fuel economy, and overall truck performance.
Many new mechanics mix up intercooler pipes with cooling system lines. However, these are two fully independent systems. You can learn more about cooling system components from our truck thermostat valve guide.
Knowing the difference between air intake and coolant pipelines helps you diagnose faults accurately. It prevents unnecessary disassembly and misjudgment during routine maintenance.
Why Intercooler Pipe Condition Matters for Heavy-Duty Trucks
Most fleet teams underestimate small intercooler pipe leaks. They view minor seepage as a trivial issue that does not need immediate repair. In reality, tiny defects worsen rapidly under heavy-load operation.
First and foremost, damaged pipes cause consistent boost pressure loss. Turbo diesel engines rely on stable factory-spec boost pressure to generate rated power. Leaks drop pressure below standard levels instantly.
As a result, the engine does not get enough intake air. Insufficient air leads to incomplete diesel combustion. This directly reduces acceleration power and increases daily fuel costs.
Incomplete combustion also produces excess carbon deposits and black exhaust smoke. Over time, carbon buildup clogs intake passages and wears fuel injectors. It can even block the exhaust system and trigger DPF errors.
Additionally, persistent boost leaks force the turbocharger to work overtime. The turbo spins faster to compensate for lost pressure. This abnormal operation accelerates bearing wear and shortens turbo service life significantly.
In extreme cases, aged pipes rupture completely during highway driving or steep hill climbs. Sudden pipe failure causes instant power loss. This creates major safety hazards for loaded trucks.
Modern electronic truck engines log fault codes when boost pressure fluctuates frequently. Frequent error codes hinder vehicle inspections and roadside compliance checks.
Overall, keeping intercooler pipes in good condition does more than preserve power. It cuts long-term maintenance costs, prevents roadside breakdowns, and protects expensive turbo and engine components.
Common Symptoms of a Bad or Failing Truck Intercooler Pipe
Intercooler pipe faults develop in clear stages. Early subtle leaks turn into full ruptures if ignored. You can catch issues early by watching these common symptoms during daily operation.
1. Noticeable Power Loss Under Load
Power drop is the most recognizable sign of a boost leak. Empty trucks show almost no performance issues. But once fully loaded or climbing slopes, the power deficit becomes obvious.
Drivers will notice slow acceleration even with the throttle fully pressed. The truck struggles to maintain speed and lacks the usual torque for heavy hauling.
This happens because compressed air escapes through pipe gaps. The engine cannot access enough air to support heavy-load combustion, resulting in weak performance.
2. Excess Black Smoke During Acceleration
If your truck blows thick black smoke while accelerating or taking off under load, suspect an intercooler pipe leak first.
Air shortages create an imbalanced fuel-to-air ratio. Extra unburned diesel turns into carbon particles and exits through the exhaust pipe as black smoke.
Continuous black smoke not only pollutes the environment but also clogs DPF filters. This leads to frequent regeneration cycles and extra maintenance work.
3. Sudden Rise in Fuel Consumption
Stable fuel usage is a sign of a healthy turbo system. If your fuel costs spike without route or load changes, faulty intercooler pipes are a likely culprit.
Leaking pipes waste fuel in two ways. Incomplete combustion burns fuel inefficiently, and the engine consumes extra diesel to make up for lost power.
4. High-Pitched Whistling Noise From the Engine Bay
Cracked or loose pipes release high-pressure air rapidly during acceleration. This creates a distinct whistling sound inside the engine compartment.
The noise grows louder as engine RPM rises. It fades at idle. Experienced mechanics can pinpoint leak locations quickly using this sound cue.
5. Unstable Idle and Engine Jitter
Severe boost leaks disrupt the engine’s air intake balance. The ECU receives inconsistent pressure data, which throws off idle speed control.
In serious cases, the engine shakes noticeably while idling. Individual cylinders misfire occasionally, worsening internal component wear over time.
6. Visible Aging, Cracks and Joint Oil Stains
You can spot pipe damage during simple visual inspections. Aging pipes have hardened, brittle rubber with fine surface cracks.
Micro air leaks trap oil mist and dust at pipe joints. Dark oily residue around clamps and connections is a clear sign of slow boost leakage.
Main Causes of Truck Intercooler Pipe Failure
Intercooler pipe damage rarely happens by accident. Nearly all failures stem from long-term harsh conditions, poor maintenance, low-quality parts, or incorrect installation. Below are the six most common root causes.
1. Long-Term Under-Hood Heat Aging
Intercooler pipes sit in the hottest zone of the engine compartment. Daily heat exposure bakes rubber materials for hours during long hauls.
Over time, rubber loses elasticity and flexibility. Hardened pipe material cannot resist air pressure impacts or vibration, which leads to cracking and leakage.
2. Continuous Chassis Vibration and Pipe Tension
Heavy trucks produce intense vibration on bumpy highways and rural roads. Intercooler pipes endure constant pulling and friction during operation.
Bending points and hose ends bear the most stress. These weak areas develop fatigue damage first and eventually leak or split open.
3. Loose or Rusted Hose Clamps
Many boost leaks come from loose clamps, not damaged pipes. Long-term vibration loosens clamp tension gradually.
Rusted and worn clamps also lose clamping power. They create tiny gaps at joints that let air escape, often without obvious visual signs.
4. Improper Installation Angle and Overstretching
Improper installation is a top human error causing repeat failures. Many mechanics force pipes into misaligned positions during replacement.
Twisted or overstretched pipes stay under constant tension. Vibration and pressure quickly crack these stressed sections after installation.
5. Low-Quality Aftermarket Pipe Parts
Budget aftermarket pipes often skip internal fiber reinforcement. These cheap units cannot handle standard turbo boost pressure.
They bulge, deform, and crack within a short time. For long-lasting reliability, always install genuine heavy duty truck OEM parts.
6. External Friction and Road Debris Damage
Intercooler pipes sit exposed in the chassis layout. They frequently rub against nearby metal brackets and components.
Flying road stones also scratch pipe surfaces during driving. Small abrasions expand under repeated air pressure cycles and turn into leak points.
Professional Intercooler Pipe Leak Diagnosis Methods
Before replacing any parts, confirm the exact leak location. Blind replacement wastes time and money. Use these five professional diagnosis methods for accurate results.
1. Basic Visual Inspection
First, turn off the engine and let the bay cool completely. Heat protects hidden cracks and oil stains from easy observation.
Check the entire pipe surface carefully. Look for dry cracks, bulging rubber, hardened texture, and joint oil buildup. Focus on bends and clamp connections.
2. Idle and Acceleration Sound Check
Start the engine and maintain stable idle speed. Gradually raise RPM while listening closely to engine bay sounds.
A consistent high-pitched whistle that rises with engine speed confirms a boost leak. This method quickly rules out other mechanical noises.
3. Soapy Water Bubble Test (Most Accurate Manual Method)
Mix simple diluted soapy water and coat all pipe surfaces and joints thoroughly. Cover every clamp and bending section.
Start the engine and apply gentle acceleration. Bubbles form instantly at even the smallest leak points. This method finds micro leaks invisible to the naked eye.
4. Boost Pressure Data Scan
Connect a professional truck diagnostic scanner to read real-time boost pressure data. Compare live readings to factory standard parameters.
Slow pressure rise and consistently low peak boost confirm severe system leakage. This method delivers data-backed fault verification.
5. Loaded Road Test Verification
Perform a real road test with standard cargo loads. Monitor acceleration response, power output, and exhaust smoke.
Weak loaded performance plus black smoke, with no other engine faults, verifies intercooler pipe leakage as the core issue.
Pre-Replacement Safety Preparation & Tool Checklist
Intercooler pipe replacement is basic routine maintenance. Even so, careless steps cause repeat leaks and secondary damage. Follow these prep steps for safe, effective repairs.
1. Standard Safety Procedures
Park the truck on flat, solid ground. Engage the parking brake and place wheel chocks to prevent rolling.
Shut down the engine fully and cut auxiliary power. Wait 20 to 30 minutes for under-hood components to cool down completely.
Hot pipe surfaces cause severe burns. Never start disassembly while the engine bay is warm.
2. Required Tools
Gather standard socket sets, screwdrivers, adjustable wrenches, and clean lint-free shop rags.
Always prepare new matching hose clamps. Reusing old fatigued clamps is the top cause of post-repair leakage.
3. New Parts Pre-Check
Inspect the new pipe before installation. Verify length, diameter, bend angles, and port size match the original OEM unit exactly.
Check for factory defects including uneven rubber thickness, surface bubbles, and weak flexible sections. Reject all flawed parts.
If you struggle with part matching, refer to detailed guidelines in our truck technical support articles.
Step-by-Step Truck Intercooler Pipe Replacement Guide
These universal steps apply to all mainstream heavy-duty truck models. This includes Sinotruk, FAW, Shacman, Dongfeng, and all Cummins-equipped diesel trucks.
Step 1: Confirm Fault Zone and Clean Pipeline
Double-check the confirmed leak location from your earlier diagnosis. Wipe away dust, oil, and debris from the entire pipe surface.
Clean surfaces prevent foreign particles from entering the turbo and intercooler during disassembly. This protects internal precision components.
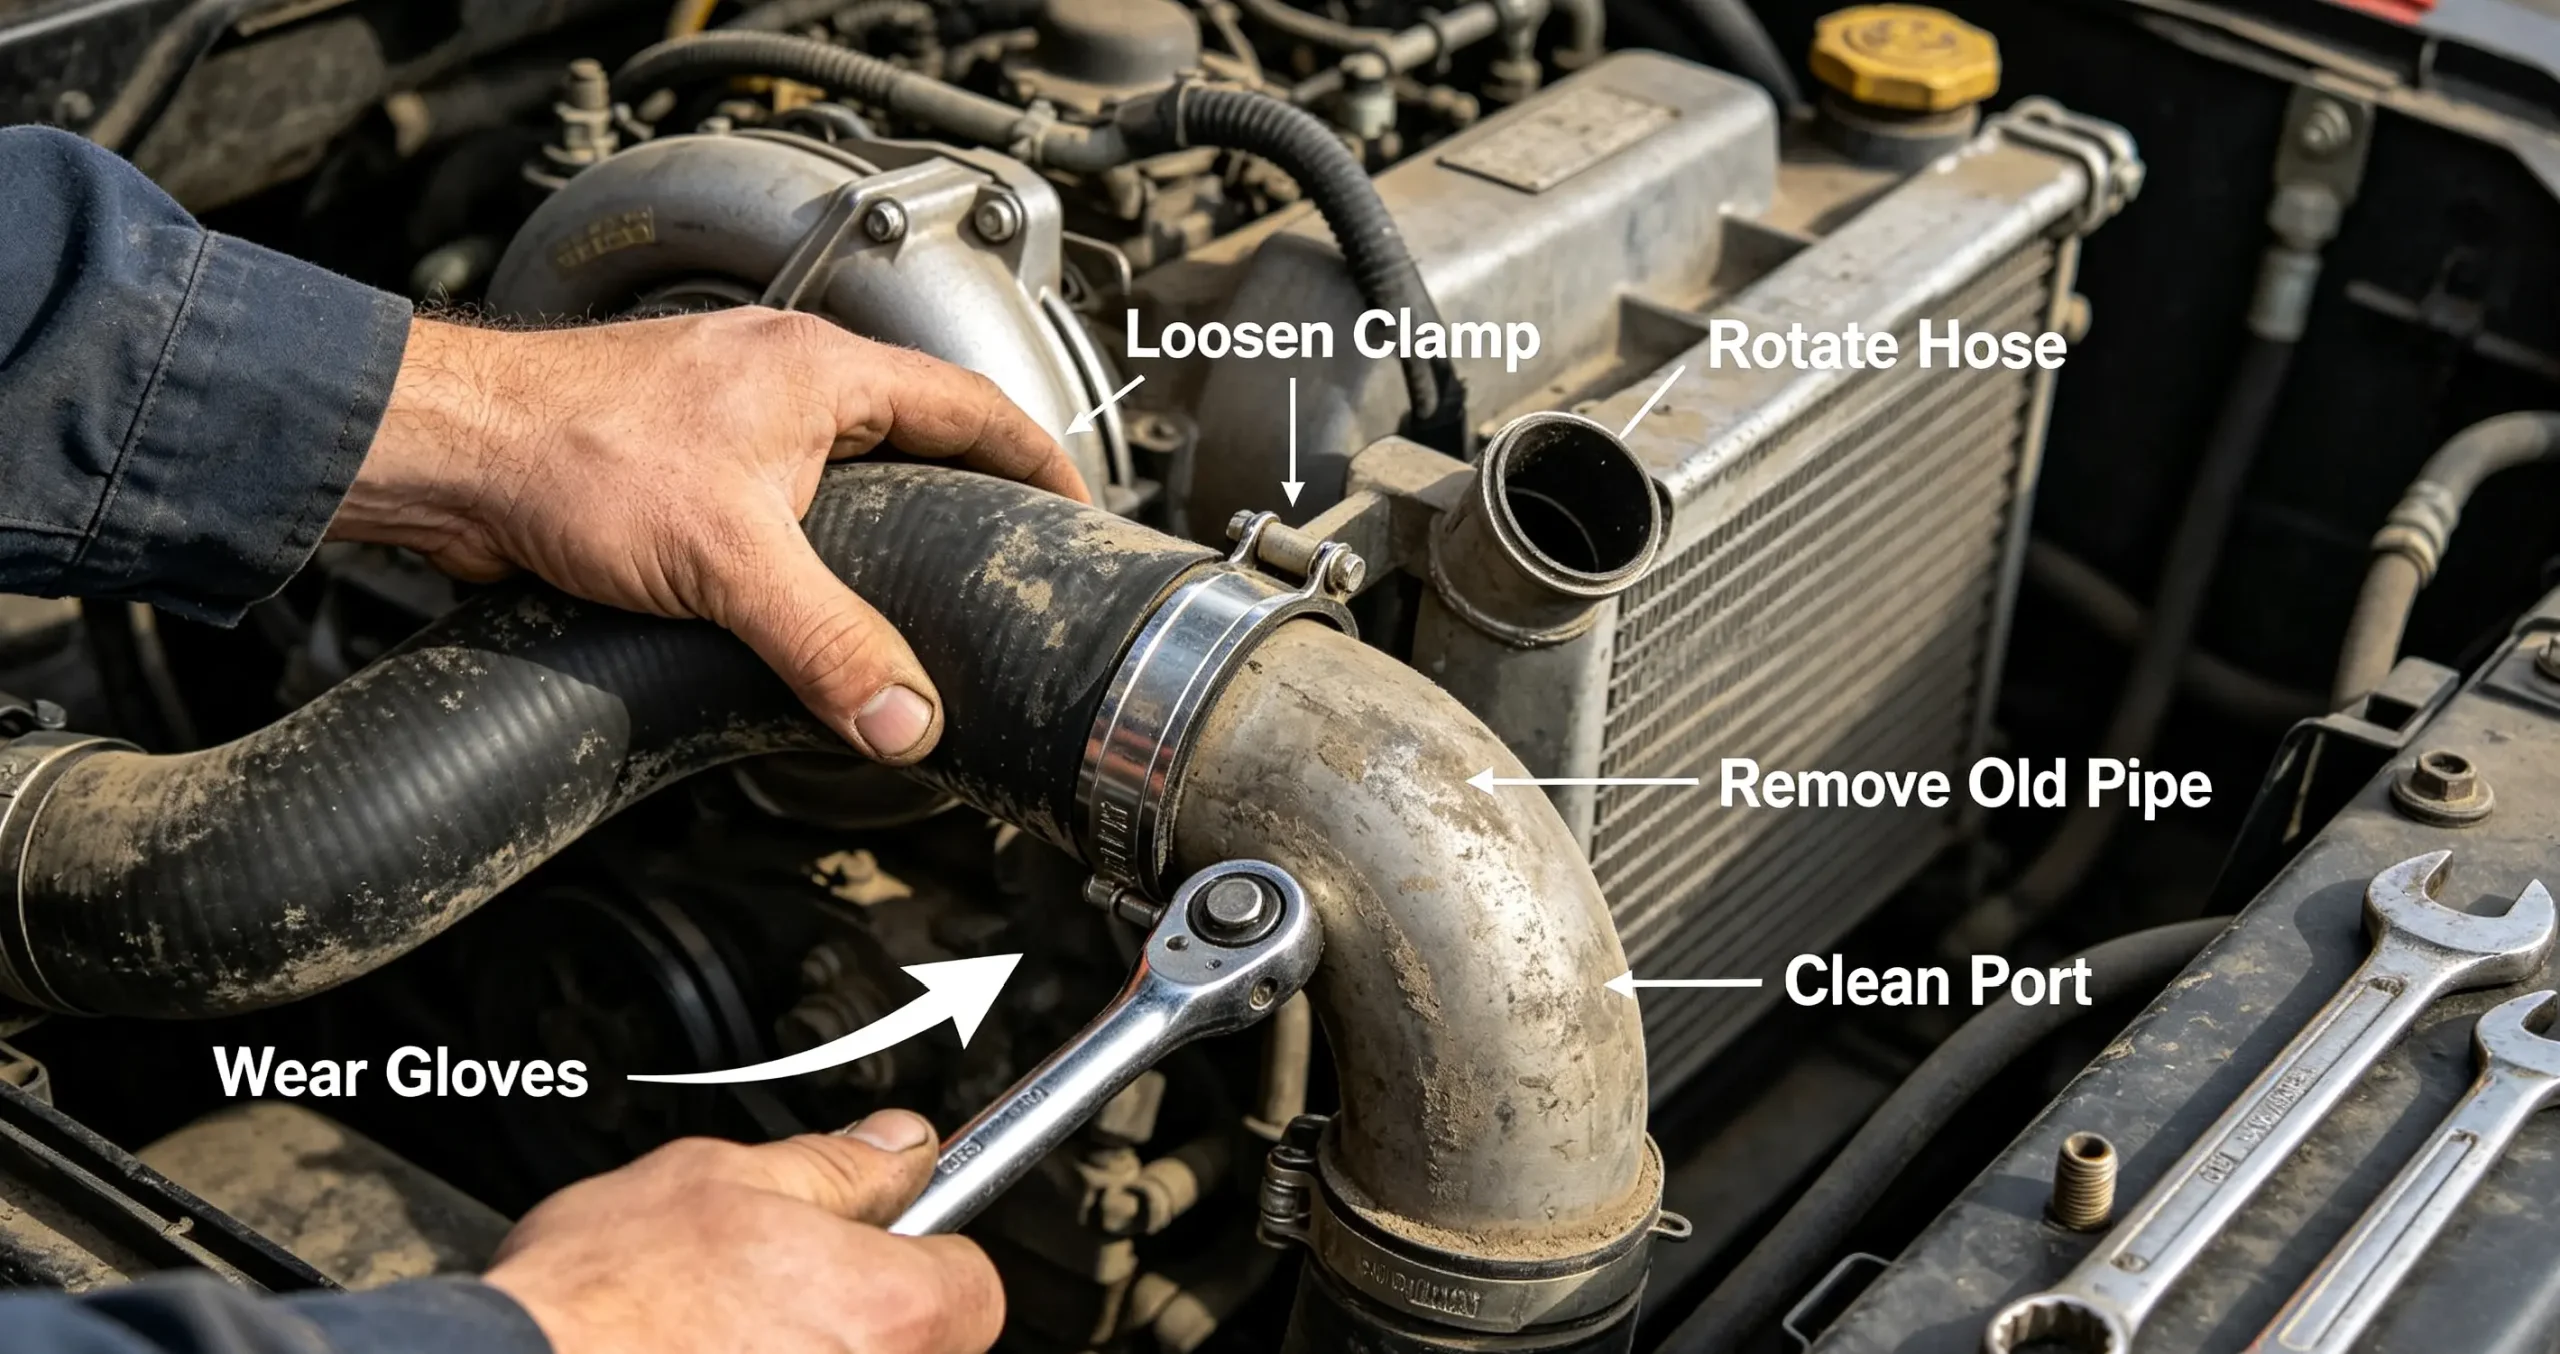
Step 2: Loosen Hose Clamps Evenly
Use a matched wrench to slowly loosen clamp bolts at both pipe ends. Work gradually to avoid bending or warping clamp hardware.
Slide loosened clamps outward to fully expose pipe connection ports. This creates clear space for pipe removal.
Step 3: Detach Pipe Interfaces and Remove Old Unit
Grip the rubber hose firmly. Rotate side to side gently to break the sealed connection with metal ports.
Do not yank the pipe forcefully. Violent pulling scratches port sealing grooves and damages threaded interfaces.
Once both ends are free, remove the old pipe completely. Examine its wear pattern to confirm the root failure cause.
Step 4: Clean Ports and Inspect Hardware
Wipe turbo and intercooler connection ports clean. Remove residual rubber bits, oil buildup, and fine dust.
Inspect metal ports for deformation, groove damage, and thread wear. Repair or replace damaged ports before installing new pipes.
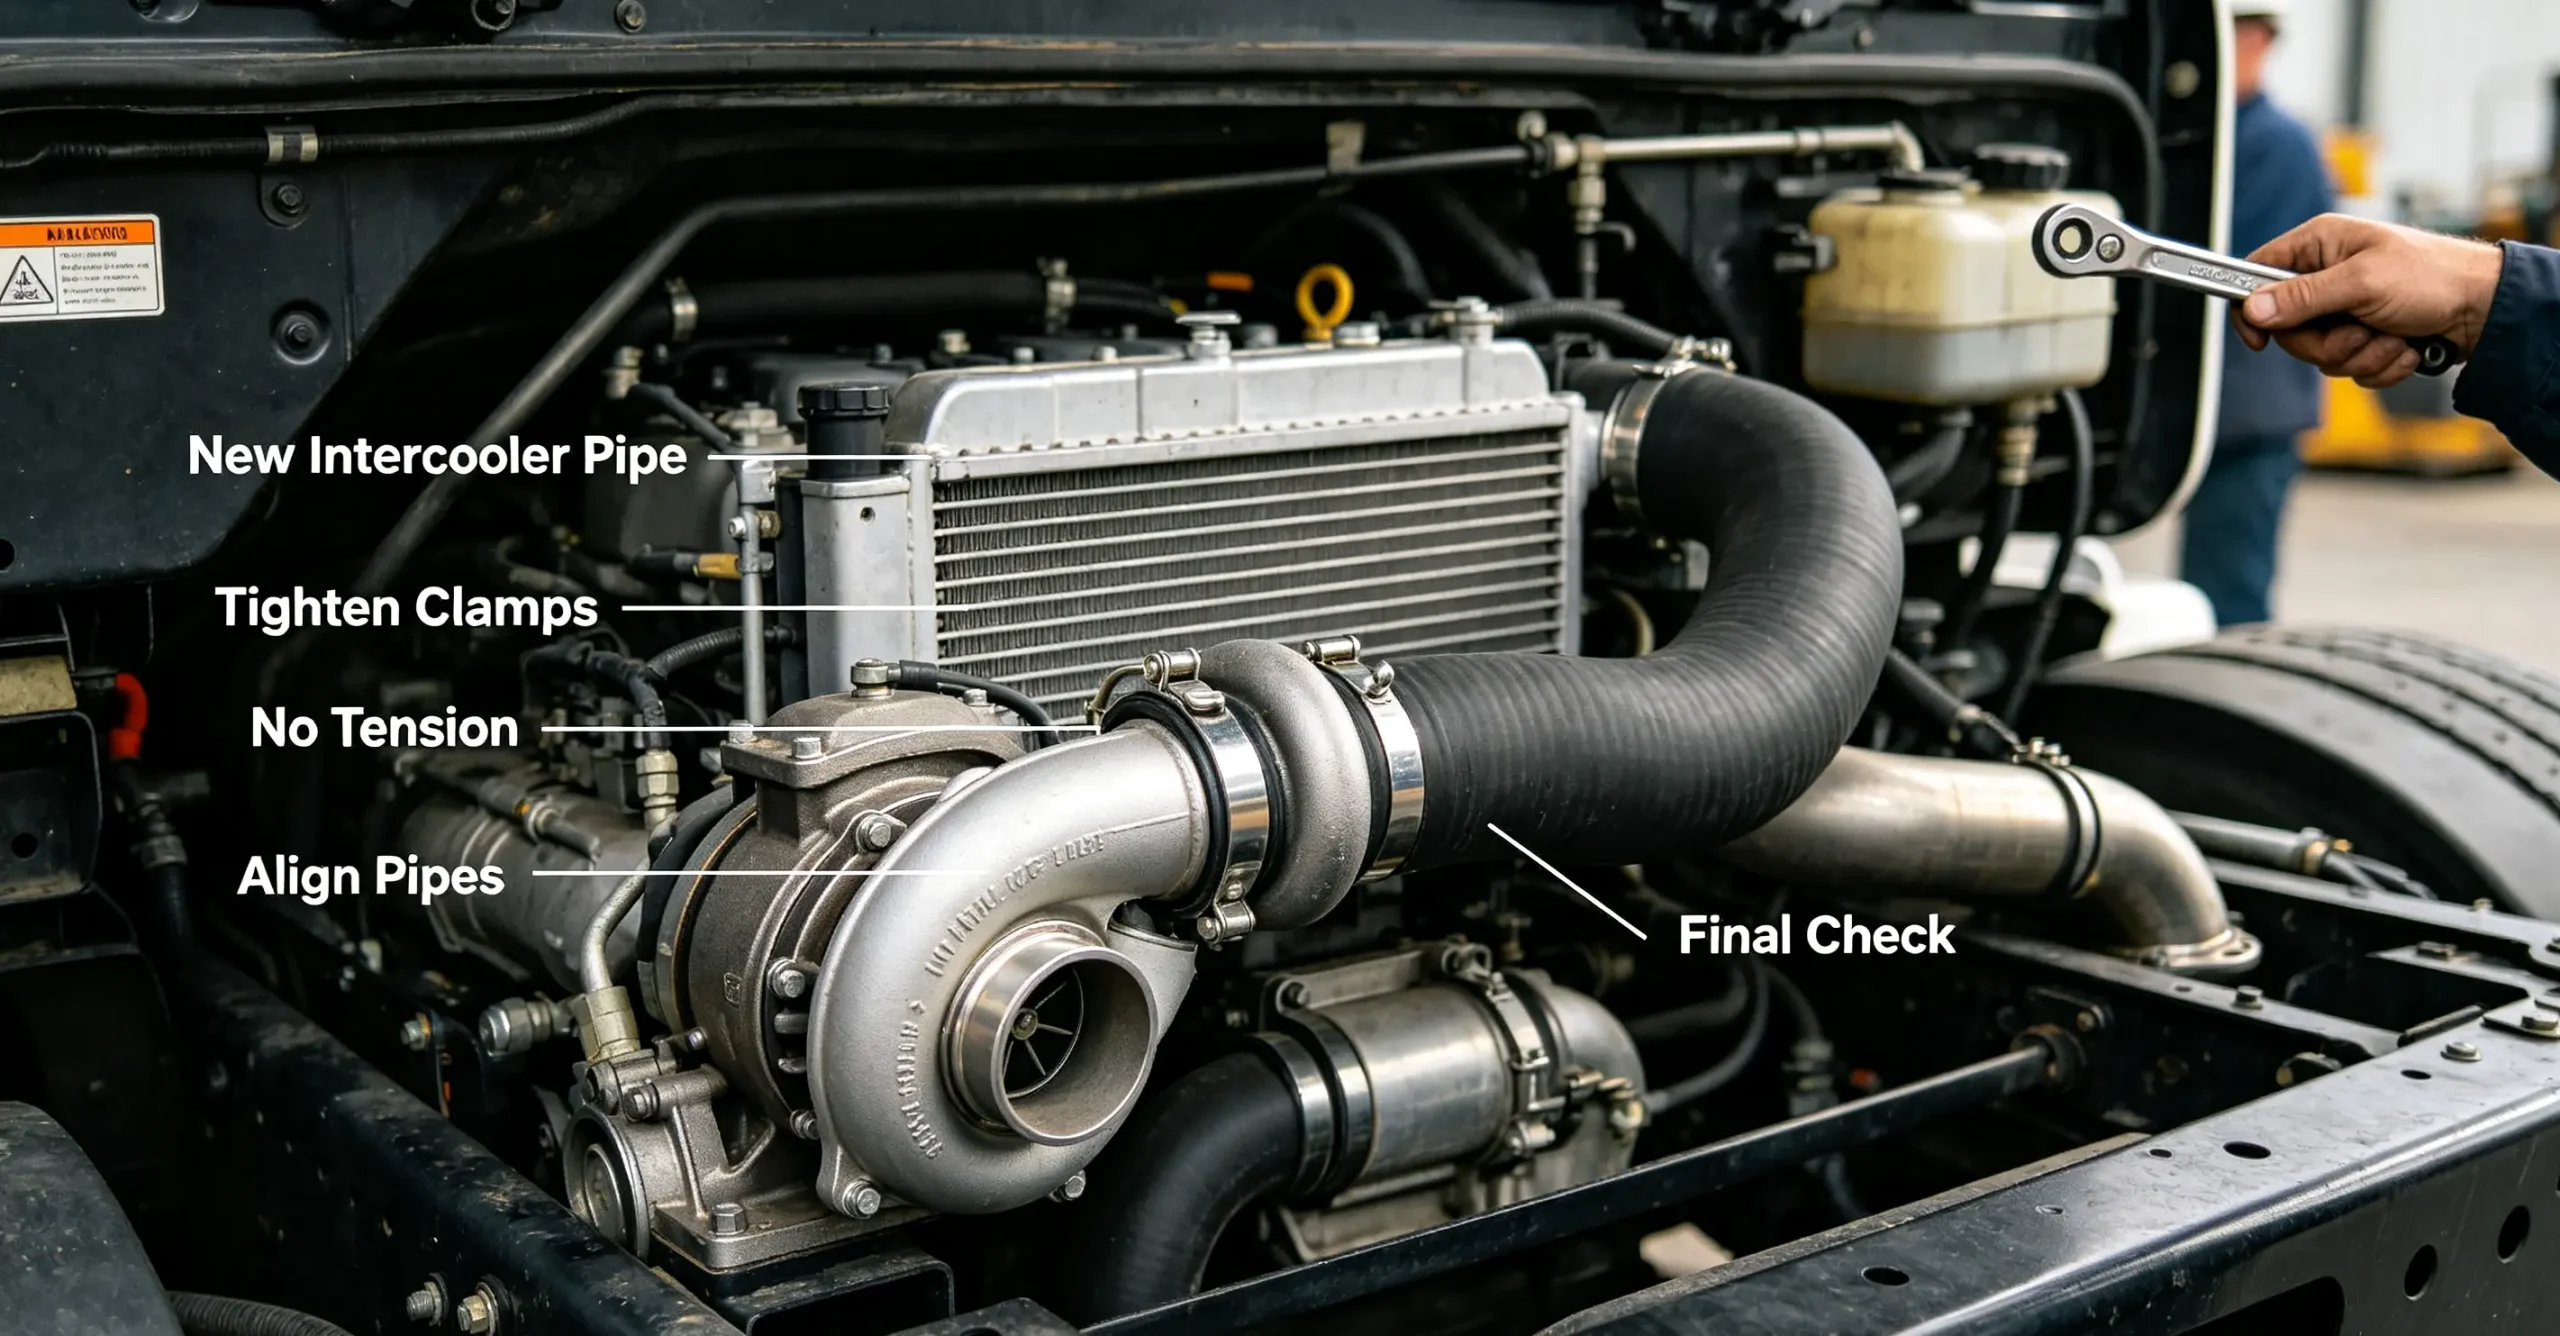
Step 5: Mount New Intercooler Pipe
Align the new pipe with factory mounting angles strictly. Follow the original pipeline layout exactly.
Avoid twisting, stretching, or squeezing the pipe during fitting. The hose must sit naturally with zero tension or torsion.
Fully seat the pipe onto both metal ports. Adjust positioning to eliminate contact with surrounding chassis parts.
Step 6: Install and Tighten New Clamps
Fit brand-new clamps onto both pipe joints. Position each clamp perfectly over the sealed port section.
Tighten bolts evenly with moderate torque. Over-tightening crushes rubber; under-tightening leaves leak-prone gaps.
Step 7: Final Visual Inspection and Cleanup
Review the full pipeline layout again. Confirm no twisting, friction points, or loose hardware.
Clear all tools and debris from the engine bay. Foreign objects cause serious engine damage during operation.
Step 8: Start Engine and Test for Leaks
Start the engine and run stable idle for five minutes. Listen for abnormal whistling or pipe vibration.
Perform several gentle accelerations to stabilize boost pressure. Recheck joints with soapy water to confirm zero bubbles.
Complete a short loaded road test. Verify full power recovery and clean exhaust. Stable performance confirms successful replacement.
Common Replacement Mistakes Leading to Repeat Leaks
Many trucks develop new leaks days after pipe replacement. In most cases, poor maintenance technique, not part quality, causes repeat failures. Avoid these six common pitfalls.
1. Reusing Old Worn Clamps
Used clamps suffer elastic fatigue and rust damage. They cannot maintain consistent tension after reinstallation.
Vibration quickly loosens old clamps, creating new leaks. Always install brand-new clamps with every pipe replacement.
2. Forced or Twisted Installation
Installing pipes at distorted angles creates constant internal tension. Pressure and vibration crack stressed hoses rapidly.
Always prioritize natural, relaxed pipeline alignment. Never force pipes to fit misaligned mounting points.
3. Dirty Connection Ports
Dust, rubber residue, and oil on ports prevent full hose contact. Tiny invisible gaps create persistent boost leaks.
4. Mismatched Pipe Specifications
Different engine models use unique pipe diameters and bend profiles. Ill-fitting pipes never seal perfectly.
5. Uneven Clamp Tightening
One-sided over-tightening deforms rubber hoses. Uneven sealing surfaces leak once heat expands the material.
6. Unaddressed Chassis Friction Points
New pipes wear fast if they rub against sharp metal brackets. Always adjust pipe routing to eliminate friction zones post-installation.
Daily Maintenance Tips to Extend Pipe Service Life
Proactive maintenance drastically reduces intercooler pipe failure rates. These field-proven tips extend pipe lifespan and prevent sudden roadside failures.
1. Weekly Visual Inspections
Check pipe surfaces and clamp tension every week. Watch for cracks, hardening, oil stains, and loose hardware.
Early detection of minor issues avoids major breakdowns and expensive secondary repairs.
2. Regular Clamp Retightening
Road vibration loosens clamps over thousands of miles. Retighten joints during every routine service interval.
3. Keep Engine Bay Clean
Excess dust and oil grime trap heat and accelerate rubber aging. Regular bay cleaning preserves pipe flexibility.
4. Avoid Sustained Overload High-Speed Runs
Long full-load high-speed driving keeps boost pressure at peak levels. This accelerates pipe fatigue and wear.
5. Schedule Scheduled Pipe Replacements
Standard rubber intercooler pipes last 2 to 3 years. Replace aging units proactively before failure occurs.
6. Stick With OEM-Quality Replacement Parts
Genuine OEM pipes feature precise engineering and durable materials. For trusted part sourcing, use our professional parts consultation channel.
Related Turbo System Parts & Professional Supply
The intercooler system relies on coordinated performance from multiple components. This includes intercooler cores, boost hoses, clamps, and intake manifolds.
We supply full-series heavy-duty intercooler pipes, turbo hoses, and supporting hardware. All parts match mainstream truck and engine brands perfectly.
Every product meets strict OEM quality standards with high heat and pressure resistance. We support retail orders and fleet bulk wholesale with fast global shipping.
For more in-depth turbo and engine maintenance guides, browse our truck engine parts articles to upgrade your fleet maintenance protocols.


