Introduction
Air brake systems are the most critical safety feature on all heavy-duty trucks and semi-trailers. Unlike passenger cars that rely on hydraulic brake fluid, commercial trucks use compressed air to deliver steady, powerful braking force. This specialized system is built to handle heavy vehicle weights, long highway hauls, and frequent stop-and-go delivery conditions—scenarios that would easily overwhelm standard hydraulic brake setups.
As a core part of the air brake system, the brake chamber acts as the main mechanical actuator. It bridges compressed air pressure and physical braking movement, turning pneumatic power into pushrod motion to engage drum brakes. Even small, easy-to-miss defects in this part can weaken brake balance, lengthen stopping distances, and reduce overall vehicle control on the road.
Most truck drivers and fleet maintenance teams take a reactive approach to brake chamber upkeep. They only fix issues after obvious, severe failures appear. Common late-stage warning signs include hissing air leaks, consistent pulling while braking, overheated brake drums, and weak, unresponsive brakes. Waiting for these symptoms to worsen often leads to roadside breakdowns, failed DOT inspections, and preventable traffic collisions.
For this reason, learning to spot early brake chamber issues is key to proactive fleet maintenance. Beyond identifying warning signs, understanding why brake chambers fail and mastering proper repair and adjustment techniques helps fleets stop recurring brake problems and avoid wasting money on unnecessary part replacements.
This easy-to-follow, industry-standard guide covers every early and severe warning sign of a failing brake chamber, breaks down key failure causes, shares step-by-step professional diagnosis methods, details full replacement procedures, and outlines long-term maintenance tips to extend part life. We also include a comprehensive FAQ section to resolve common questions drivers and technicians face during daily brake system servicing.
After reading this guide, you will be able to check brake chamber health during pre-trip inspections, troubleshoot abnormal brake behavior accurately, and complete professional repairs to restore full, safe brake performance for your heavy-duty truck or semi-trailer.
What Is a Brake Chamber & How Does It Work?
Before exploring failure symptoms and fixes, it’s important to understand the basic structure and function of a brake chamber. This foundational knowledge helps you connect every abnormal brake issue to its root mechanical cause, eliminating guesswork during troubleshooting.
A brake chamber (also called an air brake actuator) is a fully sealed pneumatic component mounted to each wheel’s brake assembly on heavy-duty commercial vehicles. As the main power source for drum brake systems, it converts compressed air pressure into physical force to slow and stop large trucks and trailers.
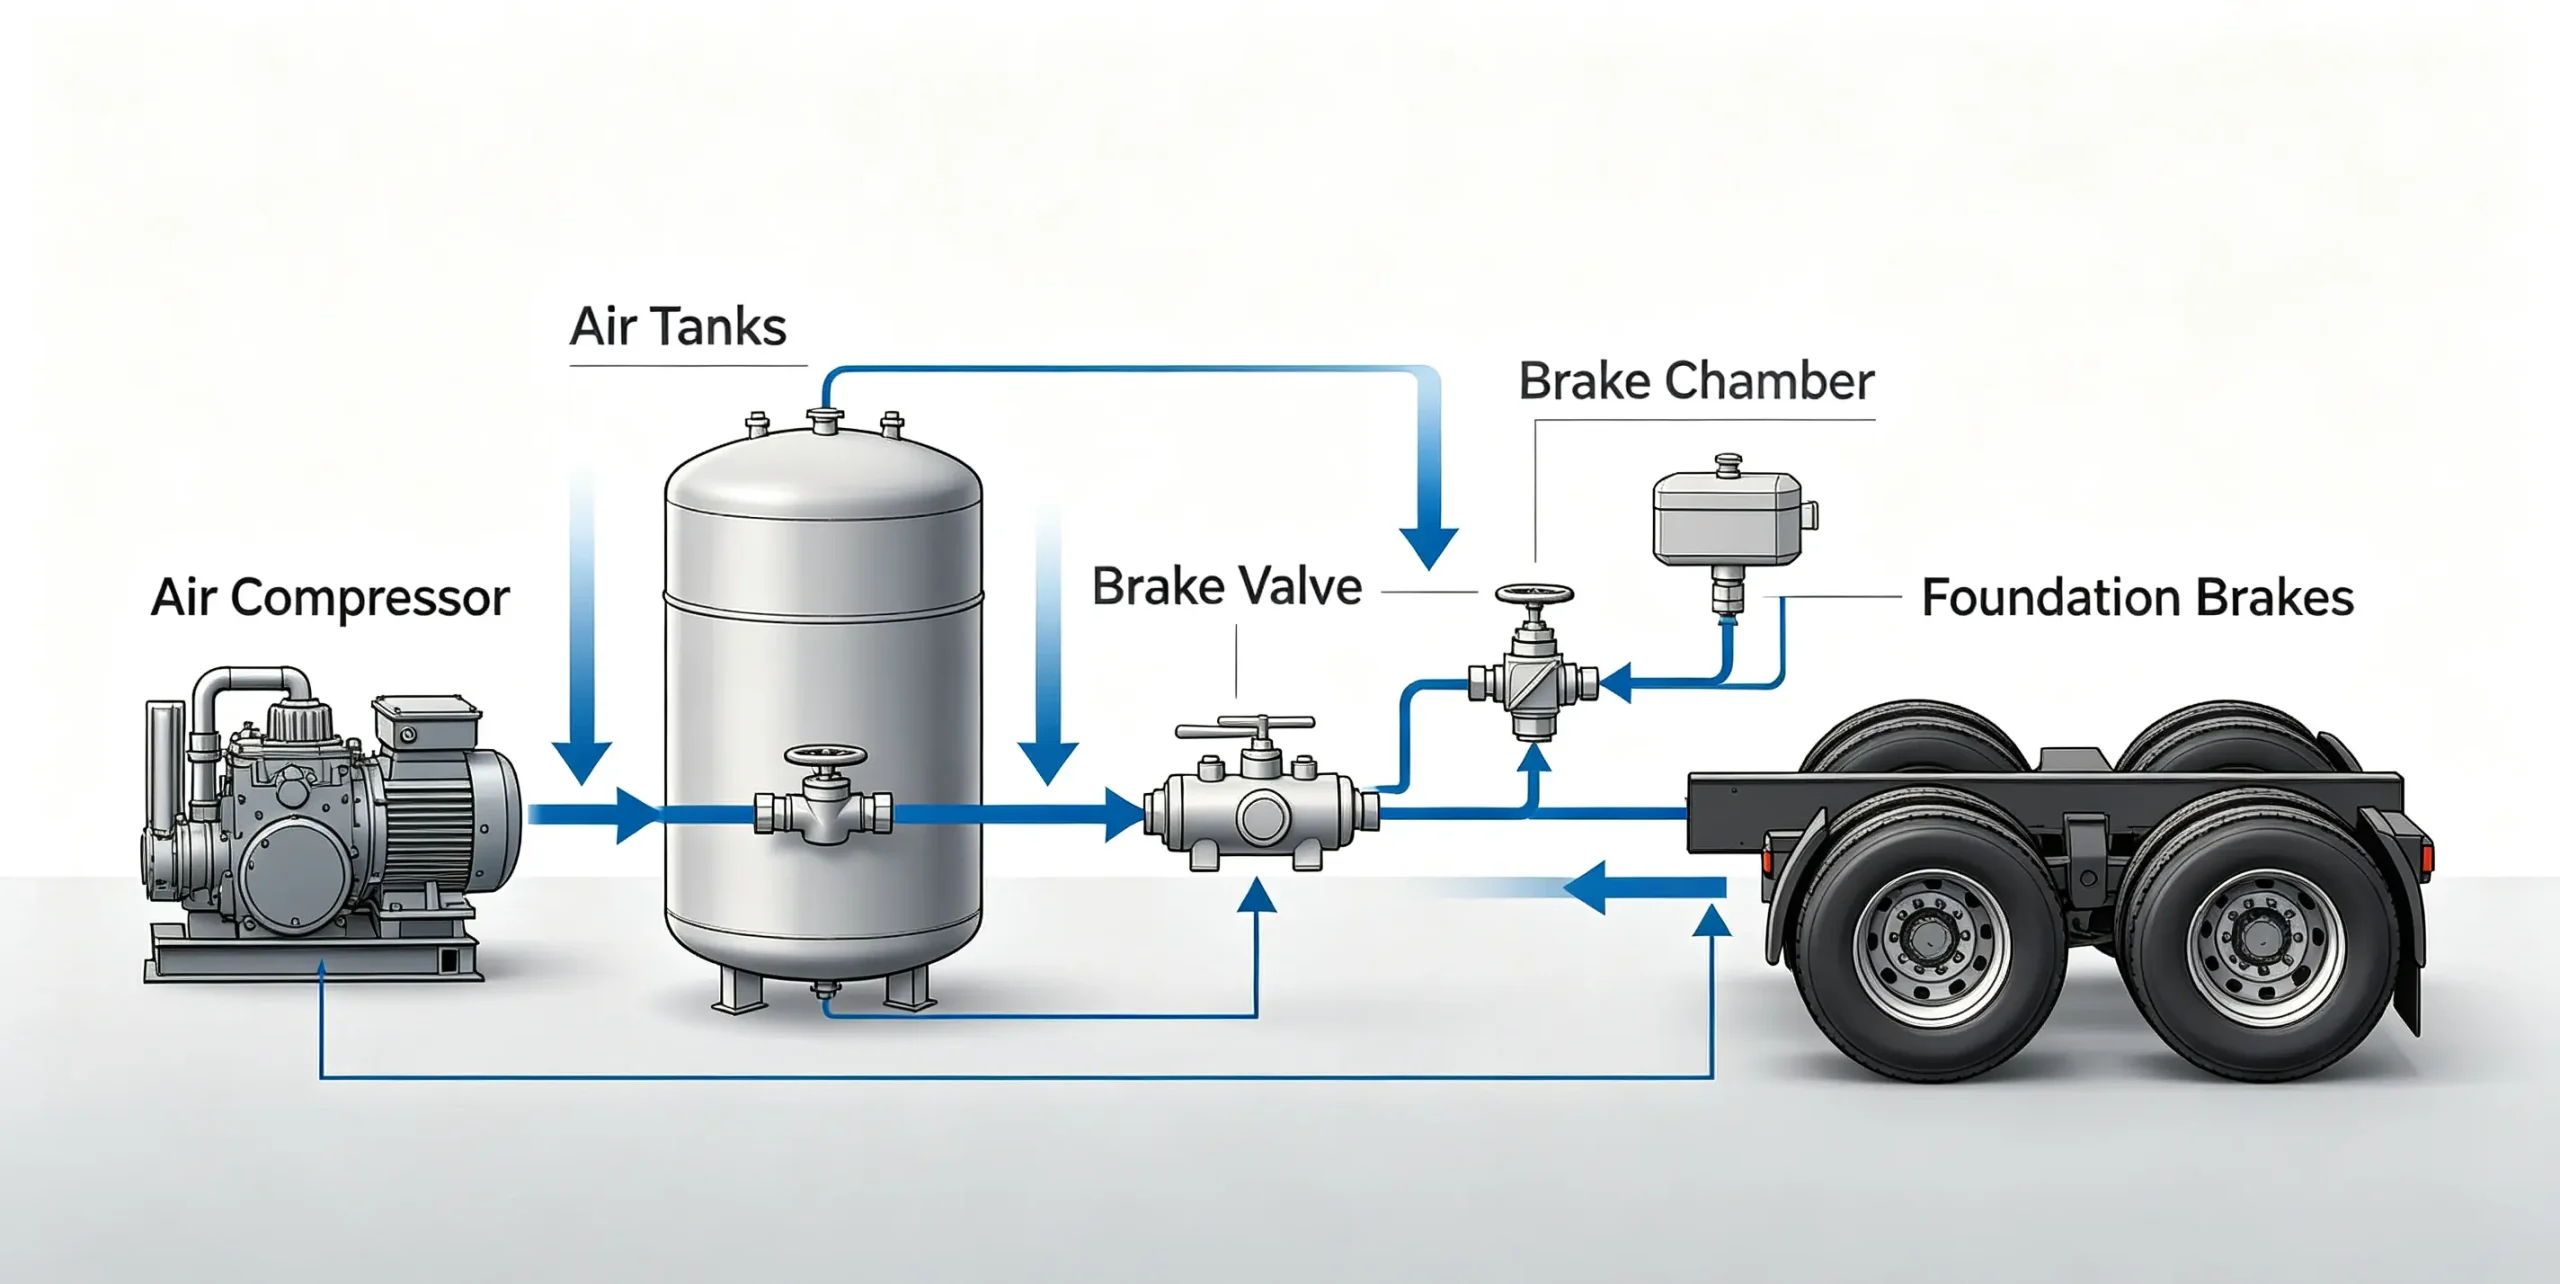
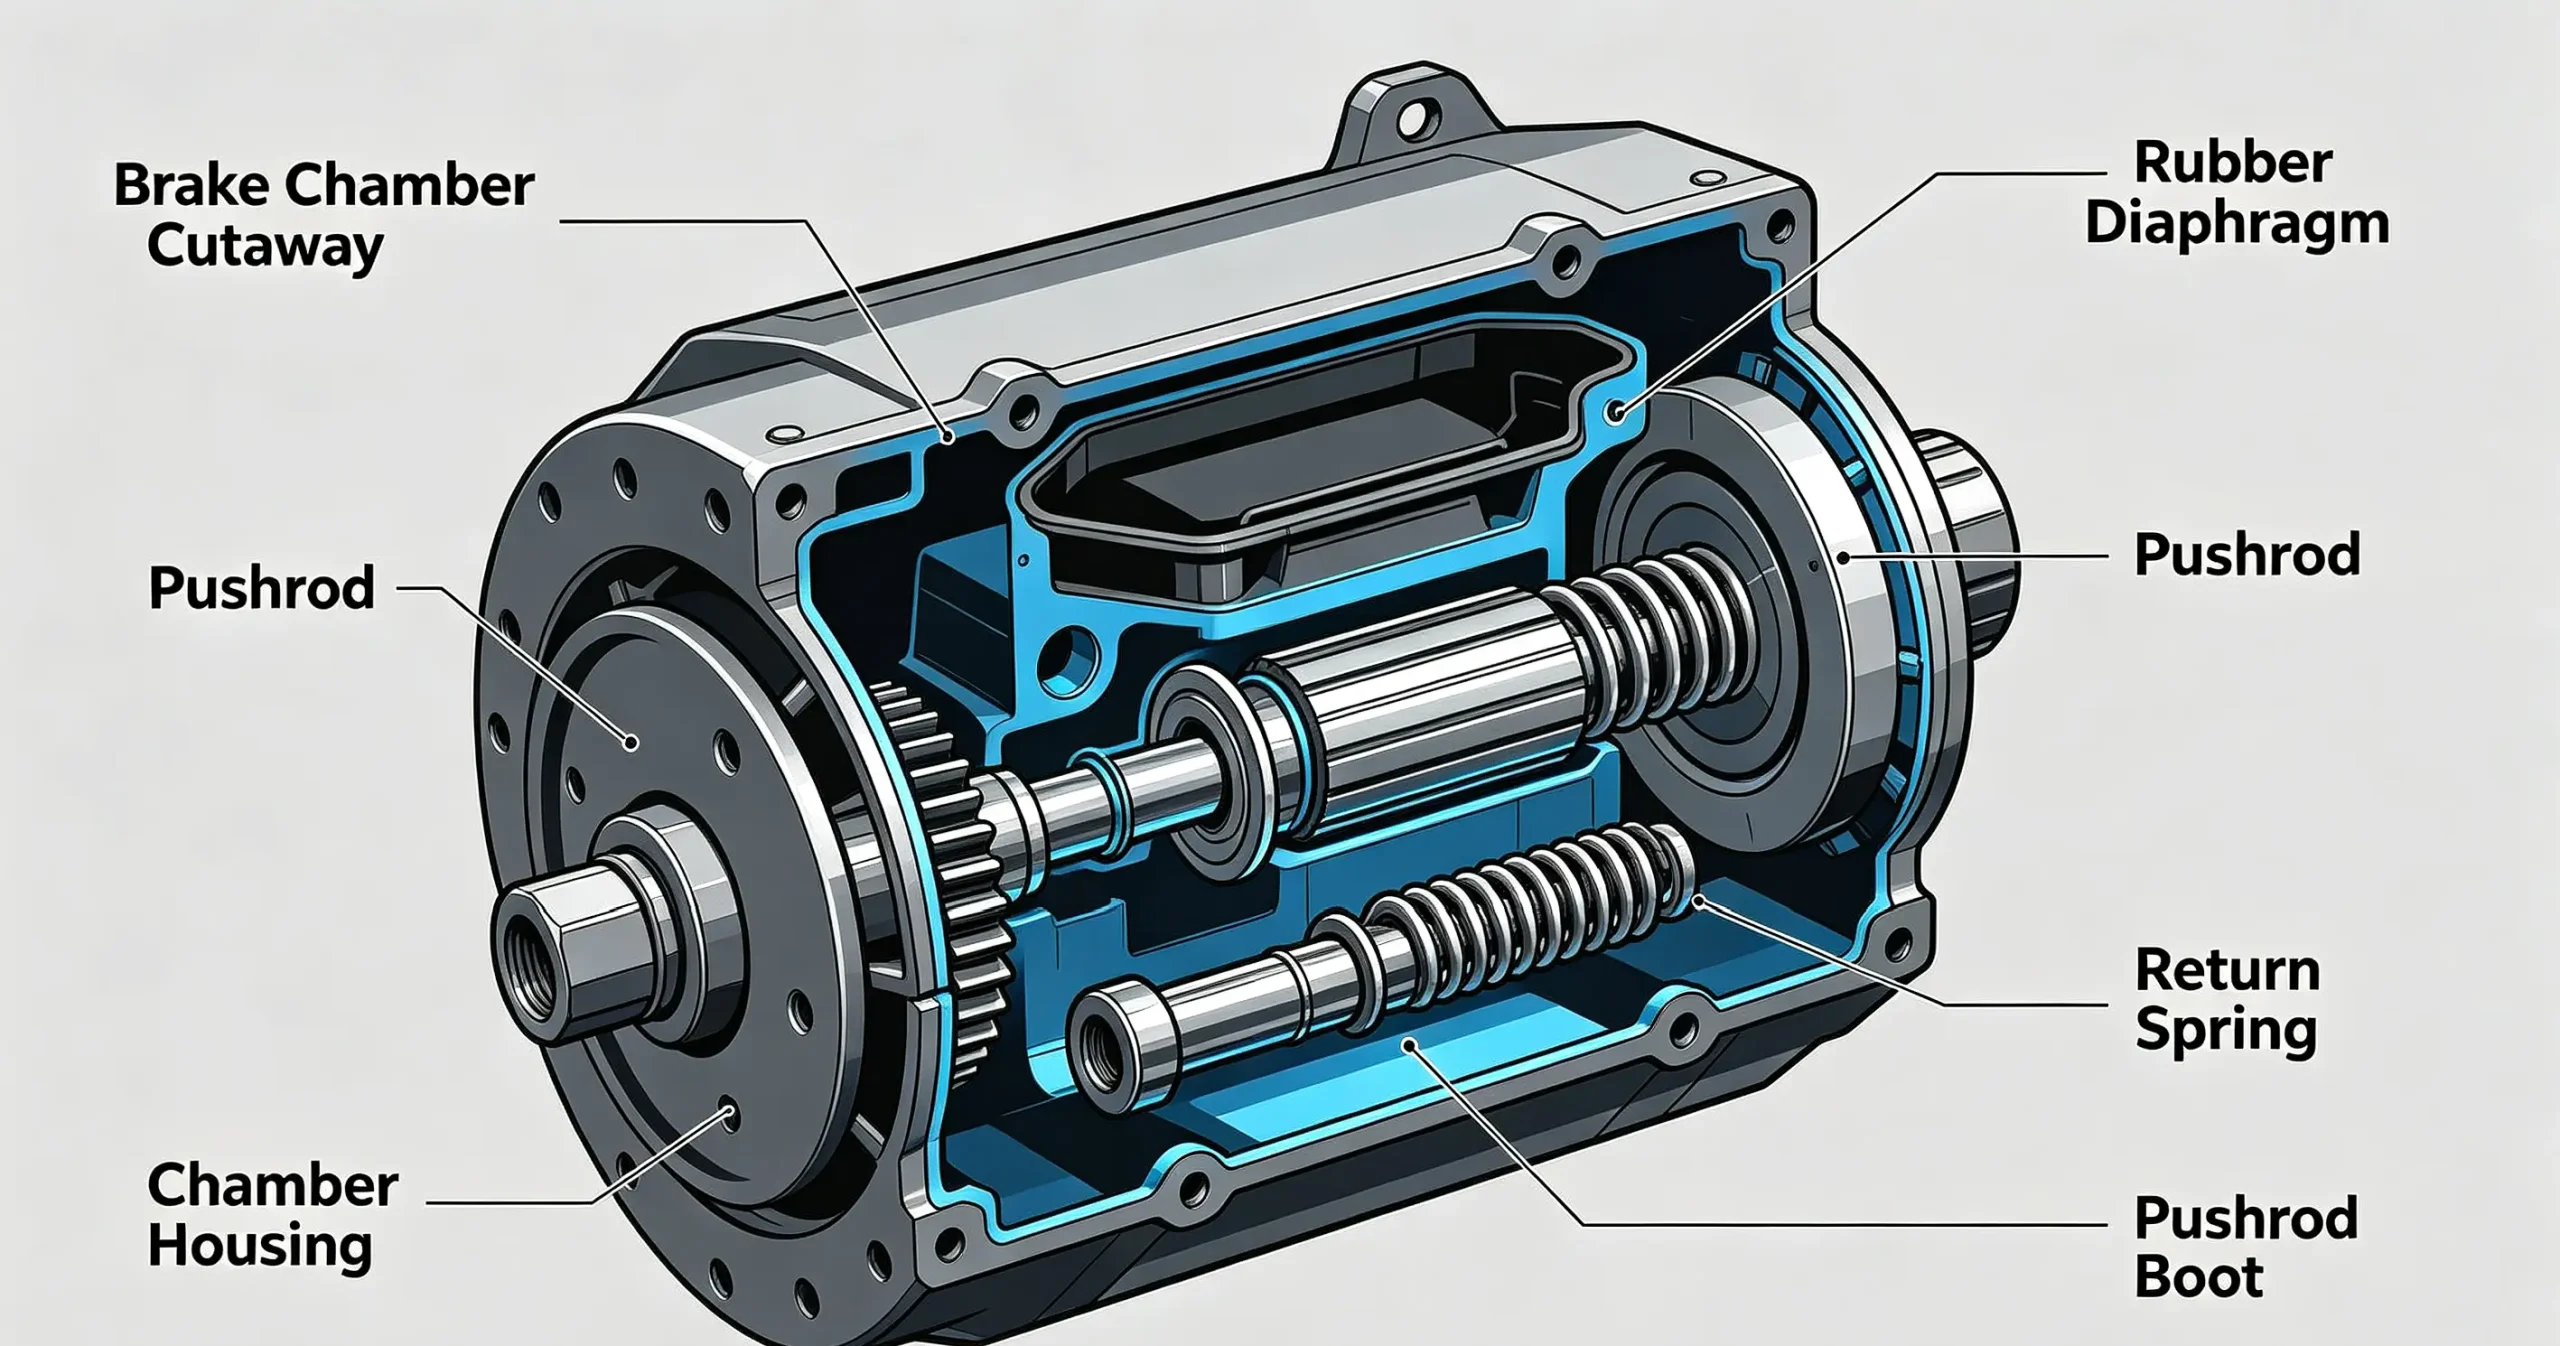
The brake chamber operates on a simple, reliable cycle. When you press the brake pedal, the truck’s air compressor and storage tanks send regulated compressed air through dedicated lines into the brake chamber. This incoming air builds pressure against the flexible internal rubber diaphragm, pushing it toward the chamber’s outlet.
As the diaphragm moves forward, it pushes the rigid metal pushrod outward from the chamber housing. The extended pushrod engages the slack adjuster, which turns the S-cam gear mechanism. The rotating S-cam pushes brake shoes outward, pressing brake linings against the inner brake drum. The friction created here generates stopping force to slow the vehicle.
When you release the brake pedal, the air supply to the chamber shuts off automatically, and a quick-release valve vents leftover air pressure. At the same time, a heavy-duty internal return spring pulls the diaphragm and pushrod back to their original resting position. This relieves tension on the slack adjuster and S-cam, letting brake shoes pull away from the drum so the wheels can rotate freely again.
Modern heavy-duty trucks use two distinct types of brake chambers, each with unique functions. Mixing up these two types during repairs is a common beginner mistake that leads to persistent brake issues.
The first type is a standard service brake chamber. These single-purpose units only handle routine braking while the truck is in motion. They activate solely when the brake pedal is pressed and have no connection to parking or emergency brake systems.
The second type is a spring brake chamber, often called a piggyback chamber due to its stacked dual-layer design. It combines two systems in one compact housing: a standard service brake section for regular stopping, and a high-tension spring section that controls parking and emergency brake functions.
The fail-safe design of spring brake chambers is vital to truck safety. If system air pressure drops below the 60 PSI safety threshold, the large internal spring releases stored energy automatically. This mechanical force pushes the pushrod forward and locks the brakes without air pressure. This is why heavy-duty trucks engage parking brakes and stop operating when the air brake system fails.
All brake chambers rely on four core components for consistent performance: airtight sealing surfaces, intact flexible rubber diaphragms, functional tension return springs, and unobstructed pushrod movement. Even minor wear or damage to these parts leads to gradual performance loss and eventual component failure.
Internal Link 1: To learn how this component fits into the full vehicle system, check out our complete guide on how truck air brake systems work from compressor to wheel.
Most Common Bad Brake Chamber Symptoms (Early to Severe)
Brake chambers never fail suddenly. Degradation happens slowly over weeks, months, or years, producing subtle warning signs long before total failure. Drivers and fleet technicians who catch these early symptoms can fix minor issues proactively, avoiding dangerous in-service failures and costly emergency repairs.
Below are the most common brake chamber failure symptoms, organized from mild early warning signs to severe late-stage issues. This structured breakdown makes it easy to assess brake chamber condition during routine inspections.
1. Truck Pulls Left or Right When Braking
Vehicle pulling during braking is the earliest and most common sign of a compromised brake chamber. Despite how frequently it occurs, many new drivers and entry-level maintenance staff overlook or misdiagnose this symptom.
Pulling happens when braking force is uneven across the vehicle’s axles. A faulty brake chamber may have small air leaks, worn diaphragms, delayed response times, or weak springs, resulting in far less braking power on one wheel. The opposing wheel with a fully functional brake chamber creates stronger stopping force, pulling the truck toward that side.
The pull intensity matches brake pressure: gentle braking causes slight drifting, while hard emergency braking creates sharp, aggressive pulling that can compromise vehicle stability—especially on wet or slippery roads.
Many people mistakenly blame brake pull on tire pressure issues, wheel alignment, or suspension wear. While these problems cause minor cruising drift, they almost never trigger pulling specifically during braking. Over 80% of fleet brake pull cases stem directly from inconsistent brake chamber performance across axle wheels.
If your truck pulls consistently while braking (empty or fully loaded), always inspect brake chambers and slack adjuster calibration first before adjusting tires, alignment, or suspension parts.
2. Continuous Hissing Air Leaks Near Wheel Hubs
Audible air hissing around wheel hubs and axles is the most straightforward, easy-to-verify sign of a faulty brake chamber. Once you learn to recognize this sound during pre-trip inspections, you can spot brake chamber damage instantly.
Air leaks stem from four key brake chamber failure points: cracked or worn internal diaphragms, degraded sealing edges that lose airtightness, corroded or punctured metal shells, and torn rubber pushrod boots. Severe damage causes constant air leakage, whether the brakes are engaged or released.
You can verify this issue in two minutes during standard pre-trip checks. First, let the truck’s air system build to full operating pressure (100–120 PSI). Then walk around each wheel hub and listen closely for steady hissing sounds.
Different leak patterns indicate different failures. Constant hissing with the brake pedal released means severe internal leakage or shell damage. Hissing that only occurs when pressing the brake pedal points to a worn diaphragm that cannot hold air pressure during activation.
Unfixed air leaks create a chain of secondary problems. Continuous air loss forces the air compressor to run nonstop to replenish pressure, increasing fuel consumption, speeding up compressor wear, shortening part lifespan, and causing unstable air pressure during highway driving.
Internal Link 2: For step-by-step leak detection methods, read our guide to truck air leak diagnosis and common leak points.
3. Slow Brake Response & Longer Stopping Distance
Functional brake chambers deliver near-instant braking response. Seasoned drivers know this consistent feel well, making it easy to notice when performance drops.
Failing brake chambers create a clear delay between pressing the brake pedal and vehicle deceleration. Damaged internal components slow pneumatic compression and pushrod movement, creating a split-second lag that significantly increases overall stopping distance.
Three main internal issues cause slow brake response: stiff, aged rubber diaphragms with reduced flexibility, sticky or weakened return springs that hinder fast movement, and built-up moisture, dust, and corrosion debris inside the chamber.
This small delay poses major highway safety risks. During emergency stops, every extra foot of stopping distance raises collision odds. For loaded semi-trucks traveling at highway speeds, slow brake response can mean the difference between a safe stop and a serious accident.
4. Brakes Drag and Fail to Release Fully
Brake drag is a subtle, progressive brake chamber issue that often goes unnoticed during regular driving. Many drivers ignore early drag symptoms because the truck still accelerates and operates normally at first glance.
Brake drag occurs when internal brake chamber parts cannot fully retract after brake release. Weakened return springs, deformed diaphragms, corroded pushrods, or internal debris trap the pushrod in a partially extended position. This leaves brake shoes lightly pressed against the brake drum at all times.
Constant contact between brake linings and drums creates ongoing friction while the truck moves. Over time, this causes reduced acceleration power, unexplained fuel waste, and unusual heat buildup on individual wheel hubs.
Unaddressed brake drag leads to severe secondary damage. Continuous friction overheats brake drums, glazes brake linings (reducing future braking power), warps metal drum surfaces, and can cause total brake assembly failure during long hauls.
Internal Link 3: Explore full drag-related issues and fast solutions in our guide on truck brake drag causes and how to resolve them fast.
5. Rapid Air Pressure Drop & Frequent Low Air Warnings
The dashboard air pressure gauge offers real-time insight into air brake system and brake chamber health. In a fully functional system, air pressure stays stable once the compressor reaches its cut-off pressure and shuts down.
Faulty brake chambers with internal leaks steadily bleed stored air pressure from the system. Even when the truck is stationary and the brake pedal is untouched, you will see a consistent drop in dashboard air pressure.
As chamber damage worsens, air loss speeds up, triggering low air pressure warning lights and audible alarms. Heavy-duty trucks have a critical 60 PSI safety threshold; once pressure falls below this level, spring brake chambers automatically lock the parking brakes, forcing an emergency roadside stop.
Unplanned emergency stops on busy highways create sudden road hazards for other drivers, disrupt delivery schedules, and often require costly towing services.
6. Overheated Brake Drums & Smoking Wheels
Overheated brake drums and smoking wheel hubs are late-stage symptoms of long-term, unaddressed brake drag from faulty brake chambers. These issues never appear without prior drag problems, making them a clear sign of neglected brake maintenance.
After highway driving or repeated stop-and-go travel, you can easily check wheel hub temperatures. Under normal conditions, all hubs stay consistently warm. If one drum is noticeably hotter than others on the same axle, its corresponding brake chamber is failing to release fully.
In extreme failure cases, continuous friction generates intense heat, turning brake drums red hot and producing white smoke from wheel wells. This is a critical red flag indicating imminent total brake system failure.
Severe brake heat causes permanent component damage. High temperatures warp precision-cut brake drums, crack rubber internal seals, speed up diaphragm brittleness, and weaken internal spring tension. A single major overheating event can reduce brake chamber lifespan by several years.
7. Parking Brake Failure
As noted earlier, spring brake chambers control both service braking and parking/emergency brake functions. This means internal chamber damage directly impairs parking brake performance, creating major safety and compliance risks.
Faulty brake chambers cause two common parking brake issues. First, the parking brake fails to engage when system air pressure drains, leaving the truck unable to lock its wheels for stationary parking. Second, the parking brake fails to release after air pressure rebuilds, locking the brakes and preventing vehicle movement.
Both issues stem from the same internal damage: corroded or weakened internal springs, damaged spring housing, or moisture and debris contamination inside the chamber.
Parking brake failure is both a mechanical issue and a compliance violation. Trucks with non-functional parking brakes automatically fail official DOT inspections. Additionally, operating a truck that cannot secure its parking brakes creates major fleet safety hazards, especially on sloped roads or job sites.
8. Visible Rust Holes, Dents, and Cracked Boots
External physical damage to brake chambers is the easiest symptom to spot during daily pre-trip inspections—yet many rushed drivers overlook it. The rubber pushrod boot acts as the primary protective barrier for all internal brake chamber parts.
Intact pushrod boots block water, road dust, dirt, snow, ice, and corrosive road salt from entering the chamber. Once the boot cracks, tears, or wears out, these contaminants penetrate the interior, causing irreversible damage. Internal diaphragms rot, metal springs and housing corrode rapidly, and precision seals break down completely.
Beyond boot damage, external chamber corrosion creates tiny pinhole air leaks over time. Flying road debris, gravel strikes, and minor curb impacts also dent the metal chamber shell, misaligning internal parts and breaking the chamber’s airtight seal.
Internal Link 4: Catch these issues early with our official checklist: truck pre-trip inspection checklist for brake system safety.
Root Causes of Premature Brake Chamber Failure
To stop recurring brake chamber failures and extend part lifespan, it’s crucial to understand what causes premature degradation. Most early brake chamber damage is not from normal wear and tear. Instead, it stems from avoidable maintenance gaps, harsh operating conditions, improper repair practices, and air system flaws.
Below are the most common root causes of premature brake chamber failure, with actionable context to help fleets build targeted preventive maintenance routines.
1. Moisture Buildup in the Air Brake System
Moisture contamination is the leading cause of premature air brake component failure, including brake chambers. Compressed air naturally contains water vapor, which condenses into liquid water as it cools inside air tanks and lines.
The truck’s air dryer is designed to remove this water vapor before it reaches critical brake parts. However, worn, neglected, or faulty air dryers fail to eliminate moisture effectively, letting liquid water flow through lines and accumulate inside brake chambers.
Trapped moisture causes widespread internal damage. It corrodes metal springs and chamber housing, weakening structural integrity and spring tension. It also accelerates rubber diaphragm aging, leading to stiffness, cracking, and brittleness. In winter, trapped water freezes solid, locking pushrod movement and disabling brake function until thawing.
2. Road Salt, Mud, and Corrosion
Trucks operating in snowy northern regions, coastal salt-air areas, or muddy off-road job sites face accelerated brake chamber corrosion. Road salt melts ice effectively but acts as a harsh corrosive agent that erodes unprotected metal components.
Salt and mud buildup sticks to brake chamber exteriors, trapping moisture against the metal shell year-round. This constant damp contact creates rust spots that expand into pinhole leaks over time. External corrosion can destroy a brake chamber in just 1–2 years—far faster than its standard service life.
Many fleet operators assume brake chamber corrosion is unavoidable, but regular undercarriage washing and targeted component inspections can eliminate most corrosion-related failures.
3. Long-Term Overloading and Excessive Brake Load
Sustained excessive brake load operation is an overlooked cause of premature brake chamber fatigue. Heavy-duty trucks are engineered for specific gross vehicle weight ratings (GVWR), and prolonged high-load braking conditions put extreme stress on every brake system component.
Hard braking under extreme load conditions overstretches brake chamber diaphragms and over-compresses internal springs. Repeated overload braking creates cumulative material fatigue, forming tiny micro-cracks in rubber diaphragms and weakening spring tension over time.
These small defects gradually worsen, causing air leaks, slow response times, and total chamber failure. Fleets that regularly operate with excessive brake load see brake chambers wear out 2–3 times faster than fleets following standard vehicle operating specifications.
4. Improper Slack Adjuster Settings
Incorrect slack adjuster calibration is a hidden, common cause of brake chamber damage. Many entry-level technicians over-adjust slack adjusters during routine service to eliminate minor brake play, unaware of the long-term harm this causes.
Over-adjusted slack adjusters hold the brake chamber pushrod partially extended at all times. This creates constant tension on the diaphragm even when brakes are fully released, stretching the rubber beyond its resting state and causing premature fatigue, permanent deformation, and tearing.
Conversely, under-adjusted slack adjusters create excessive pushrod travel, reducing braking effectiveness and forcing the chamber to work harder to generate stopping power. Both over-adjustment and under-adjustment speed up component wear significantly.
Internal Link 5: Get accurate calibration specs in our guide to slack adjuster adjustment and pushrod travel standards.
5. Low-Quality Aftermarket Brake Chambers
Opting for cheap, low-quality aftermarket brake chambers is a common fleet mistake that leads to repeated brake failures. While generic off-brand parts lower upfront costs, they result in far higher long-term maintenance and downtime expenses.
Budget aftermarket chambers use inferior rubber for diaphragms, which cannot withstand constant pressure cycling and temperature changes. Their thin metal shells dent and corrode easily, and low-tensile steel internal springs weaken rapidly with use.
These substandard parts often fail within 3–6 months of installation, requiring frequent replacements, causing ongoing brake performance issues, and increasing roadside breakdown risk. Premium OEM or high-tier aftermarket chambers deliver consistent performance and a much longer service life.
6. Lack of Regular Inspection and Maintenance
Most premature brake chamber failures are fully preventable with basic routine maintenance. Unfortunately, many drivers and fleet maintenance programs prioritize engine, tire, and oil service while neglecting brake system accessory components.
Minor issues like tiny cracked pushrod boots, faint air leaks, and surface rust escalate into catastrophic failures when left unaddressed. Monthly visual inspections and quarterly brake system servicing eliminate these small defects before they cause costly breakdowns.
Step-by-Step Brake Chamber Diagnosis (Professional Standard)
If you notice abnormal brake symptoms during driving or inspections, follow this standardized professional diagnosis process. It lets you locate faulty brake chambers accurately without unnecessary part replacements or guesswork, aligning with professional fleet shop standards.
First, park the truck on level, solid ground. Chock all tires securely to prevent rolling during service. Start the engine, let the air system build to full 100–120 PSI operating pressure, then shut off the engine to stabilize pressure for testing.
Second, complete a full visual inspection of all brake chambers on every axle. Check metal shells for rust holes, dents, corrosion, and physical damage. Examine all pushrod boots for cracks, tears, brittleness, or missing sections. Replace any damaged boot immediately, even if no leaks are visible.
Third, perform a soapy water leak test—the most reliable method for finding small hidden air leaks. Mix a simple soap and water solution, then spray it on all air line fittings, chamber connection points, and shell surfaces. Bubbling foam confirms active air leakage.
Fourth, conduct an auditory leak test. Ask a helper to press and hold the service brake while you listen closely to each wheel hub for hissing. Repeat with the brake fully released to identify static leaks.
Fifth, measure pushrod travel with a standard brake chamber stroke gauge. Compare your measurements to OEM specifications. Excessive stroke length confirms worn internal diaphragms and degraded chamber performance.
Sixth, test parking brake functionality. Drain system air pressure to trigger automatic parking brake engagement, verifying all wheels lock securely. Rebuild air pressure and confirm all brakes release completely with no sticking or delay.
Seventh, complete a low-speed road test. Drive the truck a short distance to check for brake pull, drag, abnormal hub heat, and delayed response. Document all irregularities for targeted repairs.
Critical safety note: Always fully depressurize the entire air brake system before loosening or disconnecting brake chamber components. Sudden release of trapped compressed air can cause serious personal injury or component damage.
Internal Link 6: Learn full shop safety protocols in our guide to truck brake repair safety rules for technicians.
Brake Chamber Repair vs. Full Replacement: Which Is Better?
After confirming a faulty brake chamber, you have two professional repair options: rebuild the existing chamber with a service kit, or replace the entire assembly with a new unit. Each method has unique benefits, limitations, and ideal use cases for fleet owners and independent operators.
Brake Chamber Rebuild Kits
Brake chamber rebuild kits include all wearable internal parts: new diaphragms, return springs, rubber seals, and pushrod boots. Rebuilding retains the original metal chamber housing, cutting parts costs compared to full replacement.
This repair method works best for chambers with intact, corrosion-free, dent-free metal shells. If the external housing is structurally sound, a full rebuild can restore like-new performance at a lower cost.
However, rebuilding requires professional skill and precise installation. Improper diaphragm placement, misaligned springs, or loose seals will cause repeated air leaks and ongoing brake issues. For this reason, most large fleets only use rebuild kits for lightly used trucks with minimal corrosion exposure.
Complete Brake Chamber Replacement
For heavy-duty highway trucks, commercial fleets, and vehicles operating in harsh corrosive environments, full brake chamber replacement is the more reliable long-term solution. Pre-assembled new chambers eliminate rebuild installation errors and guarantee consistent factory-grade performance.
Industry best practice requires replacing both brake chambers on the same axle at the same time. Matching new chambers ensure balanced braking force, identical response speeds, and even wear across the axle. Mismatched old and new chambers always cause brake imbalance and premature tire wear.
Internal Link 7: Compare part quality and service life in our OEM vs aftermarket truck brake parts guide.
Professional Brake Chamber Replacement Guide
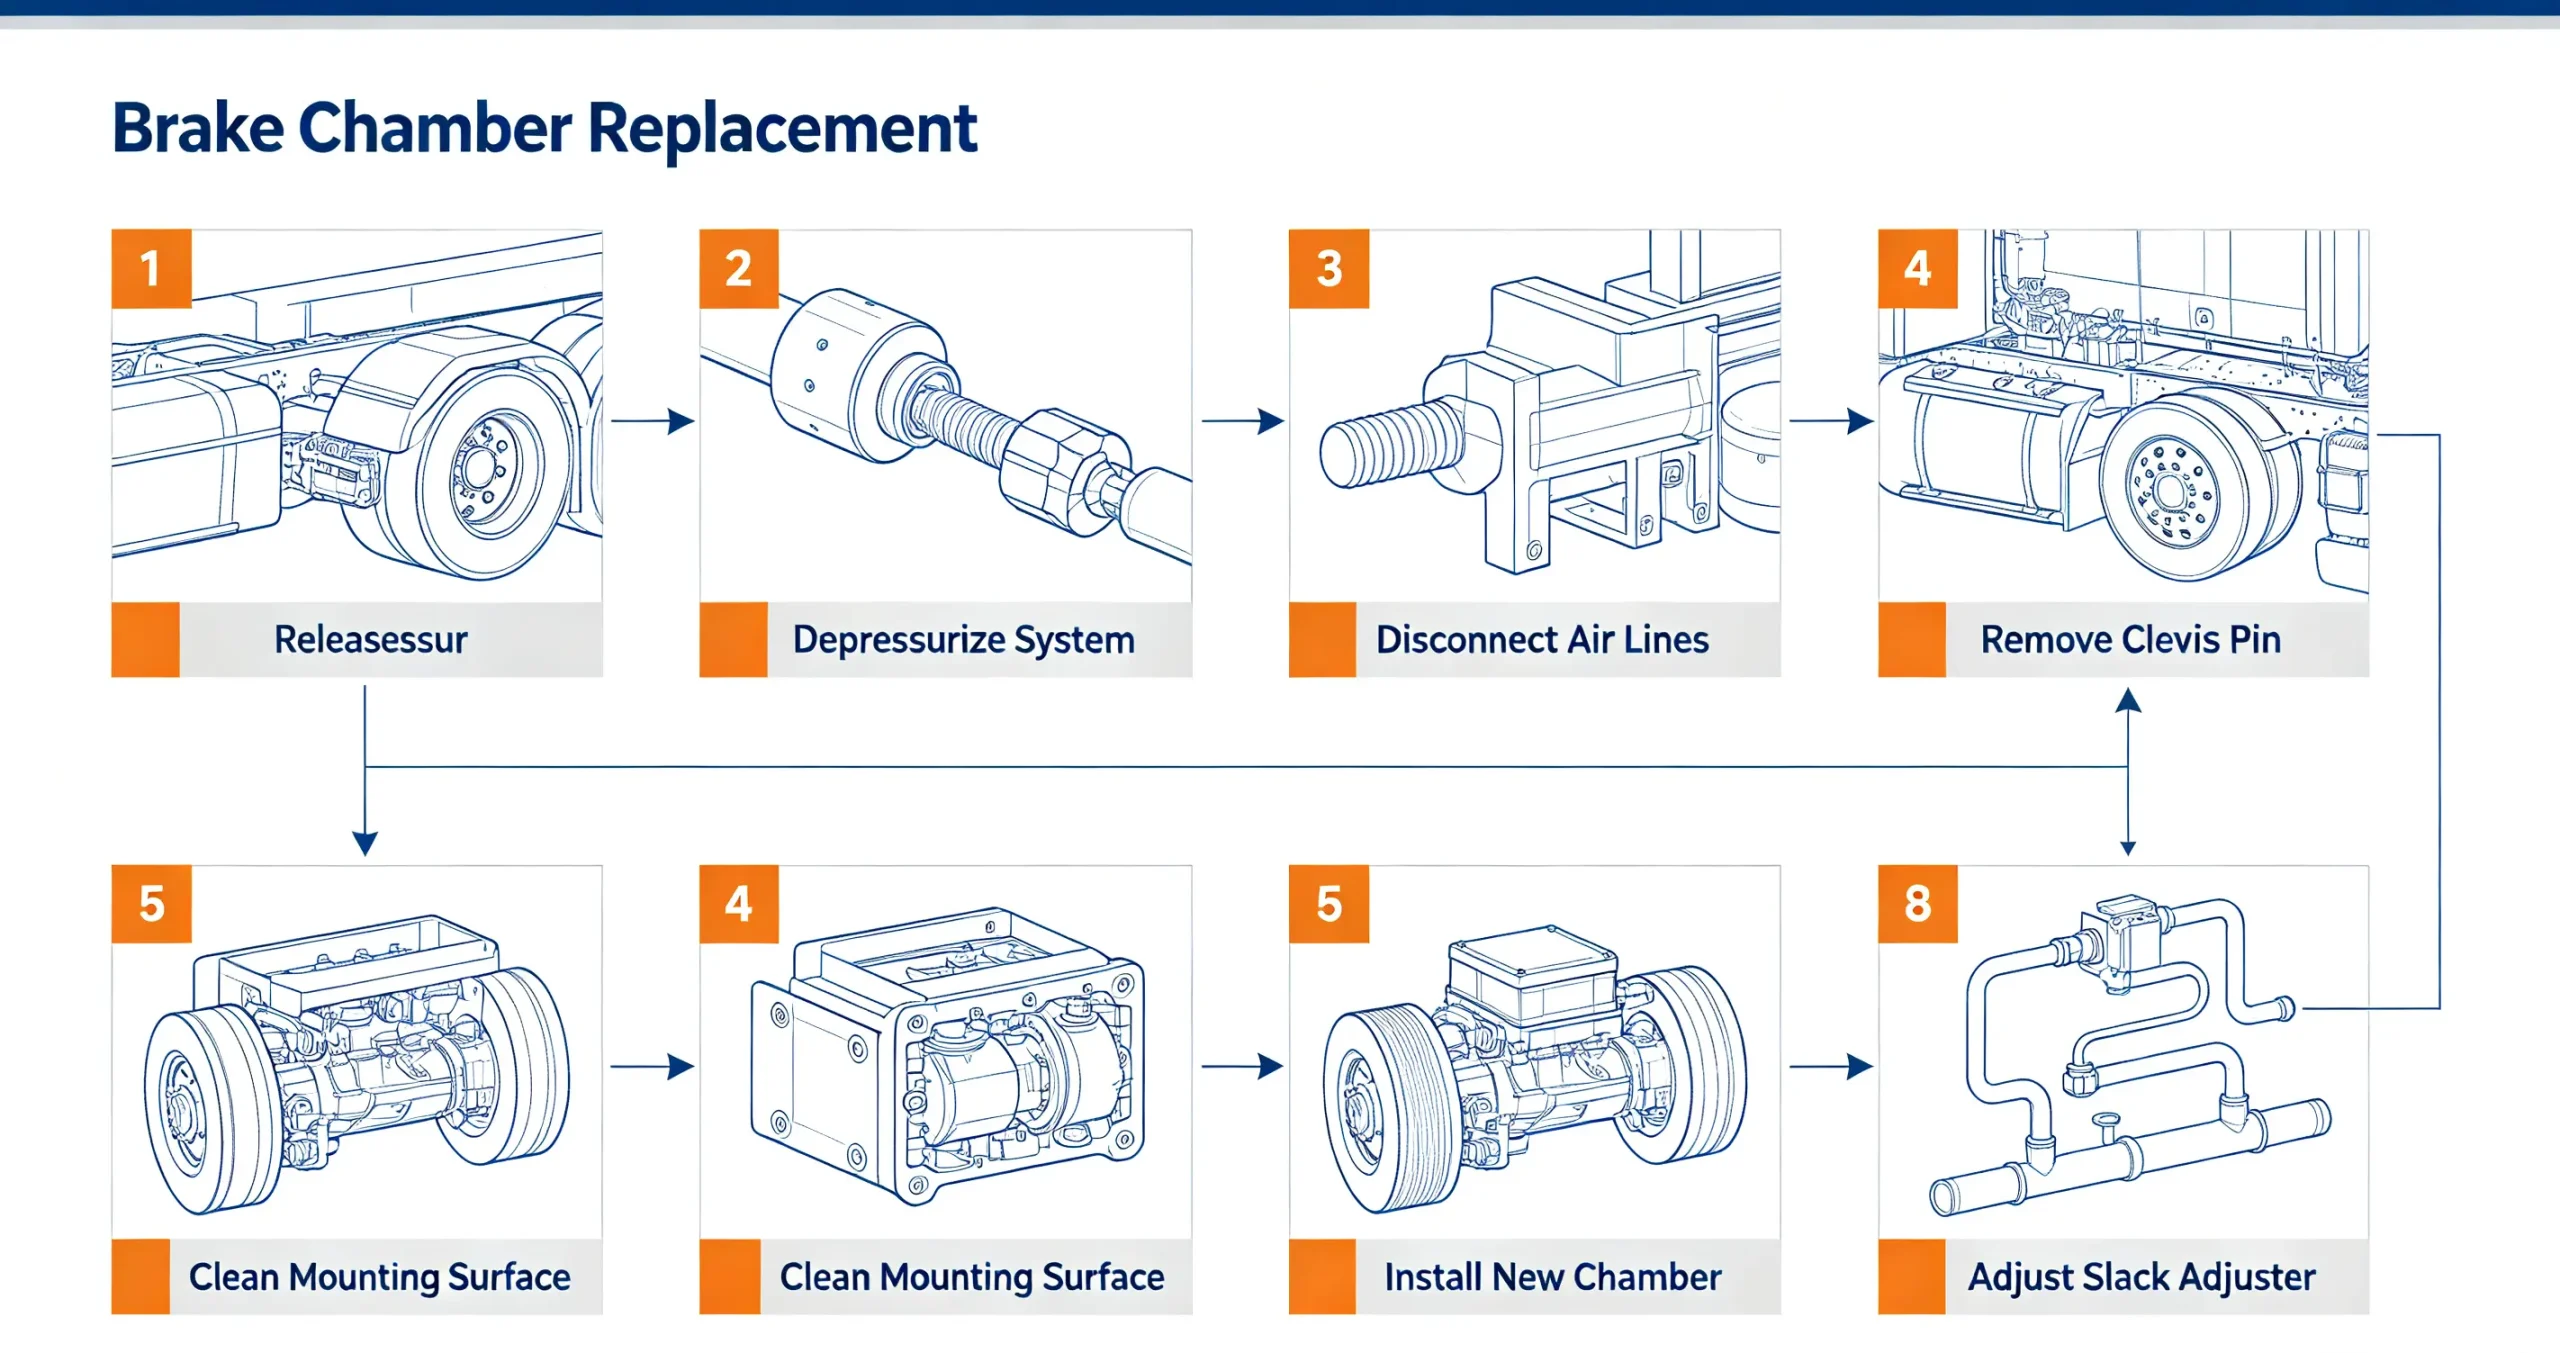
Follow this industry-standard step-by-step process for safe, durable, DOT-compliant brake chamber installation, aligned with OEM service manual guidelines.
Step 1: Fully depressurize the truck’s air brake system. Chock all wheels firmly to prevent rolling, and engage the parking brake for maximum safety.
Step 2: Locate and disconnect all air supply lines connected to the faulty chamber. Label each line with tape to avoid cross-connection errors during reinstallation.
Step 3: Remove the clevis pin that secures the brake chamber pushrod to the slack adjuster. Take out all retaining clips and hardware to fully separate the components.
Step 4: Unbolt the mounting bolts holding the brake chamber to the axle bracket, then carefully remove the old chamber assembly.
Step 5: Clean the axle mounting surface thoroughly with a wire brush to remove rust, dirt, debris, and old gasket residue. A clean surface ensures a tight, secure new installation.
Step 6: Position the new brake chamber in place and hand-tighten all mounting bolts. Torque bolts to exact OEM specifications to avoid shell damage from over-tightening or leaks from under-tightening.
Step 7: Reconnect the pushrod to the slack adjuster using brand-new clevis pins and retaining clips. Never reuse old hardware for safety-critical brake components.
Step 8: Reattach all air lines per your earlier labels, ensuring tight, cross-thread-free connections.
Step 9: Start the engine and let the air system rebuild full pressure. Perform a soapy water leak test on all new connections and the chamber shell to confirm zero leakage.
Step 10: Calibrate the slack adjuster to factory-specified pushrod travel to eliminate brake drag and ensure full brake release.
Step 11: Complete low-speed and highway road tests to verify balanced braking, no pulling or drag, and responsive brake performance.
Long-Term Maintenance Tips to Extend Brake Chamber Life
Proactive, consistent maintenance can double or triple brake chamber service life. These simple, cost-effective habits eliminate premature failure and reduce long-term fleet brake repair costs.
Service the air dryer at manufacturer-recommended intervals to remove moisture and contaminants from the air system. A fully functional air dryer is the best defense against internal brake chamber corrosion.
Wash the truck undercarriage regularly during winter and rainy seasons to remove road salt, mud, and corrosive debris. Routine cleaning prevents external rust and pinhole leak formation.
Inspect all pushrod boots during monthly maintenance checks. Replace any cracked, torn, or brittle boots immediately to block contaminant entry into the chamber.
Check slack adjuster calibration during every pre-trip inspection and quarterly service. Maintain factory pushrod travel specs to avoid unnecessary diaphragm tension and wear.
Avoid consistent vehicle overloading and aggressive hard braking. Repeated heavy braking under load exponentially accelerates component fatigue.
Replace aging, cracked air hoses during routine service to prevent system contamination and unstable air pressure.
Internal Link 8: Build a complete fleet service routine with our heavy-duty truck maintenance guide for fleets.
Frequently Asked Questions
Q1: Can I drive with a bad brake chamber?
No. Driving with a faulty brake chamber is extremely dangerous and violates commercial vehicle safety regulations. Bad brake chambers increase stopping distances, create severe brake imbalance, and can trigger sudden brake lockups at highway speeds. Operating a truck with defective brakes risks serious accidents, DOT fines, and immediate out-of-service orders.
Q2: How long do truck brake chambers last?
Brake chamber lifespan depends on operating conditions and maintenance quality. With regular service and mild highway use, premium chambers last 4–6 years. Trucks operating in salty coastal areas, snowy northern climates, or muddy off-road sites face fast corrosion and typically need chamber replacement every 2–3 years.
Q3: Can I mix different brake chamber brands on one axle?
It is strongly not recommended. Different manufacturers design chambers with slight variations in pushrod force, response speed, and internal spring tension. Mixed brands on one axle cause persistent brake imbalance, braking pull, and uneven tire wear.
Q4: Why does brake drag happen right after replacement?
Post-replacement brake drag almost always stems from three common installation errors: incorrect slack adjuster calibration, misaligned pushrod positioning, or uneven mounting bracket gaps. A quick recalibration and alignment check resolves nearly all post-install drag issues.
Q5: Is a service brake chamber interchangeable with a spring brake chamber?
No. The two chamber types have unique dimensions, internal structures, and functional designs. Swapping them disables parking brake functionality, eliminates critical fail-safe safety features, and creates life-threatening brake system hazards. Always match OEM chamber specifications during replacement.
Q6: Can a small air leak in a brake chamber be repaired temporarily?
Minor seal leaks can be fixed temporarily with rebuild kits for roadside emergency use. However, shell damage or diaphragm tears require full replacement. Temporary fixes are only for immediate roadside repair and are not a viable long-term solution.
Conclusion
Brake chambers are small but essential components that form the backbone of heavy-duty truck air brake systems. Despite their compact size, they play an irreplaceable role in vehicle safety, braking performance, and regulatory compliance. Even minor overlooked defects can weaken brake balance, reduce stopping stability, and create life-threatening road hazards.
By learning to spot early warning symptoms, understanding key failure causes, and following professional diagnosis and repair protocols, fleet managers and owner-operators can shift from reactive breakdown repairs to proactive preventive maintenance. This approach eliminates hidden brake risks, cuts costly downtime, and drastically extends component lifespan.
Consistent pre-trip inspections, timely part replacements, precise adjustment practices, and regular air system maintenance are the most effective ways to preserve full brake system reliability for every heavy-duty truck and semi-trailer in your fleet.


