Every heavy-duty truck relies on a stable drivetrain system to deliver consistent performance. Most fleet owners and repair shops focus heavily on engines, gearboxes, and suspension parts. In contrast, the transmission mount is often an overlooked component.
Even though it looks simple, a high-quality heavy duty truck transmission mount plays an irreplaceable role. It fixes the gearbox in place, absorbs massive drivetrain vibration, and reduces road shock during long-distance transportation.
A worn or broken transmission mount will not cause immediate stalling. However, it triggers a series of hidden faults over time. These faults include gearbox displacement, abnormal noise, accelerated shaft wear, and even drivetrain misalignment.
For fleet managers, independent repair technicians, and bulk parts buyers, understanding transmission mount specifications is essential. It helps you select compatible, durable, and cost-effective replacement parts.
This complete buyer guide covers everything you need to know. We include core functions, material types, key features, failure signs, diagnosis methods, installation standards, and daily maintenance tips. All paragraphs are optimized for Google readability with natural transition words. For more professional truck component tutorials, visit our technical support resource center.
What Is a Heavy Duty Truck Transmission Mount?
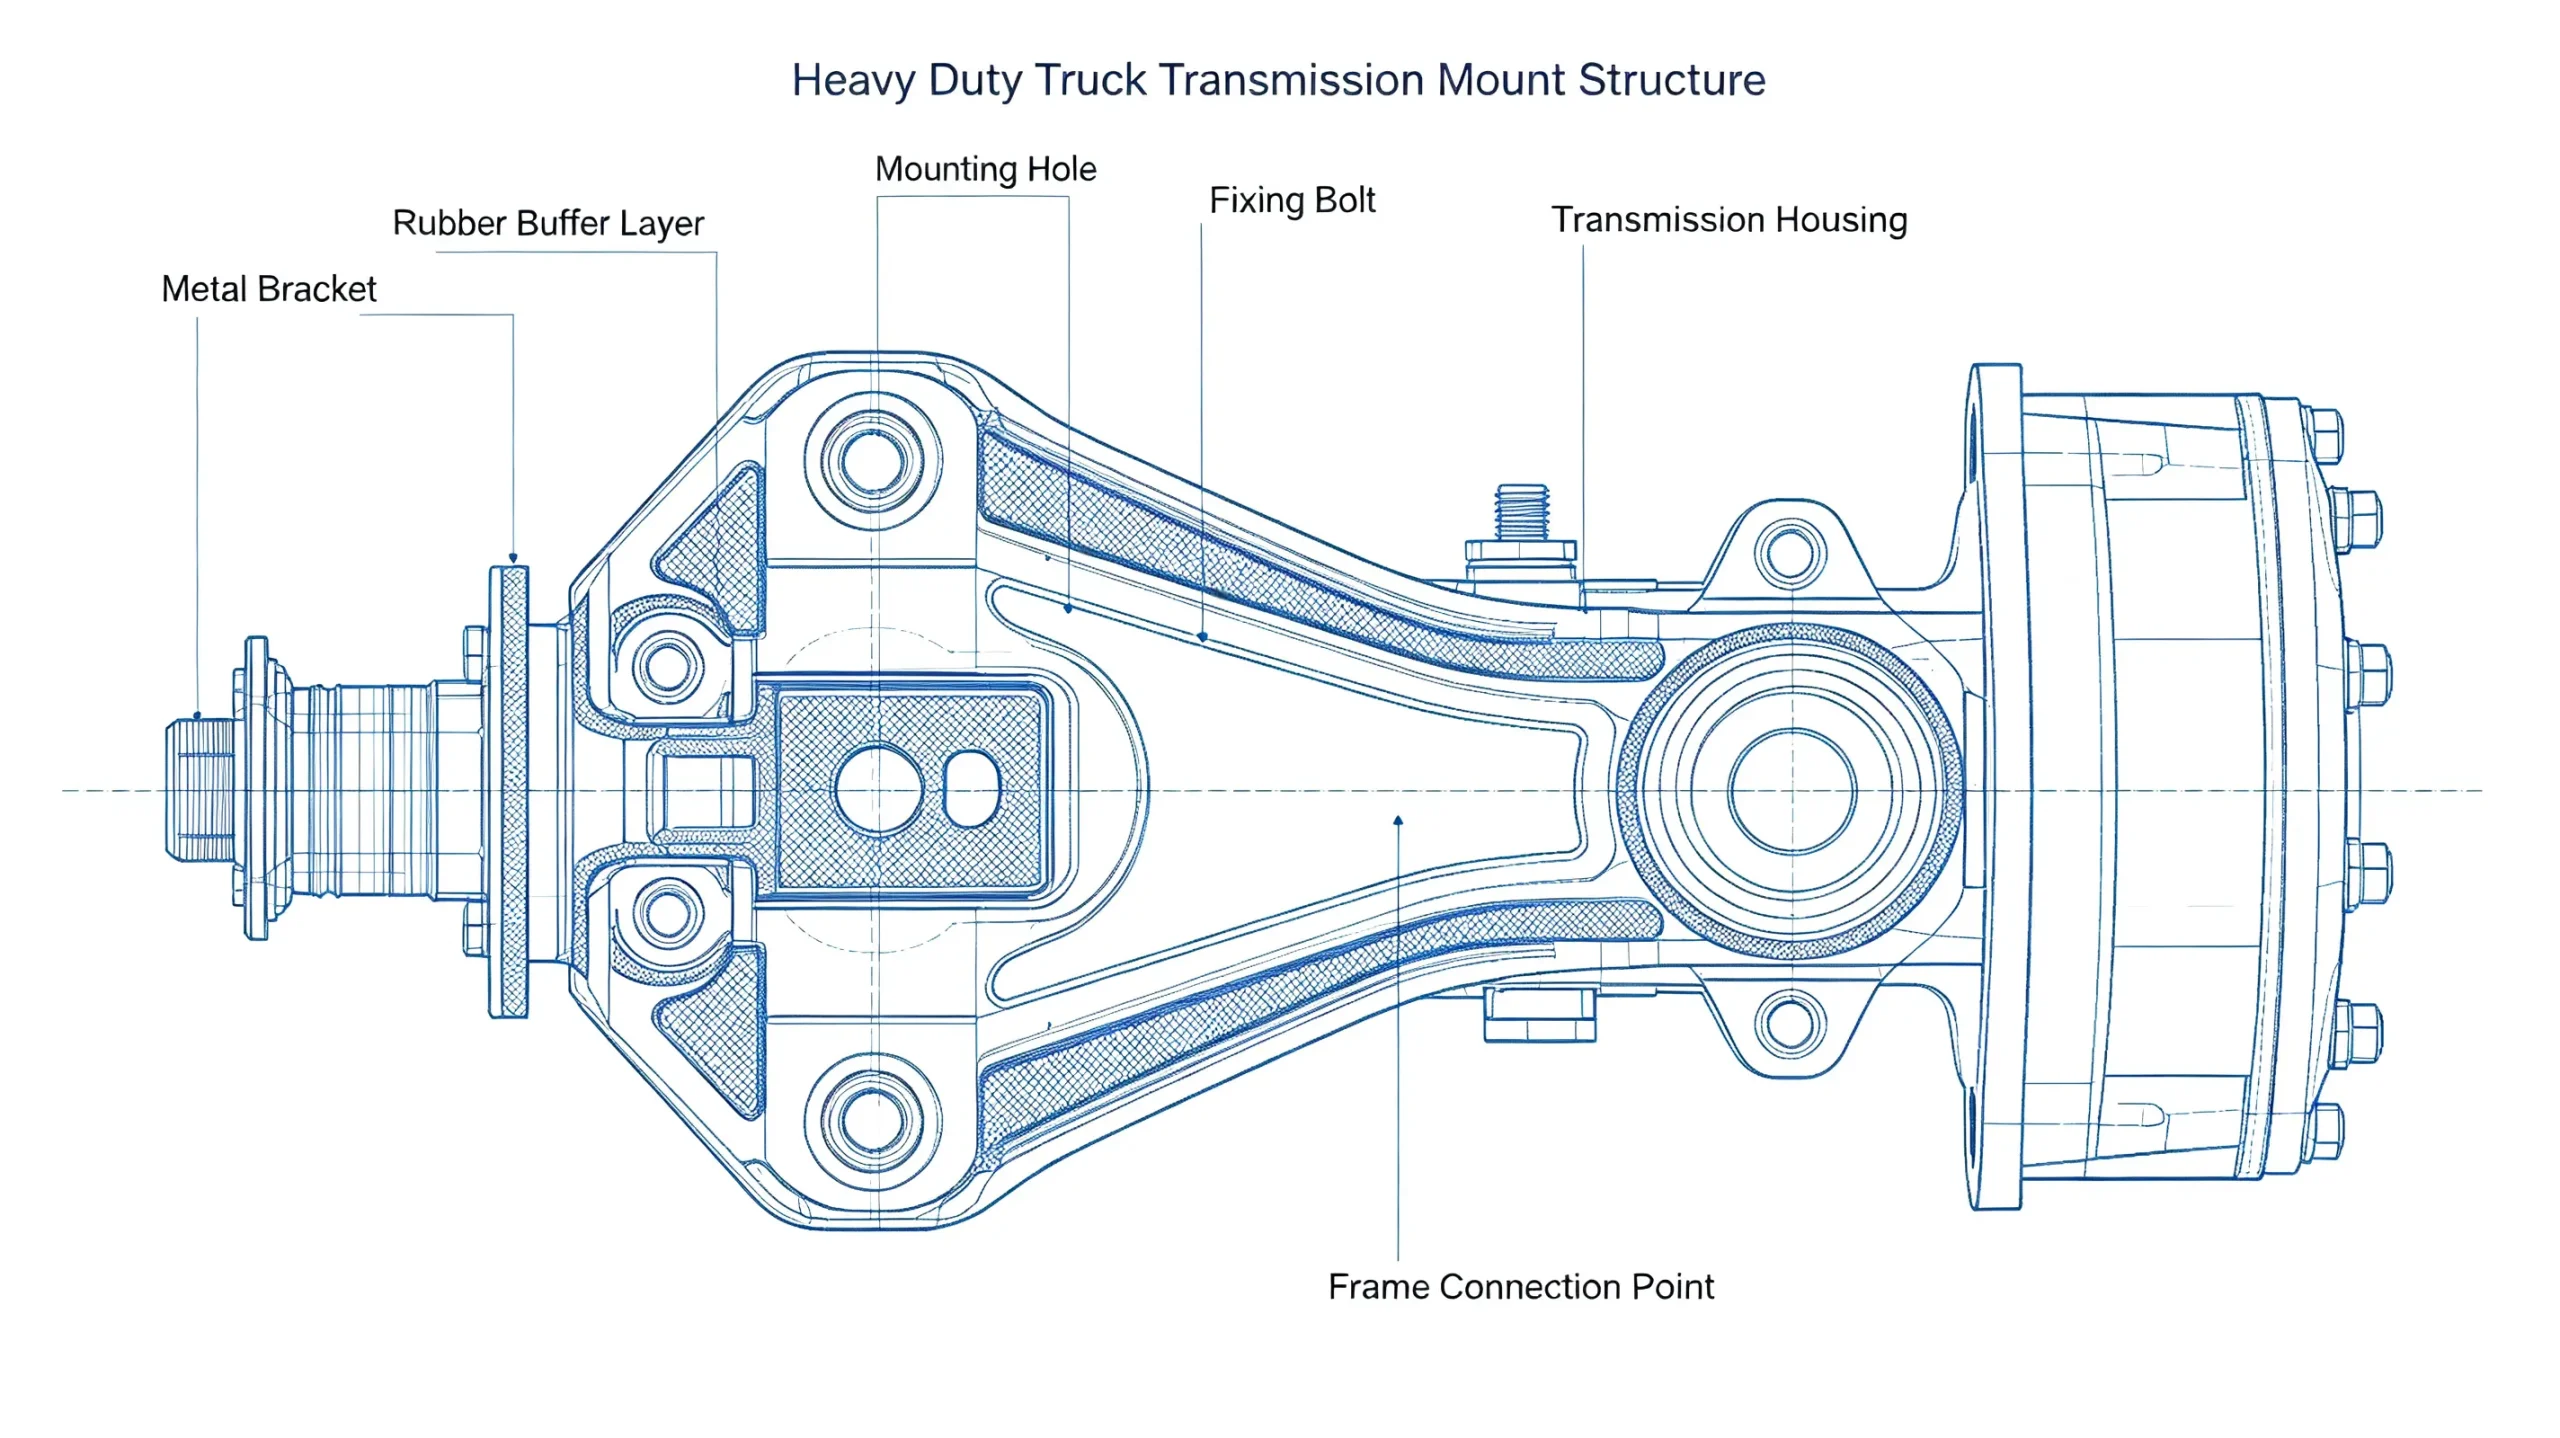
First of all, let’s clarify the basic definition of a heavy-duty transmission mount. A transmission mount, also known as a gearbox mount, is a core chassis damping component.
It is installed between the truck frame and the bottom of the transmission housing. Different from engine mounts, transmission mounts focus on supporting gearbox weight and stabilizing shift vibration.
Heavy-duty truck models carry tons of cargo. Their gearboxes are larger and heavier than ordinary light trucks. Therefore, standard passenger car mounts cannot adapt to commercial truck working conditions.
Professional heavy-duty transmission mounts adopt thickened metal brackets and high-hardness rubber buffers. They are specially designed for high-load, long-cycle, and high-vibration working environments.
In general, most heavy trucks are equipped with one or two transmission mounts. The specific quantity and installation position depend on the truck brand, chassis model, and gearbox type. You can find model-matched chassis parts in our truck system product catalog.
Core Functions of Heavy Duty Transmission Mounts
Many buyers only know that transmission mounts are used for fixing. In fact, they undertake multiple critical protective tasks during truck operation. Each function directly affects drivetrain service life and driving stability.
1. Fixed Support for Transmission Assembly
The most basic function is bearing and fixing the entire gearbox assembly. The transmission generates gravity load all the time during static parking and dynamic driving.
Without qualified mounts, the gearbox will sink and shift. Long-term offset will cause misalignment between the transmission shaft and gearbox output port.
A stable mounting structure ensures the transmission stays in the standard installation position. It provides a stable foundation for normal gear shifting and power output.
2. Vibration Damping and Noise Reduction
During engine operation and gear switching, the transmission will produce continuous micro-vibration. Road bump vibration will also transmit upward to the gearbox.
The rubber buffer layer of the transmission mount can isolate most high-frequency vibration. It prevents vibration from transmitting to the chassis and cabin.
For long-haul drivers, excellent damping performance reduces cabin resonance noise. It greatly improves driving comfort and reduces long-term driving fatigue.
3. Protect Drivetrain Alignment
The truck drivetrain forms a complete power chain: engine, clutch, transmission, drive shaft, and rear axle. All components must maintain precise coaxiality.
Damaged mounts will cause gearbox displacement. This breaks the original drivetrain balance. As a result, the drive shaft bears eccentric wear load.
Serious misalignment will accelerate universal joint wear and even cause drive shaft fracture. Therefore, transmission mounts indirectly protect the entire drivetrain system.
4. Buffer Impact Load During Driving
Heavy trucks often pass bumpy roads, slope roads, and construction road sections. Instant road impact will form instantaneous impact force on the gearbox.
The elastic structure of the transmission mount can absorb sudden impact energy. It avoids rigid collision between the gearbox and chassis frame.
This buffer effect effectively prevents transmission shell cracking and internal gear impact damage.
5. Reduce Wear of Shift Linkage Parts
Most truck shift cables and shift rods are fixed near the transmission. If the gearbox shakes violently, the shift linkage will deflect synchronously.
Long-term irregular deflection will increase shift cable abrasion and rod joint wear. Stable mounts keep the shift mechanism in a fixed stroke range.
In short, qualified transmission mounts protect not only the gearbox but also a series of surrounding linkage components.
Common Materials of Heavy-Duty Truck Transmission Mounts
Material determines the durability, load-bearing capacity, and damping effect of transmission mounts. When purchasing, buyers must distinguish material configurations to avoid inferior products.
Generally speaking, formal heavy-duty transmission mounts are composed of metal skeleton and elastic buffer medium. The mainstream materials are divided into three types below.
1. Steel Bracket + Natural Rubber Buffer (Most Common)
This is the most widely used configuration for original factory matched mounts. The outer bracket adopts thick stamping steel or cast steel.
The middle buffer layer uses high-density natural rubber. This material has good elasticity, aging resistance, and moderate hardness.
It balances load-bearing stability and damping performance. It is suitable for most highway logistics trucks and general engineering vehicles.
The cost performance of this type of mount is high. It is the first choice for daily fleet maintenance and batch replacement.
2. Cast Iron Bracket + Reinforced Rubber (Heavy Load Version)
For mining dump trucks, heavy engineering trucks, and overloaded freight vehicles, ordinary stamping steel brackets are easy to deform.
Therefore, heavy-duty models adopt integral cast iron brackets. The overall structural strength is greatly improved, and it is not easy to deform under extreme load.
The internal rubber layer uses thickened reinforced rubber. It can resist long-term strong vibration and impact load.
This type of mount has longer service life in harsh working conditions. It is strongly recommended for off-road and heavy-load fleets.
3. Hydraulic Damping Transmission Mount (High-End AMT Truck)
New generation high-end heavy trucks with AMT automatic transmissions are equipped with hydraulic damping mounts.
Different from pure rubber elasticity, hydraulic mounts are filled with damping liquid inside. They can intelligently absorb low-frequency resonance vibration.
The damping effect is far better than ordinary rubber mounts. It can eliminate subtle jitter during automatic gear shifting.
However, hydraulic mounts have higher costs and stricter installation requirements. They are mainly used for high-end logistics tractors. You can view high-quality original and upgraded parts from our brand product center.
Key Buying Features Every Buyer Must Check
Many buyers only check the appearance size when purchasing mounts. In fact, several core parameters determine whether the part is durable and compatible.
If you ignore these details, the new mount may deform quickly or fail to install perfectly. Below are the key purchasing standards for professional reference.
1. Overall Structural Thickness and Stiffness
The thickness of the metal bracket directly determines the load-bearing limit. Inferior mounts use thin iron sheets to reduce costs.
After installation, slight vibration will cause bracket deformation. This leads to gearbox displacement again.
Qualified heavy-duty mounts have thickened edges and reinforced bending positions. They keep structural stability under long-term load.
2. Rubber Density, Hardness and Adhesion
High-quality rubber is compact and uniform, without pores and cracks. It is tightly bonded with the metal bracket without degumming gaps.
Inferior rubber is loose and easy to age. It will harden and crack in winter and soften and deform in summer.
Good adhesion technology prevents rubber peeling. It avoids mount failure caused by separation of rubber and metal.
3. Hole Position Accuracy and Installation Matching
Screw hole position, hole diameter, and mounting spacing must be 1:1 consistent with OEM standards.
Inaccurate hole positions will cause forced installation. Forced extrusion will generate internal stress, leading to early deformation and fracture.
Professional manufacturers strictly follow original data for mold opening. They ensure zero error in installation dimensions.
4. Anti-Aging and Anti-Oil Performance
The chassis working environment is complex. Gear oil, engine oil, rainwater, and road salt will corrode the mount for a long time.
High-quality mounts add anti-aging agents and oil-resistant formulas. The rubber will not swell or crack after long-term contact with oil stains.
Ordinary inferior rubber will swell and soften after contacting oil. It completely loses damping and support functions.
5. Vibration Damping Balance Design
Excellent transmission mounts adopt asymmetric damping design. They target the vibration frequency of heavy truck gearboxes.
This design can filter out most operating vibration. It avoids resonance between gearbox and chassis.
Common Failure Symptoms of Faulty Transmission Mount
Transmission mount failure is gradual. The early symptoms are very subtle. Most drivers and maintenance personnel will ignore them.
When obvious faults appear, the mounts have been severely damaged, and the surrounding parts have also suffered wear. Therefore, mastering early failure signs is very important for fleet maintenance.
1. Obvious Cabin Vibration During Idling
When the truck is parked and idling, the cabin should remain stable. If you feel obvious jitter in the seat and steering wheel, the mount damping capacity decreases.
After the rubber buffer ages and hardens, it cannot absorb vibration. All gearbox vibration is directly transmitted to the chassis and cabin.
2. Abnormal Thumping Noise During Gear Shifting
When shifting gears or accelerating suddenly, a dull thumping sound appears at the bottom of the truck.
This is because the loose mount causes the gearbox to shift instantly. The metal bracket collides with the chassis frame.
This symptom becomes more obvious when switching between forward gear and reverse gear.
3. Unstable Gear Shifting and Vague Gear Feeling
If the gearbox shakes randomly during operation, the shift cable and shift rod will deflect abnormally.
Drivers will feel the gear lever is loose and the gear engagement is not solid. It is easy to have incomplete gear engagement.
4. Serious Chassis Resonance at Specific Speed
Every truck has a specific resonance speed section. When the mount is damaged, the resonance frequency will change.
The whole truck will vibrate violently at a certain speed. Once leaving this speed range, the vibration weakens.
5. Visible Rubber Cracking, Deformation and Degumming
6. Accelerated Drive Shaft and Universal Joint Wear
Root Causes of Premature Transmission Mount Damage
1. Inferior Aftermarket Parts With Substandard Materials
2. Long-Term Overload Operation
3. Severe Road Conditions and Frequent Impact
4. Oil Pollution Corrosion
5. Improper Installation and Uneven Stress
6. Long-Term High-Speed Resonance
Step-by-Step Diagnosis Method for Bad Transmission Mounts
Step 1: Static Visual Inspection
Step 2: Idling Vibration Test
Step 3: Gear Switching Impact Test
Step 4: Manual Prying Inspection
Step 5: Road Test Verification