Heavy duty trucks rely on sturdy suspension components to handle heavy loads and rough road conditions every day. Among these core chassis parts, the control arm stands out as a fundamental yet frequently overlooked assembly. It plays a critical role in connecting the truck frame to the steering and wheel hub system. Many fleet managers and truck operators focus heavily on engine maintenance, brake service, and tire replacement. However, they often ignore gradual control arm wear and damage.
In fact, a worn or faulty control arm triggers a wide range of hidden chassis problems. These issues include unstable steering, uneven tire wear, excessive body vibration, and poor load‑bearing performance. If operators leave these faults unaddressed, minor wear will evolve into severe structural damage. It will also raise driving safety risks and increase long‑term fleet maintenance costs.
This comprehensive control arm replacement guide targets heavy‑duty commercial trucks. It covers basic component knowledge, common failure symptoms, root causes, tool preparation, step‑by‑step replacement workflows, post‑installation checks, and professional maintenance tips. We designed every section for practical on‑site repair use. Meanwhile, we optimized the content for Google readability and SEO performance. You can follow this guide for DIY inspections or formal workshop replacement work. For more systematic chassis repair tutorials, visit our professional technical support page.
What Is a Control Arm? Key Functions in Heavy Duty Truck Suspension
Before you start any replacement work, you need to understand the basic definition and core functions of a truck control arm. Clear structural knowledge helps you recognize abnormal failures and standardize installation operations.
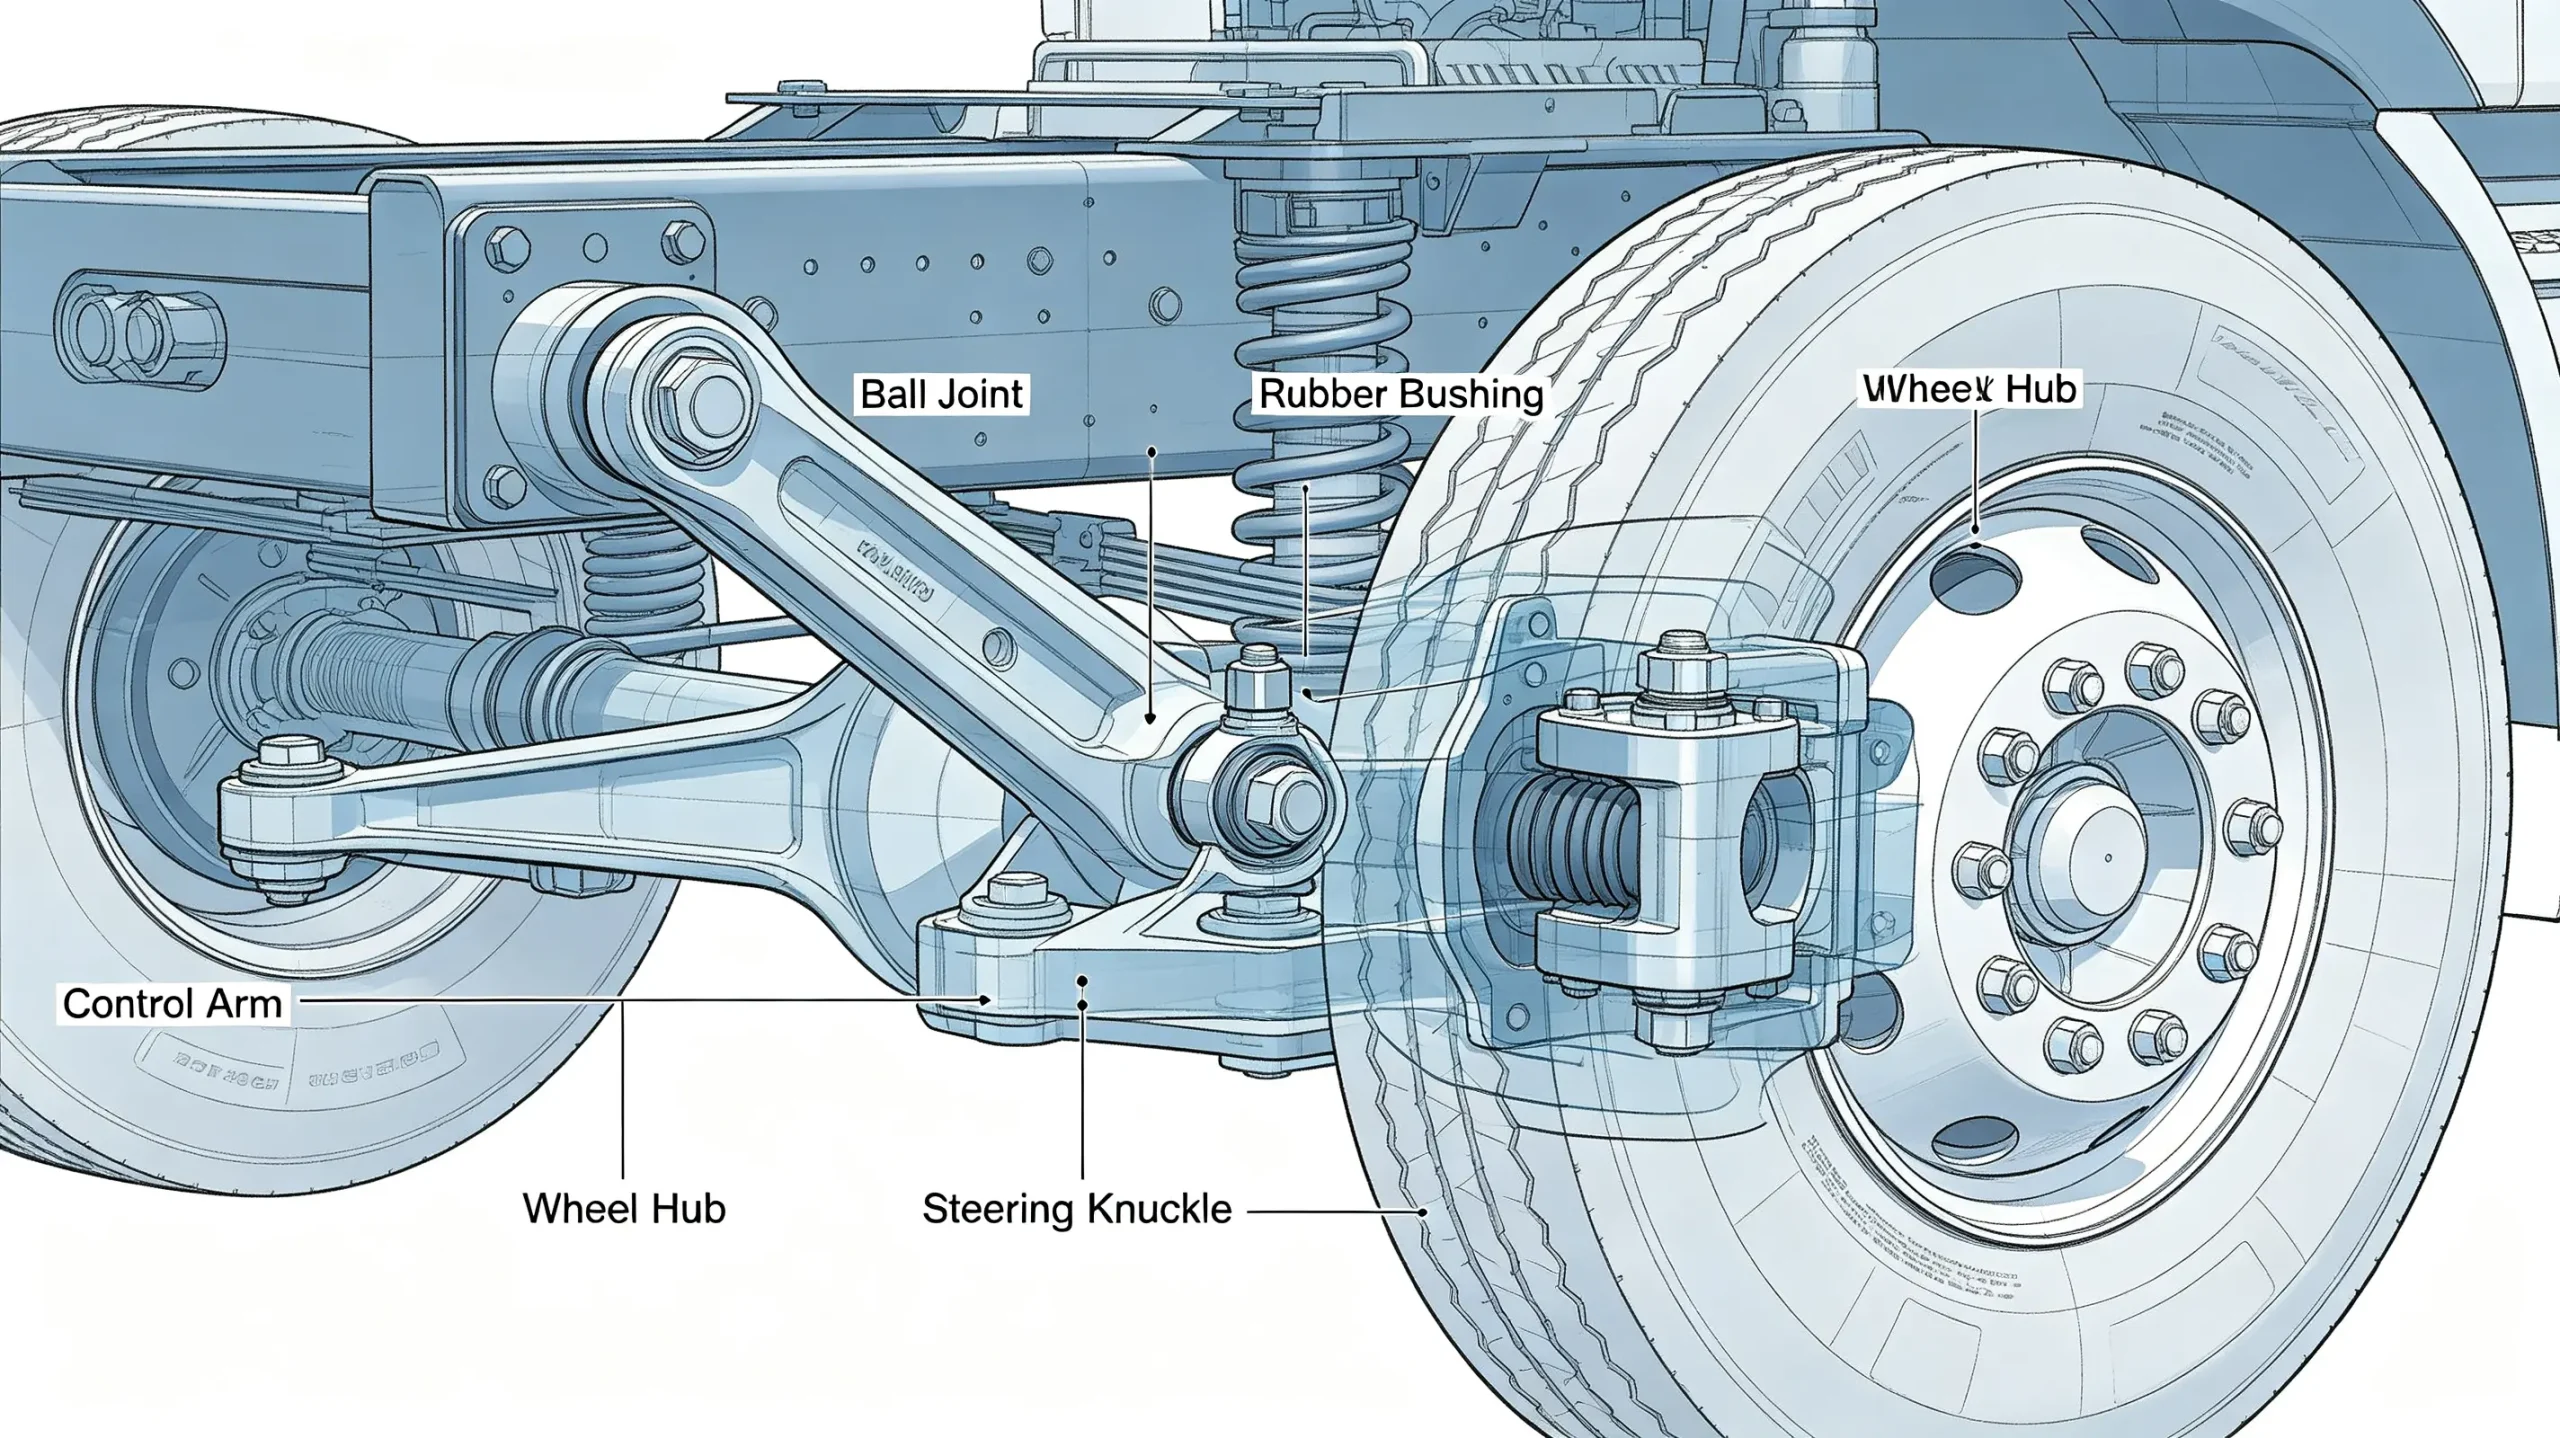
A control arm is a rigid metal suspension component. Mechanics and fleet technicians also call it a wishbone or track arm. It features a forged steel structure for heavy duty truck applications. One end connects to the vehicle chassis or subframe. The other end links to the wheel hub, steering knuckle, or axle assembly via ball joints and rubber bushings.
Unlike lightweight passenger car control arms, heavy duty truck control arms adopt thickened steel forging. They resist extreme torsion, impact, and load pressure. This durable structure adapts to long‑distance transportation, overloaded cargo conditions, and complex off‑road terrain.
Core Functions of Heavy Duty Control Arms
First, control arms fix wheel travel trajectories. They limit irregular front and rear, left and right movement of wheels during driving. This stable constraint maintains accurate wheel alignment angles at all times.
Second, they buffer road impact. Combined with bushings and ball joints, control arms absorb vibration from bumpy roads. They reduce rigid chassis vibration and improve overall driving stability.
Third, they support load bearing. Control arms share part of the body and cargo load during heavy transportation. They cooperate with leaf springs and shock absorbers to balance suspension force distribution.
Fourth, they guarantee steering accuracy. Stable control arm structure ensures sensitive and precise steering response. It avoids loose steering and wandering during high‑speed driving.
Common Control Arm Types for Heavy Duty Trucks
Heavy duty trucks mainly use two control arm types based on installation position and function. Each type bears different stress and shows distinct failure characteristics.
Upper control arms feature shorter rod bodies. They mainly adjust wheel camber angles and assist vibration buffering. They endure smaller impact force but fatigue easily under long‑term vibration.
Lower control arms have thicker and longer structures. They bear most vertical road impact and cargo load. They wear faster and require more frequent inspection and replacement.
Different truck brands adopt customized control arm sizes and structural designs. You can find model‑matching control arms and full suspension parts from our truck system product catalog.
Most Common Control Arm Failure Symptoms (Easy Diagnosis)
Control arm damage develops gradually. Early symptoms remain subtle and easy to ignore. As wear accumulates, abnormal driving performance becomes obvious. Many technicians misdiagnose control arm faults as steering machine failure or tire positioning deviation. This leads to ineffective repairs and repeated faults.
We sorted out the most recognizable failure symptoms based on massive heavy duty truck maintenance cases. You can quickly confirm control arm problems through road tests and visual inspections.
1. Loose Steering and Vehicle Wandering
Loose steering stands as the earliest warning sign of control arm failure. When control arm bushings wear or ball joints loosen, the wheel fixing structure loses rigidity.
During high‑speed straight driving, the truck cannot maintain a stable track. It drifts left or right without steering input. Drivers need frequent minor steering corrections to keep straight travel. This greatly increases driving fatigue.
Different from steering gear failure, control arm‑induced wandering becomes more obvious on bumpy roads. The chassis feels hollow and unstable during vibration.
2. Irregular Front Chassis Abnormal Noise
Faulty control arms produce regular dull clunking or knocking noise. The noise mainly appears when passing speed bumps, potholes, and uneven road surfaces.
Worn bushings create assembly gaps. Loose ball joints cause micro‑shaking of the control arm. Vertical suspension impact triggers collision noise between metal components.
Notably, the noise disappears completely on flat roads. It only occurs under vertical stress. This feature helps you distinguish control arm faults from other chassis problems.
3. Accelerated and Uneven Tire Wear
Control arm deformation and looseness directly destroy standard wheel alignment data. The wheel camber and toe angles deviate from factory specifications.
Long‑term abnormal wheel angles cause eccentric tire wear. The inner or outer tire shoulder wears severely, while the middle tread remains intact. This uneven wear shortens tire service life and raises fleet operating costs.
Many operators blindly adjust four‑wheel positioning to solve tire wear. However, the problem recurs quickly without replacing faulty control arms.
4. Excessive Chassis Vibration at Medium and High Speeds
Stable control arms suppress abnormal suspension vibration. Once components fail, the wheel assembly loses stable support.
When the truck runs at medium or high speeds, the chassis produces obvious resonant vibration. Drivers feel continuous shaking through the steering wheel and cab floor.
Severe vibration not only reduces driving comfort but also loosens other chassis bolts. It triggers secondary chassis faults over time.
5. Tilted Body and Unbalanced Load
For trucks with severely deformed control arms, the left and right suspension heights become inconsistent. The truck body tilts slightly to one side.
Under heavy load conditions, this imbalance becomes more obvious. Uneven force distribution increases rollover risks during turning. It also causes unilateral suspension overload and accelerated part wear.
6. Visible Structural Damage in Visual Inspection
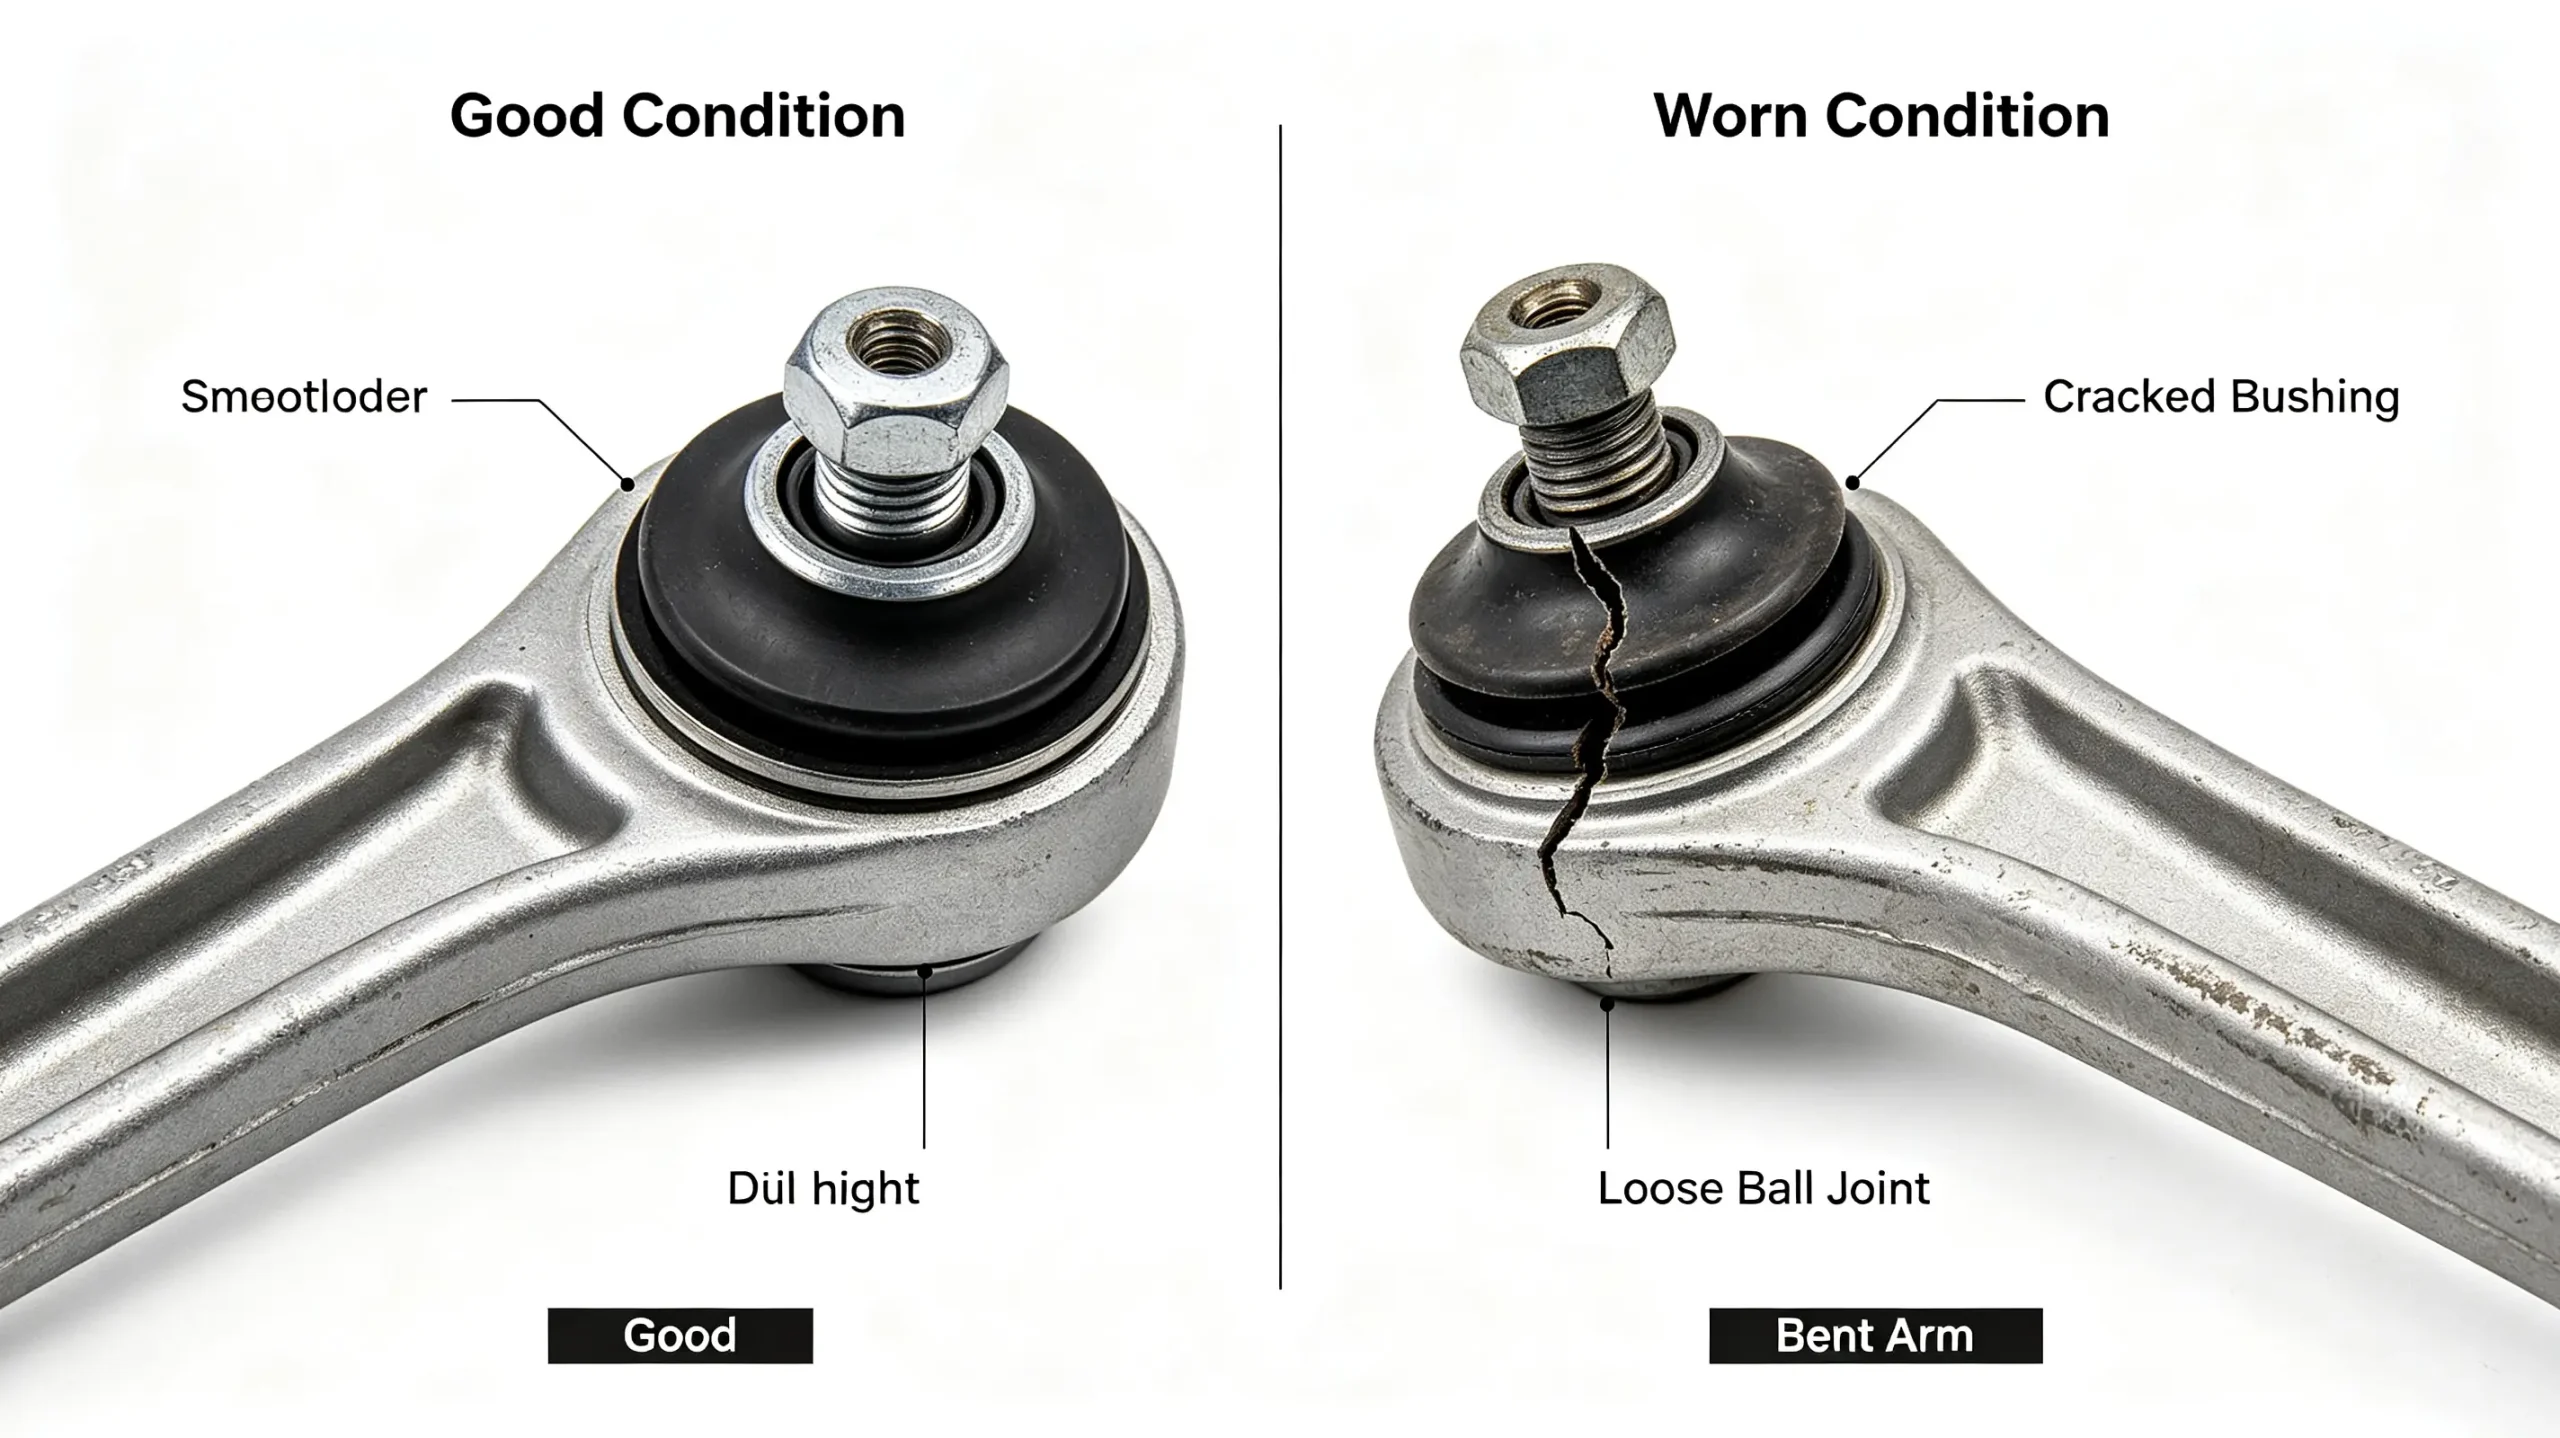
After lifting the truck for chassis inspection, you can directly observe control arm damage. Qualified intact control arms have smooth surfaces without deformation, cracks, or bending.
Failed control arms show obvious problems. Common issues include bent rod bodies, metal fatigue cracks, loose bushing sleeves, rubber cracking, and ball joint stud shaking.
Even minor bending cannot be repaired. You must replace the entire assembly to restore chassis stability.
Root Causes of Premature Control Arm Damage
Control arms belong to durable chassis components. They feature long service life under standard working conditions. Most premature failures stem from improper use, harsh working environments, and non‑standard maintenance. Mastering failure causes helps you extend new component service life and avoid repeated replacement.
1. Long‑Term Overload and Over‑Speed Driving
Overload ranks as the top cause of early control arm failure. Heavy duty trucks bear far beyond rated load in many working scenarios. Excessive cargo weight applies extreme pressure on suspension systems.
Control arms endure super‑standard vertical impact and torsion. Long‑term overload leads to metal fatigue and subtle bending deformation. Once structural deformation occurs, wheel alignment cannot return to normal state.
In addition, frequent high‑speed driving and violent road grabbing amplify suspension vibration. This accelerates bushing aging and ball joint wear.
2. Harsh Road and Complex Working Conditions
Many heavy duty trucks work on mountain roads, construction sites, and gravel roads. These roads feature uneven surfaces and frequent bumpy impact.
Control arms bear continuous irregular impact force. This repeated stress causes gradual fatigue damage. Compared with highway fleets, engineering and off‑road trucks have much shorter control arm replacement cycles.
3. Aging and Wear of Matching Accessories
Control arms work with supporting bushings and ball joints. These rubber and movable parts wear faster than steel rod bodies.
Aging bushings lose elasticity and create assembly gaps. Worn ball joints produce shaking clearance. These accessory failures change control arm stress points. They cause eccentric load and lead to overall component failure.
Most control arm replacement projects target failed accessories. Technicians replace the whole assembly for better overall stability.
4. Inferior Aftermarket Replacement Parts
Market control arm quality varies greatly. Low‑cost inferior products use recycled steel and thin structures. They lack overall rigidity and fatigue resistance.
These cheap parts deform easily after short‑term use. They fail to meet heavy duty load requirements. They even bring hidden driving safety hazards.
Fleet users should choose brand‑matched high‑quality control arms. Browse reliable heavy duty truck accessory brands through our brand product center.
5. Non‑Standard Installation and Repair Errors
Many new control arms fail quickly due to improper installation. Non‑standard operation creates hidden structural stress.
Common mistakes include incorrect bolt tightening sequence, uneven torque force, and installation without restoring normal suspension height. These errors cause forced deformation of new components.
In addition, failure to clean mounting surfaces leads to foreign matter padding. This results in unstable assembly and eccentric stress wear.
6. Lack of Daily Inspection and Maintenance
Most fleet maintenance focuses on wearing parts like filters and tires. Technicians ignore regular chassis suspension inspections.
Long‑term accumulated mud, dust, and corrosive substances erode control arm surfaces. They accelerate metal aging and rust. Unchecked minor wear gradually evolves into irreversible structural damage.
Pre‑Replacement Preparation: Tools, Parts, and Safety Rules
Standardized preparation ensures smooth replacement and avoids secondary faults. Before starting disassembly and installation, prepare all tools and confirm safety specifications. This step improves replacement efficiency and guarantees construction quality.
Necessary Professional Tools
Prepare a complete tool set for accurate and safe replacement. Core tools include hydraulic lifting jack, safety jack stands, complete socket wrench set, torque wrench, breaker bar, ball joint separator, pry bar, and penetrating lubricant.
You also need cleaning tools, marker pens, and new cotter pins. These small accessories ensure standardized assembly and safe use.
Safety Operation Specifications
First, park the truck on flat hard ground. Engage the handbrake and block tires to prevent sliding.
Second, never work under a truck supported only by a jack. Must use safety jack stands for double support to avoid collapse risks.
Third, fully cool the vehicle before operation. Avoid working with high‑temperature chassis parts to prevent scald injuries.
Fourth, wear anti‑slip gloves and protective goggles. Prevent rust and dirt from hurting hands and eyes during disassembly.
New Part Inspection Standards
Check new control arms carefully before installation. Confirm model matching, complete appearance, no bending deformation, and intact bushing and ball joint functions.
Verify bolt hole positions and sizes match original parts. Unqualified parts cannot be installed blindly. This avoids assembly failure and secondary disassembly.
Step‑by‑Step Heavy Duty Truck Control Arm Replacement Process
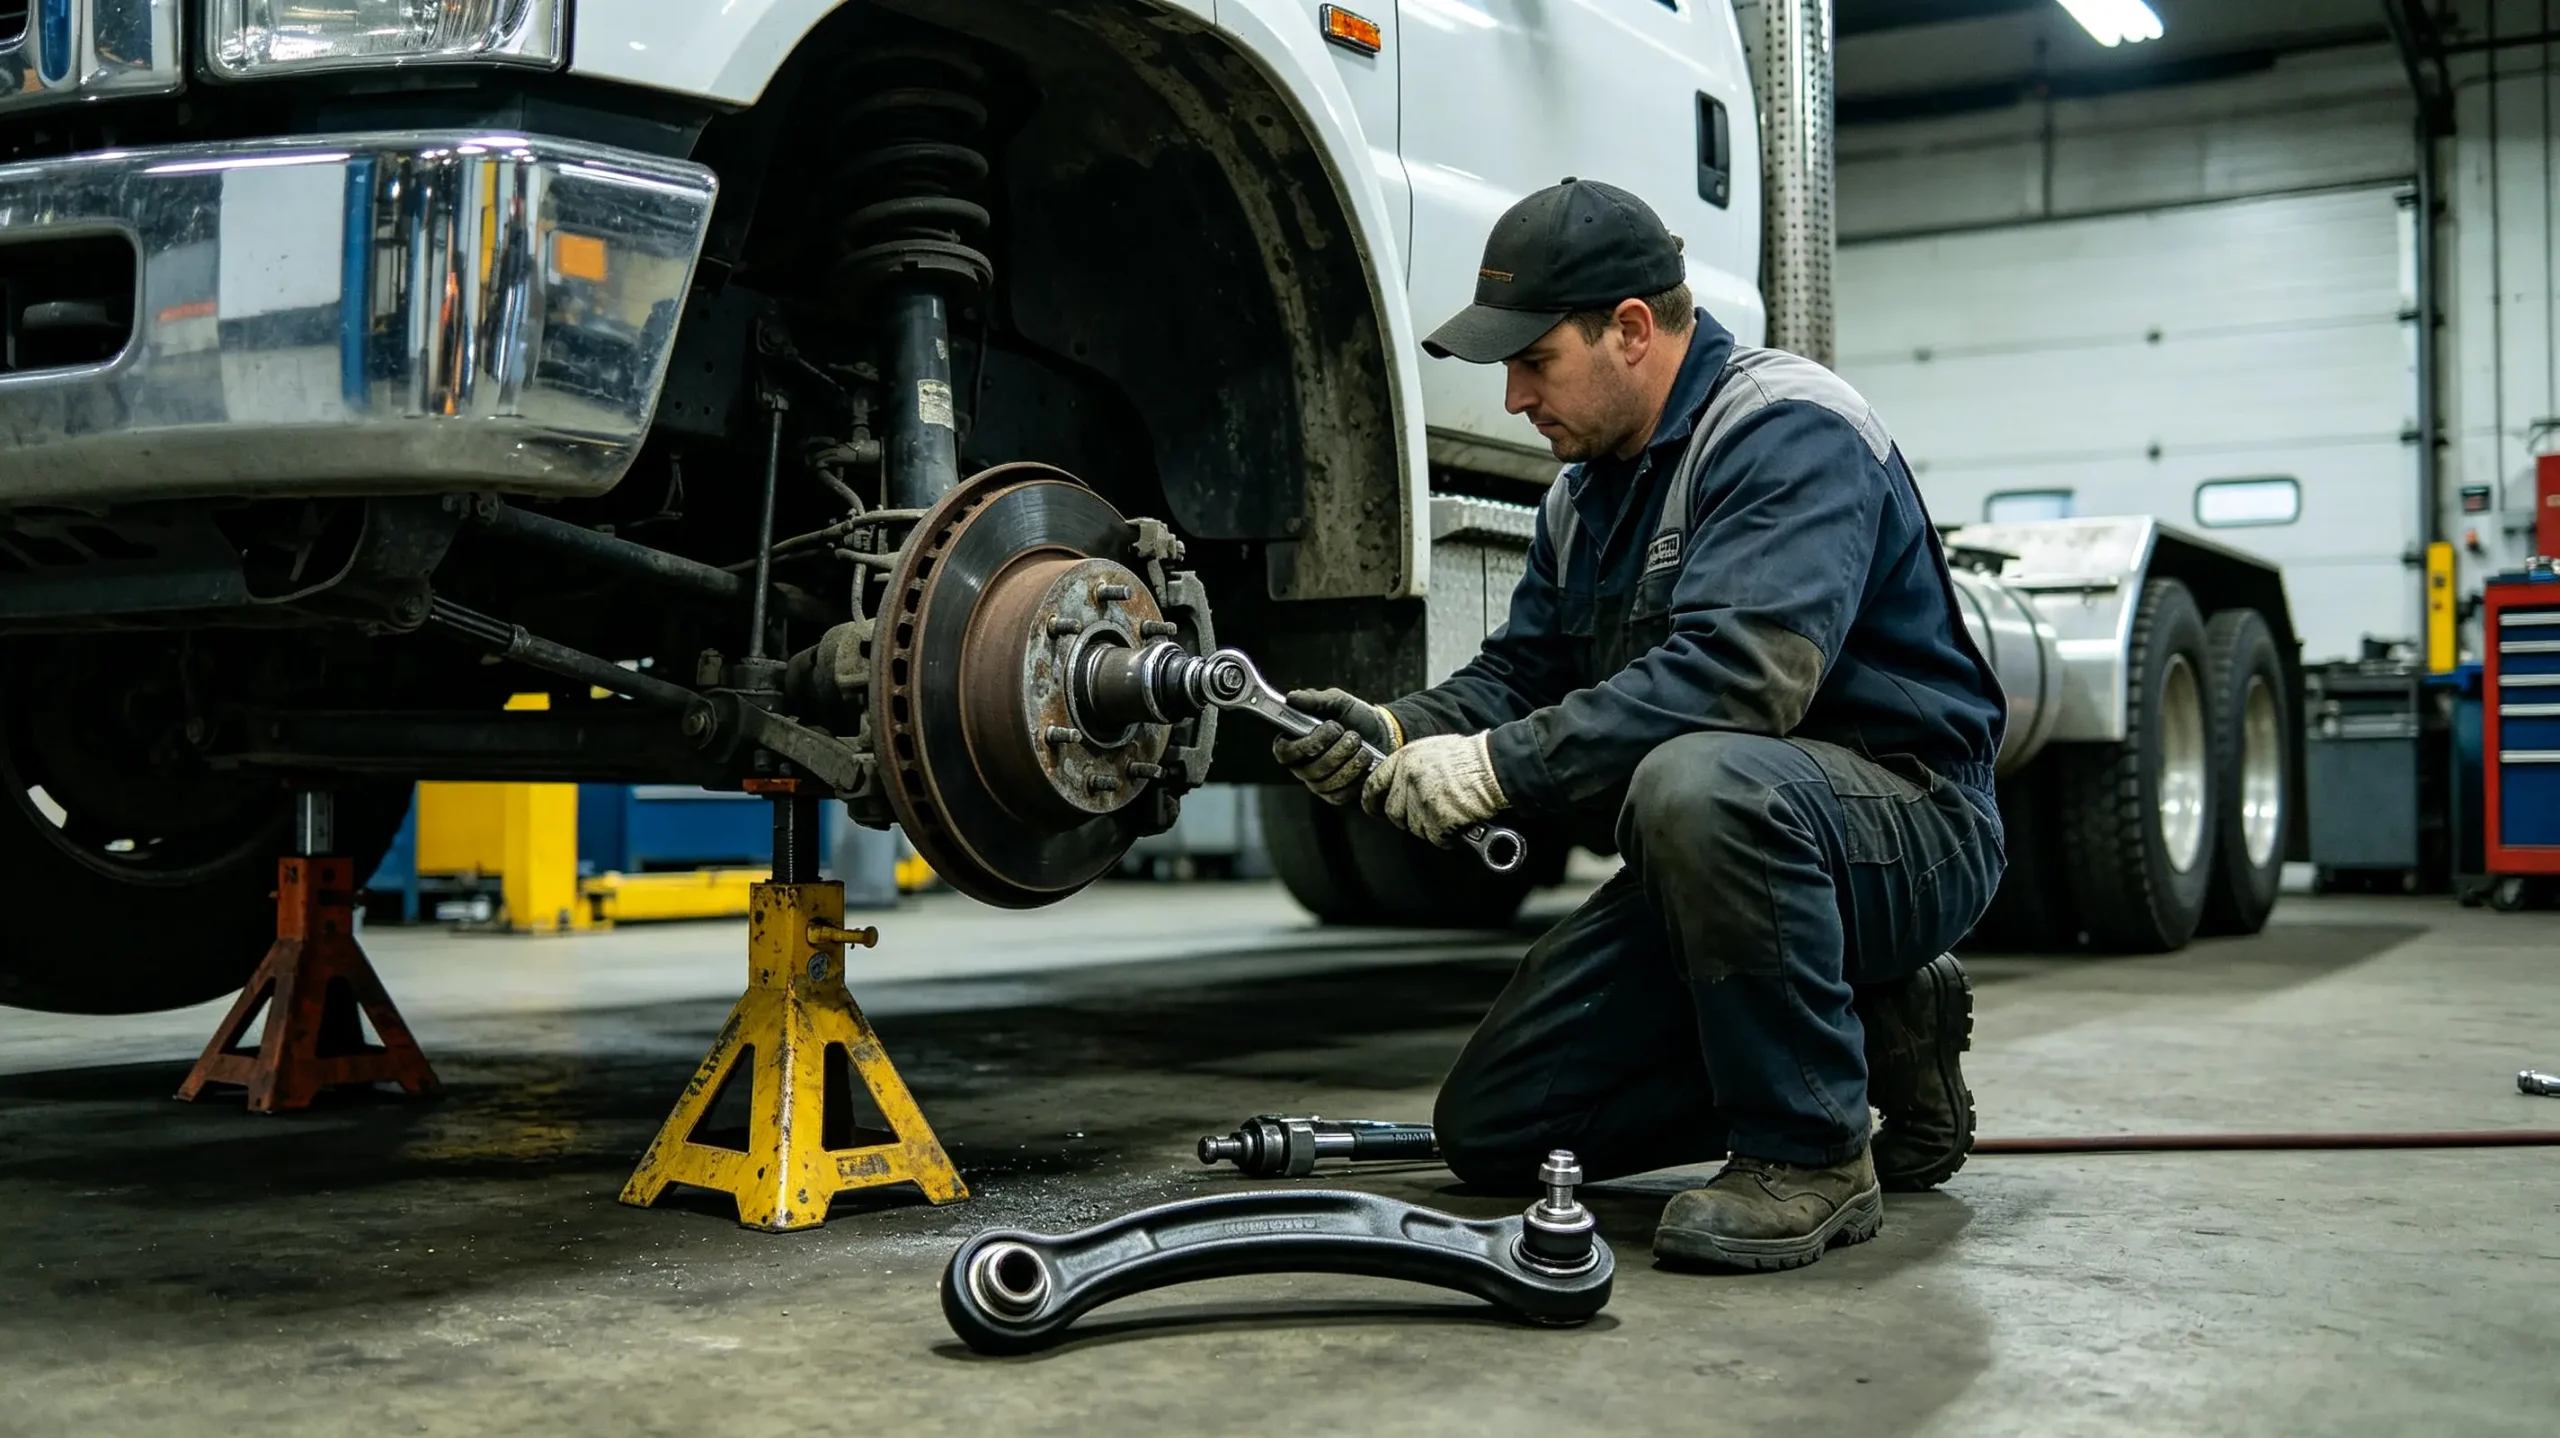
This section provides standardized full‑process replacement steps for heavy duty truck control arms. We optimized the workflow based on professional workshop construction standards. The steps apply to most Chinese heavy duty trucks including SINOTRUK, SHACMAN, and FOTON. You can complete high‑quality replacement by following the process strictly.
Step 1: Vehicle Lifting and Fixing
Loosen wheel lug nuts slightly in advance. Do not remove them completely. Lift the target side of the truck with a hydraulic jack.
After lifting to a proper height, place safety jack stands firmly under the chassis. Shake the vehicle slightly to confirm stable support.
Finally, remove the lug nuts and take off the wheel. This exposes the control arm and suspension assembly for convenient operation.
Step 2: Clean Surface and Loosen Rusty Bolts
Clean mud, dust, and rust on control arm mounting positions. Spray penetrating lubricant on all fixed bolts and ball joint nuts.
Let the lubricant soak for 10 to 15 minutes. This loosens rusted threads and prevents bolt sliding and breaking during disassembly.
Step 3: Disconnect Auxiliary Connected Parts
Some truck models have stabilizer bar links and sensor lines near control arms. Disconnect these auxiliary parts first.
Fix detached parts aside to avoid pulling damage. Mark wire positions to ensure accurate reinstallation.
Step 4: Remove Ball Joint Fixing Components
Take out the cotter pin on the ball joint castle nut. Unscrew and remove the castle nut. Place the nut and pin in order for reuse.
Use a ball joint separator to separate the ball joint stud from the steering knuckle. Apply force evenly to avoid damaging the joint stud.
Step 5: Disassemble Control Arm Mounting Bolts
Loosen and remove the chassis frame fixing bolts of the control arm. Support the control arm by hand during operation to prevent sudden falling.
Take down the old control arm completely after all bolts detach. Clean mounting holes and contact surfaces thoroughly to remove rust and sediment.
Step 6: Install New Control Arm Assembly
Align the new control arm with the chassis mounting position. Insert fixing bolts manually to ensure accurate thread matching.
Do not tighten bolts completely at this stage. Keep slight loose state to facilitate subsequent suspension height adjustment.
Align the ball joint stud with the steering knuckle hole. Install the castle nut and lock it with a new cotter pin.
Step 7: Reconnect Auxiliary Components
Reinstall stabilizer bar links, sensor lines, and other auxiliary parts in original positions. Confirm all connectors are firm and accurate.
Step 8: Standard Bolt Torque Tightening
Lower the truck to normal driving height. Let the suspension bear natural vehicle weight. This state restores standard suspension geometry.
Tighten all control arm fixing bolts to factory standard torque with a torque wrench. This step avoids pre‑torsion deformation of new parts.
Step 9: Reinstall Wheel and Test Run
Mount the wheel and tighten lug nuts in diagonal order. Lower the vehicle completely and remove safety brackets.
Take a short road test. Check for abnormal chassis noise, loose steering, and unstable body tilt. Confirm all faults disappear.
Post‑Replacement Inspection and Calibration Standards
Replacement work does not end after installation. Professional post‑inspection and calibration ensure long‑term stable operation of new control arms. Many hidden faults only appear after load operation.
Visual Inspection Checkpoints
Check all bolt tightness again. Confirm no loose or missing fasteners. Verify control arm installation angle is horizontal and free of tilt.
Inspect bushing fitting state. Ensure no extrusion deformation or offset installation. Check ball joint flexibility for smooth rotation without jamming.
Road Test Verification Items
Drive on flat roads to test straight‑line stability. Confirm no vehicle wandering or steering delay.
Pass through bumpy roads at low speed. Check for abnormal chassis knocking noise.
Complete left and right turning tests. Verify uniform body roll and stable steering reset.
Four‑Wheel Positioning Calibration
Control arm replacement changes original wheel positioning data. You must perform professional four‑wheel alignment after installation.
Adjust camber, toe, and caster angles to factory standard values. This eliminates abnormal tire wear and steering instability risks.
Qualified positioning data lays the foundation for long‑term stable operation of suspension systems. You can refer to practical positioning and maintenance cases in our customer success cases.
Common Control Arm Replacement Mistakes to Avoid
Most premature failures of newly replaced control arms come from non‑standard operations. These wrong practices do not relate to part quality. We summarize the most frequent mistakes in on‑site maintenance to help you avoid repeated faults.
1. Tightening Bolts With Suspension Suspended
Many technicians tighten fixing bolts when the truck lifts and the suspension hangs empty. This operation leaves permanent pre‑torsion stress on new control arms and bushings.
After the vehicle lands, the suspension returns to normal height. The pre‑stressed components deform and crack easily during driving. This causes rapid failure.
Always finish final torque tightening under natural vehicle load state.
2. Reusing Old Cotter Pins and Deformed Bolts
Old cotter pins lose locking elasticity after disassembly. Reuse leads to poor locking effect and hidden falling risks.
Deformed and rusted bolts have reduced structural strength. They cannot bear standard torsion load. Always replace with new standard fasteners during maintenance.
3. Ignoring Mounting Surface Cleaning
Residual rust, sediment, and metal burrs on mounting surfaces cause uneven fitting. This leads to eccentric stress on control arms.
Thoroughly polish and clean mounting positions before installation. Ensure flat and tight fitting contact.
4. Replacing Single‑Side Control Arm Only
Left and right control arms age and wear synchronously. Single‑side replacement causes inconsistent suspension stress on both sides.
This imbalance leads to body tilt and steering deviation. Professional maintenance always recommends replacing left and right control arms in pairs.
5. Skipping Post‑Replacement Four‑Wheel Alignment
Some fleet owners skip positioning calibration to save time. This causes continuous abnormal tire wear and unstable handling.
Four‑wheel alignment is a necessary procedure after control arm replacement. It guarantees accurate suspension parameters.
Long‑Term Maintenance Tips to Extend Control Arm Service Life
Scientific daily maintenance effectively delays control arm aging and wear. It reduces replacement frequency and lowers fleet comprehensive operating costs. The following practical tips apply to all heavy duty truck models.
1. Standardize Driving Habits
Avoid long‑term overloaded operation. Do not drive violently on bumpy roads. Reduce sharp turning and emergency braking.
Smooth driving reduces instantaneous impact and torsion on suspension components. It greatly slows fatigue wear.
2. Regular Chassis Cleaning and Rust Prevention
Clean chassis mud and dust regularly. Remove corrosive attachments such as road salt and deicing agents.
Do regular rust prevention treatment for metal components. Avoid rust erosion that reduces structural rigidity.
3. Periodic Suspension Inspection
Check control arm status every monthly maintenance. Focus on bolt tightness, bushing elasticity, and ball joint clearance.
Detect minor wear early. Arrange replacement during idle maintenance to avoid sudden in‑transit faults.
4. Timely Resolution of Auxiliary Component Faults
Repair worn bushings and loose ball joints promptly. Do not leave minor faults untreated.
Timely replacement of vulnerable accessories protects the overall structural stability of control arms.
5. Adopt High‑Quality Matching Parts
High‑quality control arms have better material rigidity and fatigue resistance. They adapt to heavy duty working conditions stably.
Choosing qualified original‑matching parts avoids frequent failure of inferior products. It improves fleet operation stability.
FAQs About Heavy Duty Truck Control Arm Replacement
Q1: Can I drive with a faulty control arm?
Slight wear allows short‑distance low‑speed driving. However, long‑term driving with faults reduces steering stability. It increases sideslip and rollover risks during heavy‑load turning. It also accelerates wear of other suspension parts. Replace faulty control arms timely to ensure driving safety.
Q2: How often should heavy duty truck control arms be replaced?
Replacement cycles depend on working conditions. Highway logistics trucks need replacement every 3 to 5 years. Engineering and off‑road trucks require annual inspection and timely replacement according to wear degree.
Q3: Is paired replacement necessary?
Yes. Left and right control arms bear consistent working load and aging degree. Paired replacement ensures balanced chassis stress and avoids steering deviation and body tilt problems.
Q4: Why does abnormal noise recur after replacement?
Recurrent noise usually comes from non‑standard installation, unclean mounting surfaces, or uncalibrated positioning. Standardize installation steps and complete post‑replacement positioning to solve the problem fundamentally.
Q5: Can I replace control arms by myself?
DIY replacement requires professional tools and chassis maintenance experience. Non‑professional operation easily causes installation errors. It is recommended to rely on professional workshop technicians for accurate replacement.
Conclusion
The control arm serves as the core supporting component of heavy duty truck suspension systems. Its structural stability directly determines steering accuracy, driving safety, tire wear state, and overall chassis performance. Although it is not a quick‑wear part, long‑term heavy load, harsh road conditions, and insufficient maintenance inevitably cause fatigue damage and functional failure.
Timely identification of failure symptoms, standardized replacement operations, and professional post‑installation calibration effectively eliminate hidden chassis risks. Scientific daily maintenance extends component service life and reduces fleet long‑term maintenance costs. For more heavy duty truck suspension repair and replacement guides, continue to follow our technical support resource center.
If you need high‑quality heavy duty truck control arms, complete suspension system parts, and professional part matching services, browse our official truck system product page for full‑spec product resources.
We support customized part solutions and bulk supply services for various heavy duty truck brands. You can check brand‑matched original accessories through our brand catalog.
To learn more about our project service experience and industry solutions, view our rich customer cooperative cases.
For technical consultation, part customization, and bulk cooperation demands, feel free to contact us anytime.
Learn more about our company’s development history, strength advantages, and global service layout on our about us page. Explore full‑series heavy duty truck accessories and professional service support on our official homepage.


