
How to Repair Truck Alternator Parts: A Comprehensive Guide
In the demanding world of heavy-duty trucking, the alternator stands as a cornerstone of the electrical system, tirelessly converting mechanical energy into electrical power to run the truck’s myriad electrical components and recharge the battery. For fleet managers, owner-operators, and maintenance professionals dealing with robust Chinese trucks like Sinotruk (HOWO), Shacman, FAW (Jiefang), Foton, and Dongfeng, understanding the intricacies of alternator repair is not just a cost-saving measure—it’s a strategic advantage. Rather than opting for immediate replacement, component-level repair of an alternator can significantly extend its lifespan, reduce operational expenses, and minimize downtime. This comprehensive guide delves into the function of an alternator, common failure modes of its individual parts, detailed diagnostic procedures, and step-by-step repair instructions for its key components, empowering you to maintain your fleet with precision and expertise.
Understanding the Truck Alternator: The Heart of the Electrical System
The alternator is a vital component in any heavy-duty truck, responsible for generating the electrical power necessary for the vehicle's operation. It works in conjunction with the battery, which primarily provides power for starting the engine. Once the engine is running, the alternator takes over, supplying electricity to all electrical systems (lights, radio, HVAC, electronic control units, etc.) and recharging the battery.
Function and Importance
The primary functions of a truck alternator include:
- Power Generation: Converts mechanical energy from the engine's crankshaft (via a serpentine belt) into alternating current (AC) electricity. This AC current is then rectified into direct current (DC) suitable for the vehicle's electrical system.
- Voltage Regulation: An integrated voltage regulator ensures that the output voltage remains stable, typically around 13.5 to 14.8 volts for 12V systems (or 27.0 to 29.6 volts for 24V systems), regardless of engine RPM or electrical load. This critical function protects sensitive electronic components from damaging voltage spikes and ensures proper, efficient battery charging.
- Battery Recharging: Replenishes the battery's charge that was used during engine startup and provides additional current to keep the battery fully charged during operation. A properly functioning alternator prevents battery discharge, extending battery life.
- Supporting Electrical Loads: Supplies power to all electrical accessories and systems while the engine is running, preventing the battery from discharging. This is especially crucial for heavy-duty trucks with numerous auxiliary systems, such as refrigeration units, lift gates, and advanced telematics.
For heavy-duty trucks, which often feature extensive electrical systems, multiple batteries, and operate under continuous high loads for long durations, the alternator is a robust, high-output unit. Its reliable operation is critical for vehicle safety, performance, and compliance with modern emission standards, as many engine control systems rely on a stable and consistent power supply. A failing alternator can quickly lead to a cascade of electrical issues, impacting everything from engine performance to driver comfort and safety.
Key Components of a Truck Alternator
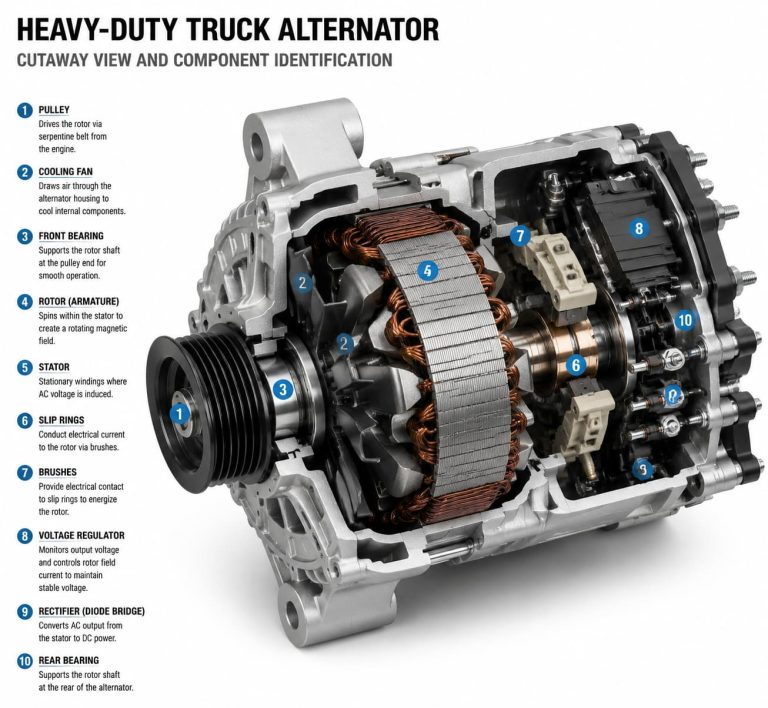
A typical heavy-duty truck alternator is a complex assembly of several interconnected parts, each playing a crucial role in its operation. Understanding these components is fundamental to effective diagnosis and repair:
- Stator: This is the stationary part of the alternator, consisting of a laminated iron core with multiple coils of copper wire (windings). As the magnetic field from the rotor passes through these windings, it induces an alternating current (AC) through electromagnetic induction. The design and quality of the stator windings are critical for the alternator's power output.
- Rotor (Armature): The rotating component, often referred to as the armature, contains field windings that are energized by a small current (field current) from the voltage regulator. When current flows through these windings, it creates an electromagnetic field. This magnetic field rotates within the stationary stator, generating electricity. The rotor's balance and integrity are vital for smooth operation and bearing longevity.
- Rectifier (Diode Bridge): Since a truck's electrical system operates on direct current (DC), the alternating current (AC) generated by the stator must be converted. The rectifier, typically consisting of six or eight high-power diodes arranged in a bridge, performs this conversion. Diodes allow current to flow in only one direction, effectively transforming AC into DC. Failure of even one diode can significantly impair alternator performance.
- Voltage Regulator: This is the
brain of the charging system. It monitors the system voltage and precisely controls the field current supplied to the rotor. By adjusting this current, it maintains a constant output voltage, typically between 13.5 and 14.8 volts for 12V systems (or 27.0 to 29.6 volts for 24V systems), regardless of engine RPM or electrical load. This critical function protects sensitive electronic components from damaging voltage spikes and ensures proper, efficient battery charging. Modern regulators often incorporate advanced features like temperature compensation and load response, making them more sophisticated than older designs. - Brushes: These are small, carbon-graphite blocks that ride on the slip rings to transfer the field current from the voltage regulator to the rotor windings. They are wear items, designed to gradually abrade over time. When brushes wear too short, they lose consistent contact with the slip rings, leading to intermittent or complete loss of charging.
- Slip Rings: These are two smooth, conductive copper rings mounted on the rotor shaft. The brushes make contact with these rings to transfer electrical current to the rotor windings. Over time, slip rings can become worn, grooved, or contaminated, which can reduce the effectiveness of the brushes and impair current transfer.
- Bearings: Typically, two precision ball bearings (one at the front, one at the rear) support the rotor shaft, allowing it to spin freely and smoothly at high RPMs. Bearings are crucial for the mechanical integrity of the alternator. Worn or seized bearings are a common cause of alternator noise and can lead to rotor damage or complete alternator failure.
- Housing (Front and Rear End Frames): These are the robust metal casings that enclose and protect all the internal components. They also provide the mounting points for the alternator to attach to the engine and facilitate heat dissipation through their finned design. The integrity of the housing is important for protecting the internal components from environmental factors and vibration.
- Pulley: Mounted on the front end of the rotor shaft, the pulley connects to the engine’s serpentine belt. It transfers the mechanical rotational energy from the engine’s crankshaft to the alternator, causing the rotor to spin. The pulley must be securely fastened and free from damage.
- Cooling Fan: Often integrated into the pulley or mounted internally, the cooling fan draws air through the alternator to dissipate the significant heat generated during operation. Efficient cooling is essential to prevent overheating of the windings, diodes, and regulator, which can lead to premature failure.
Common Alternator Problems and Their Symptoms
Alternator failures can manifest in various ways, often impacting the entire electrical system of a heavy-duty truck. Recognizing the symptoms early can help in timely diagnosis and repair, preventing further damage or complete vehicle breakdown. Understanding these signs is crucial for fleet managers and technicians working with Sinotruk (HOWO), Shacman, FAW, Foton, and Dongfeng trucks.
1. Battery Warning Light Illuminated
This is the most common and direct indicator of an alternator problem. The battery warning light (often shaped like a battery icon) on the dashboard illuminates when the vehicle’s charging system is not operating within its normal parameters. This could mean the alternator is not producing enough voltage to charge the battery, or it’s overcharging, or there’s a fault in the charging circuit. While it’s called a battery light, it actually indicates a charging system issue, not necessarily a bad battery itself. For FAW and Foton trucks, this light is a primary alert for electrical system anomalies that demand immediate attention.
2. Dim or Flickering Lights
If the headlights, dashboard lights, interior lights, or even trailer lights appear dim, flicker, or fluctuate erratically in brightness, it often indicates that the alternator is not consistently supplying enough power or maintaining a stable voltage. This can be particularly noticeable at idle or low engine RPMs when the alternator output is naturally lower. As the engine RPM increases, the lights might brighten slightly, only to dim again when the RPM drops. This symptom strongly suggests an inconsistent power supply from the alternator, possibly due to a failing voltage regulator, worn brushes, or a faulty rectifier diode.
3. Electrical Component Malfunctions
Modern heavy-duty trucks are heavily reliant on sophisticated electrical systems for everything from engine management and emissions control to comfort features and safety systems. A failing alternator can lead to various electrical component malfunctions, as these systems require a stable and sufficient voltage supply:
- Radio or infotainment system cutting out, behaving erratically, or experiencing static.
- Power windows operating slowly, intermittently, or failing to work altogether.
- Wipers moving sluggishly or stopping mid-cycle.
- HVAC system not blowing as strongly or consistently, or climate control acting erratically.
- Electronic control units (ECUs) logging fault codes due to insufficient or unstable voltage, potentially leading to engine performance issues or limp mode.
- Trailer brake controllers or other auxiliary systems malfunctioning.
These issues arise because the components are not receiving the stable, sufficient voltage they require to operate correctly, leading to unpredictable behavior or complete failure.
4. Dead Battery
While a dead battery can be caused by many factors (e.g., leaving lights on, old battery), if the battery repeatedly dies, especially after being fully charged, a failing alternator is a prime suspect. If the alternator is not charging the battery effectively, the battery will eventually drain, leaving the truck unable to start. This is often the most frustrating symptom, as it can leave a driver stranded. It’s crucial to differentiate between a battery that won’t hold a charge (a battery problem) and an alternator that isn’t providing one (a charging system problem). A quick jump start might get the truck running, but if the alternator isn't charging, the truck will soon die again once the battery's residual charge is depleted.
5. Growling, Whining, or Squealing Noises
Unusual noises emanating from the alternator can indicate mechanical problems within the unit:
- Growling or Whining Sound: Often increasing in pitch with engine RPM, this typically points to worn or failing bearings within the alternator. As the bearings degrade, they create friction and noise. If left unaddressed, this can lead to complete bearing seizure and potentially rotor damage.
- Squealing Sound: Especially noticeable during startup, acceleration, or when electrical loads are high, a squealing noise usually indicates a loose, worn, or glazed serpentine belt. It can also be caused by a seized alternator pulley or excessive drag on the alternator due to internal issues, preventing the belt from gripping properly.
Any persistent unusual noise from the alternator area should be investigated promptly to prevent more severe damage.
6. Burning Rubber or Electrical Smell
A burning smell can be a serious indicator of an alternator problem and should never be ignored:
- Burning Rubber Smell: This usually suggests a slipping or misaligned serpentine belt. A slipping belt generates heat from friction, causing the rubber smell. This can be caused by a seized alternator pulley, a faulty belt tensioner, or excessive drag on the alternator due to internal issues.
- Electrical Burning Smell (like burnt toast): This often points to an internal electrical short within the alternator, such as burnt windings in the stator or rotor, or an overheating rectifier. This is a critical issue that requires immediate attention to prevent further damage or, in extreme cases, a fire.
Diagnosing Truck Alternator Problems: A Step-by-Step Guide
Accurate diagnosis is the first and most critical step in repairing a truck alternator. A systematic approach will help pinpoint whether the alternator itself is faulty, or if the problem lies elsewhere in the charging system (e.g., battery, wiring, belt). For heavy-duty trucks, especially those from Sinotruk (HOWO), Shacman, FAW, Foton, and Dongfeng, a robust diagnostic process is essential to avoid unnecessary part replacement and ensure efficient repairs.
1. Initial Visual Inspection
- Check the Serpentine Belt: Begin by inspecting the serpentine belt that drives the alternator. Ensure it is properly tensioned (not too loose or too tight), free of cracks, fraying, glazing, or missing ribs. A loose or damaged belt can cause insufficient alternator output. Check for proper alignment of the belt and all pulleys (crankshaft, alternator, tensioner, idler). Misalignment can lead to rapid belt wear and bearing stress.
- Inspect Wiring and Connections: Thoroughly examine all wiring connected to the alternator. Look for loose, corroded, or damaged terminals at the alternator itself, the battery posts, and all ground points. Ensure the main power cable from the alternator to the battery is secure and free of damage. Corrosion can significantly impede current flow and cause voltage drops.
- Look for Physical Damage and Contamination: Inspect the alternator housing for any signs of physical damage, cracks, or excessive oil/fluid contamination. Oil or coolant leaks from other engine components can enter the alternator, damaging internal electrical parts. Check for any unusual noises coming from the alternator when the engine is running (after ensuring the belt is not slipping).
2. Battery Test
Before condemning the alternator, always ensure the battery is in good condition. A weak or failing battery can mimic alternator symptoms, as the charging system struggles to maintain its charge. Use a dedicated battery tester to check the battery’s voltage and cold cranking amps (CCA). A fully charged 12V battery should read around 12.6 volts (or 25.2 volts for a 24V system) with the engine off. If the battery is weak or fails the load test, charge it fully and retest. If it still fails, the battery itself might be the primary problem, and replacing it may resolve the charging issue. If the battery is old, it might not be able to hold a charge even if the alternator is working correctly.
3. Voltage Output Test (Engine Running)
This is the most direct way to assess alternator performance and is typically the first electrical test performed. You will need a digital multimeter.
- Connect Multimeter: Set your multimeter to DC voltage (VDC). Connect the positive lead to the positive battery terminal and the negative lead to the negative battery terminal.
- Start Engine: Start the truck and let it idle.
- Read Voltage (No Load): With the engine idling and no significant electrical loads on, the multimeter should read between 13.5 and 14.8 volts (or 27.0 to 29.6 volts for a 24V system). This indicates the alternator is charging the battery and supplying power to the system. A reading below this range suggests undercharging; a reading significantly above suggests overcharging.
- Increase Electrical Load: Turn on various electrical accessories (headlights, high beams, radio, HVAC fan on high, wipers, etc.) to simulate real-world operating conditions. The voltage should remain within the specified range. A significant drop below 13.0 volts (or 26.0V for 24V) indicates the alternator is struggling to keep up with the electrical demand, suggesting a weak alternator or a problem with its internal components.
- Increase Engine RPM: Briefly increase engine RPM to around 1500-2000. The voltage should remain stable within the specified range. If the voltage increases significantly above 14.8 volts (or 29.6V for 24V), it could indicate an overcharging issue, most commonly due to a faulty voltage regulator.
4. Amperage Output Test (Load Test)
For a more comprehensive test, an amperage output test (load test) measures the actual current (amps) the alternator is producing under load. This typically requires a specialized inductive amp clamp or an alternator test bench. This test is crucial for heavy-duty alternators, which have high amperage ratings, to ensure they can meet the truck's full electrical demands.
- Connect Amp Clamp: Connect an inductive amp clamp around the main output wire of the alternator (the thick cable going to the battery). Ensure the clamp is correctly oriented for current flow.
- Start Engine and Apply Load: Start the engine and apply a significant electrical load (e.g., turn on all lights, HVAC, trailer connections, etc.).
- Read Amperage: The alternator should be producing a significant amount of current, close to its rated output, depending on the electrical load. Compare this reading to the manufacturer’s specifications for your specific alternator model (e.g., for a **HOWO** or **Shacman** truck). A low amperage reading under load, even with acceptable voltage, indicates a weak alternator that cannot supply enough current.
5. Ripple Voltage Test (Diode Test)
A ripple voltage test helps diagnose a failing rectifier (diode bridge). This test requires an oscilloscope or a multimeter with an AC voltage setting (VAC). The presence of AC voltage in a DC charging system indicates a problem with the diodes.
- Connect Multimeter (AC Volts): Set your multimeter to AC voltage (VAC). Connect the leads to the battery terminals.
- Start Engine: Start the engine and let it idle.
- Read AC Voltage: A healthy charging system should show very little AC voltage (typically less than 0.5 AC volts). A higher AC voltage reading (e.g., 0.8 VAC or more) indicates that one or more diodes in the rectifier are failing, allowing AC current to leak into the DC system. This can cause flickering lights, premature battery failure, interference with sensitive electronics, and even damage to the ECU.
Component-Level Repair of Truck Alternator Parts
While a complete alternator replacement is often the go-to solution, many common alternator failures can be resolved by replacing individual components. This approach is not only more economical but also more sustainable, reducing waste. This section will guide you through the repair procedures for the most frequently failing parts of a heavy-duty truck alternator. Always ensure you have the correct replacement parts for your specific alternator model (e.g., for FAW, Foton, or Dongfeng trucks) and strictly follow all safety precautions, including disconnecting the battery before starting work.
1. Voltage Regulator Replacement
The voltage regulator is a common failure point. Symptoms include overcharging (voltage consistently above 14.8V/29.6V) or undercharging (voltage consistently below 13.5V/27.0V), or erratic voltage output. Replacing it can often restore proper charging.
Tools Needed: Screwdrivers (Phillips and flathead), small wrenches (metric/imperial depending on alternator), multimeter, possibly a soldering iron and desoldering pump (if wires are soldered), clean rags, parts tray.
Procedure:
- Disconnect Battery: Always disconnect the negative battery terminal first to prevent electrical shorts and injury.
- Remove Alternator: In most cases, the alternator will need to be removed from the truck to access the voltage regulator. This involves:
- Disconnecting the main battery cable (B+ terminal) and any other electrical connectors (field wire, sense wire).
- Loosening the tensioner and removing the serpentine belt.
- Unbolting the alternator from its mounting brackets.
- Carefully removing the alternator from the engine bay.
- Disassemble Alternator Rear Housing: The voltage regulator is typically located at the rear of the alternator, often integrated with the brush holder. Remove the rear cover or the necessary bolts/screws to access it. Note the orientation of components.
- Disconnect Wires: Carefully disconnect the wires leading to the voltage regulator. These may be bolted, clipped, or soldered. Take clear photos before disconnecting to aid reassembly. If soldered, use a soldering iron and desoldering pump to remove the old solder.
- Remove Old Regulator: Unbolt or unscrew the old voltage regulator from its mounting points. Pay attention to any insulating washers or spacers.
- Install New Regulator: Install the new voltage regulator, ensuring all connections are secure and properly insulated. If soldering is required, ensure clean, strong solder joints that are free of cold solder or bridges. Ensure any insulating washers are correctly placed.
- Reassemble and Test: Reassemble the alternator, ensuring all covers and fasteners are properly secured. Reinstall it in the truck, reconnect the serpentine belt (tensioning it correctly), reconnect all electrical wires, and finally, reconnect the negative battery terminal. Perform the voltage output test (as described in the diagnostic section) to confirm proper operation.
2. Brush Replacement
Brushes are wear items and will eventually wear down, leading to intermittent or no charging. Symptoms include the battery light illuminating, dim lights, or no charging output. Worn brushes often cause intermittent charging as they lose consistent contact with the slip rings.
Tools Needed: Screwdrivers, small wrenches, possibly a soldering iron and desoldering pump, fine-grit sandpaper or emery cloth, clean rags.
Procedure:
- Disconnect Battery and Remove Alternator: Follow steps 1 and 2 from the voltage regulator replacement.
- Access Brush Holder: The brushes are usually housed in a brush holder assembly, often integrated with or located near the voltage regulator at the rear of the alternator. You may need to remove the rear cover or the voltage regulator itself to access the brush holder.
- Remove Old Brushes/Holder: Unbolt or unscrew the brush holder. The brushes themselves are typically spring-loaded and can be removed from the holder. In some designs, the entire brush holder assembly is replaced as a unit. If the brushes are soldered, desolder them.
- Inspect Slip Rings: While the brushes are out, inspect the slip rings on the rotor. They should be smooth, clean, and have minimal grooving. If they are deeply grooved, excessively worn, or contaminated, they may need to be cleaned with fine-grit sandpaper (e.g., 400-600 grit) or emery cloth. If wear is severe, the rotor may need to be turned on a lathe or replaced.
- Install New Brushes/Holder: Install the new brushes or brush holder. Ensure the brushes slide freely in their guides and make good, firm contact with the slip rings. Some new brush holders come with a small plastic pin or wire to hold the brushes retracted during installation, which is removed after the alternator is reassembled and the rotor is in place. If soldering, ensure strong, clean connections.
- Reassemble and Test: Reassemble the alternator, reinstall it, reconnect the battery, and test the charging system (voltage output test) to confirm proper operation. Listen for any unusual noises.
3. Rectifier (Diode Bridge) Replacement
A failing rectifier (diode bridge) can cause AC ripple voltage, undercharging, or even overcharging if a diode shorts. Symptoms include flickering lights, premature battery failure, or a higher than normal AC voltage reading at the battery terminals. This component is crucial for converting AC to DC.
Tools Needed: Screwdrivers, wrenches, soldering iron, desoldering pump, heat sink compound, clean rags, parts tray.
Procedure:
- Disconnect Battery and Remove Alternator: Follow steps 1 and 2 from the voltage regulator replacement.
- Disassemble Alternator Completely: The rectifier is usually located inside the alternator, often attached to the rear end frame. You will likely need to separate the front and rear halves of the alternator housing to access it. This involves removing the long through-bolts that hold the two halves together and carefully prying them apart. Be careful not to damage the stator windings.
- Disconnect Stator Wires: The stator wires are typically soldered to the rectifier assembly. Carefully desolder these connections. Note their positions.
- Remove Old Rectifier: Unbolt or unscrew the old rectifier from its mounting points. Pay close attention to how it is mounted and if any insulating washers or heat sink compound were used between the rectifier and the housing. These are critical for proper heat dissipation.
- Install New Rectifier: Apply a thin, even layer of heat sink compound (if applicable and recommended) to the mounting surface of the new rectifier to ensure efficient heat transfer to the alternator housing. Install the new rectifier, ensuring all connections are properly made and soldered. Resolder the stator wires securely, ensuring good electrical contact and no short circuits.
- Reassemble and Test: Carefully reassemble the alternator, ensuring all components are correctly aligned and the stator windings are not pinched. Reinstall the alternator, reconnect the serpentine belt, reconnect the battery, and perform the voltage output and ripple voltage tests to confirm proper operation.
4. Bearing Replacement
Worn bearings are a common cause of alternator noise (growling, whining) and can eventually lead to rotor damage or complete alternator seizure. Replacing bearings requires specialized tools and a careful approach to avoid damaging other components.
Tools Needed: Socket set, wrenches, bearing puller, bearing press (or suitable substitutes like a large socket and vice), snap ring pliers, hammer, punches, vice, clean rags, new bearings (front and rear).
Procedure:
- Disconnect Battery and Remove Alternator: Follow steps 1 and 2 from the voltage regulator replacement.
- Disassemble Alternator Completely: You will need to fully disassemble the alternator, separating the front and rear housings, removing the rotor, stator, rectifier, and voltage regulator. This is often the most involved part of the repair.
- Remove Old Bearings:
- Rear Bearing: The rear bearing is typically pressed onto the rotor shaft. Use a bearing puller to carefully remove it without damaging the shaft or slip rings.
- Front Bearing: The front bearing is usually pressed into the front housing and may be secured by a snap ring. Remove the snap ring (if present) with snap ring pliers. Use a punch and hammer (or a press) to carefully tap out the front bearing from the front housing. Ensure you support the housing properly to avoid damage.
- Clean and Inspect: Thoroughly clean all components, especially the rotor shaft and bearing bores in the housings. Inspect the rotor shaft for any damage, wear, or scoring. Inspect the housings for cracks or damage.
- Install New Bearings: Carefully press the new bearings into place. Never hammer directly on the inner race of a bearing, as this can damage it. Use a bearing press or a socket that matches the outer race diameter and gently tap it into the housing or onto the shaft. For the front bearing, reinstall the snap ring if applicable. Ensure both bearings are fully seated.
- Reassemble and Test: Reassemble the alternator, ensuring all components are correctly aligned and all fasteners are torqued to specification. Pay close attention to the alignment of the rotor within the stator and the proper seating of the rectifier and voltage regulator. Reinstall the alternator, reconnect the serpentine belt, reconnect the battery, and perform the voltage output test. Listen carefully for any unusual noises, which would indicate improper bearing installation or other issues.
5. Common Pitfalls and Troubleshooting During Alternator Repair
Even with a detailed guide, alternator repair can present challenges. Here are some common pitfalls and troubleshooting tips:
- Difficulty in Disassembly/Reassembly: Heavy-duty alternators can be complex. Take photos at every step of disassembly. Use a parts tray to organize screws and small components. If a part doesn't fit, do not force it; recheck your steps and the service manual.
- Damaged Wiring/Connectors: Be extremely careful when disconnecting and reconnecting wires. Old plastic connectors can be brittle. Inspect wires for fraying or damage, and repair as necessary.
- Contamination: Keep the alternator's internal components clean during repair. Dirt, grease, or metal shavings can cause premature failure of new parts.
- Incorrect Bearing Installation: Improperly installed bearings (e.g., hammered on the inner race) will fail quickly and can damage the rotor shaft. Always use appropriate pressing tools.
- Persistent Charging Issues After Repair: If the alternator still doesn't charge correctly after replacing components, re-verify all electrical connections, check the serpentine belt tension, and re-perform all diagnostic tests (voltage, amperage, ripple). The issue might be a different component than initially suspected, or a new part could be faulty.
- Noise After Repair: If there's new noise, it could indicate an improperly installed bearing, a misaligned pulley, or a loose component inside the alternator.
- Overheating: If the alternator runs excessively hot after repair, ensure the cooling fan is installed correctly and not obstructed. Check for any internal shorts or excessive current draw.
Advanced Diagnostics and Specialized Tools
For complex or intermittent alternator issues in heavy-duty trucks, especially those with sophisticated electrical systems like modern Dongfeng or Foton models, advanced diagnostic tools and techniques may be necessary.
1. Oscilloscope Analysis
An oscilloscope provides a visual representation of the alternator's output waveform. This can reveal subtle issues that a multimeter might miss, such as:
- Diode Pattern Analysis: A healthy rectifier will produce a smooth DC waveform with minimal ripple. A
jagged or irregular waveform indicates a failing diode or a problem with the stator windings. - Voltage Spikes and Drops: An oscilloscope can capture transient voltage spikes or drops that might not be visible on a standard multimeter, helping to diagnose intermittent issues with the voltage regulator or wiring.
- Load Response: Observing the alternator's voltage and current output under varying loads and RPMs can provide insights into its overall health and ability to respond to electrical demands.
2. Alternator Test Bench
For a definitive diagnosis and to verify repairs, a professional alternator test bench is invaluable. This specialized equipment can:
- Simulate Real-World Conditions: Test the alternator under various RPMs and electrical loads, mimicking actual truck operation.
- Measure Full Output: Accurately measure the alternator's maximum voltage and amperage output.
- Perform Diode and Regulator Tests: Conduct precise tests on the rectifier and voltage regulator to identify subtle failures.
- Identify Noise and Vibration: Detect mechanical issues like worn bearings or rotor imbalance.
While not practical for every workshop, access to a test bench (e.g., through a specialized repair shop or parts supplier) can save significant diagnostic time and ensure the repaired alternator meets specifications before reinstallation.
3. Thermal Imaging
Thermal imaging cameras can be used to identify hot spots on the alternator, which can indicate areas of excessive resistance, short circuits, or mechanical friction. Overheating in specific areas (e.g., rectifier, windings, bearings) can point directly to the failing component.
Specific Considerations for Chinese Heavy-Duty Trucks
When dealing with alternators for Chinese heavy-duty trucks like Sinotruk (HOWO), Shacman, FAW (Jiefang), Foton, and Dongfeng, there are a few specific considerations:
- Part Availability and Sourcing: While these trucks are robust, finding genuine or high-quality aftermarket replacement parts for individual alternator components can sometimes be challenging in certain markets. Sourcing from a specialized exporter, like ourselves, ensures access to a wide range of reliable parts that meet the original specifications.
- Variations in Design: While the fundamental principles of alternators are universal, there can be variations in design, mounting, and electrical connections between different models and manufacturers. Always cross-reference part numbers and consult the specific service manual for the truck in question.
- Electrical System Voltage: Many heavy-duty trucks, including some Chinese models, operate on a 24-volt electrical system rather than the more common 12-volt system found in passenger vehicles. Ensure all diagnostic tools and replacement components are compatible with the truck's specific voltage.
- Environmental Adaptations: Trucks operating in harsh environments (e.g., dusty construction sites, extreme temperatures) may have alternators with enhanced sealing or cooling features. When repairing, ensure these features are maintained or upgraded.
Conclusion: Empowering Your Fleet with Knowledge and Quality Parts
The alternator is a critical, yet often overlooked, component in the heavy-duty truck electrical system. Understanding its function, recognizing the signs of failure, and knowing how to diagnose and repair its individual parts can significantly impact the operational efficiency and cost-effectiveness of your fleet. By embracing component-level repair, you not only save on replacement costs but also contribute to a more sustainable maintenance practice.
For owners and operators of Sinotruk (HOWO), Shacman, FAW, Foton, and Dongfeng trucks, access to accurate technical information and high-quality replacement parts is paramount. As a specialized exporter, we are dedicated to providing both. Our commitment to quality ensures that every part, from a voltage regulator to a complete alternator assembly, meets the rigorous demands of heavy-duty applications. By leveraging our expertise and reliable supply chain, you can ensure your trucks remain on the road, performing optimally, and delivering consistent results.
Remember, proactive maintenance, thorough diagnostics, and the use of correct, high-quality parts are the pillars of a healthy electrical system. Empower yourself with this knowledge, and let us be your trusted partner in keeping your heavy-duty trucks running efficiently and reliably for years to come.
Preventive Maintenance for Alternator Longevity
Proactive maintenance is key to extending the life of your heavy-duty truck alternators and preventing unexpected breakdowns. Implementing a robust maintenance schedule can significantly reduce downtime and repair expenses for your fleet, especially for trucks from Sinotruk (HOWO), Shacman, FAW (Jiefang), Foton, and Dongfeng. By addressing potential issues before they escalate, you can ensure consistent electrical system performance and avoid costly roadside repairs.
1. Regular Belt Inspection and Maintenance
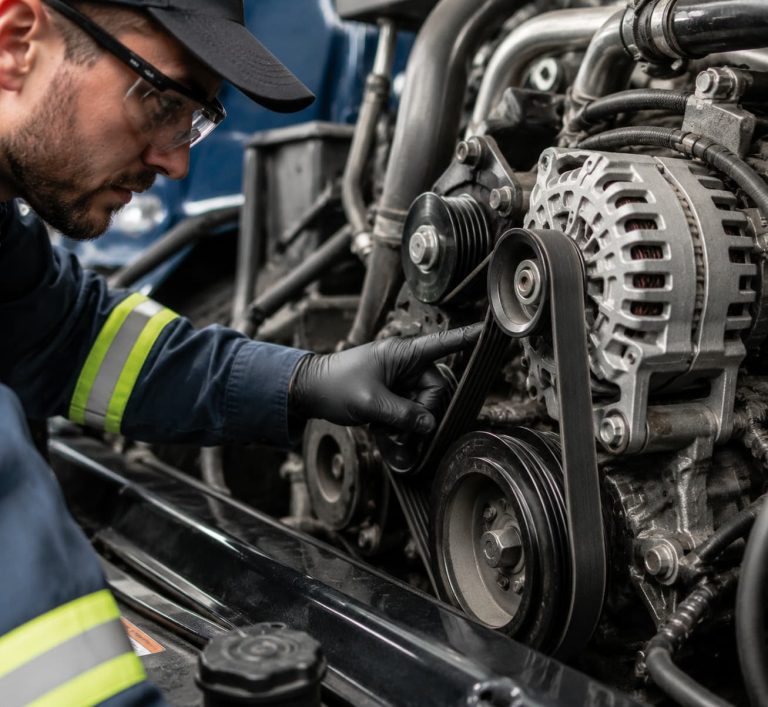
- Check Belt Tension: Ensure the serpentine belt that drives the alternator is always at the correct tension. A loose belt can slip, causing insufficient alternator output and generating excessive heat and wear on the belt and pulleys. An overly tight belt can put excessive stress on alternator bearings, leading to premature failure. Refer to your truck’s service manual for specific tensioning procedures and specifications.
- Inspect Belt Condition: Regularly check the belt for cracks, fraying, glazing (a shiny, hardened surface), or missing ribs. These are signs of wear that indicate the belt needs replacement. A worn belt can slip even if properly tensioned. Replace the belt at recommended intervals or if any signs of wear are observed.
- Pulley Alignment: Ensure all pulleys (crankshaft, alternator, tensioner, idler) are properly aligned. Misalignment can cause rapid belt wear, excessive noise, and premature bearing failure in the alternator and other accessories.
2. Battery Health Management
- Regular Battery Testing: Periodically test the battery’s voltage and cold cranking amps (CCA) to ensure it is in good health and can hold a charge. A weak or failing battery puts extra strain on the alternator, forcing it to work harder and potentially shortening its lifespan.
- Clean Battery Terminals: Keep battery terminals clean and free of corrosion. Corrosion acts as an insulator, impeding current flow and affecting the charging system’s efficiency. Use a wire brush and battery terminal cleaner for this task.
- Proper Battery Size and Type: Ensure the battery (or battery bank) is correctly sized and of the appropriate type for the truck’s electrical demands. An undersized battery will constantly be undercharged, overworking the alternator.
3. Wiring and Connection Integrity
- Inspect All Connections: Regularly check all electrical connections to the alternator, battery, and ground points for tightness and corrosion. Loose or corroded connections can cause voltage drops, intermittent charging, and generate heat. Clean any corroded terminals and apply dielectric grease for protection.
- Inspect Wiring Harnesses: Look for any signs of chafing, cuts, cracks, or damage to the alternator wiring harness. Damaged wiring can lead to shorts, open circuits, or intermittent electrical problems. Repair or replace damaged wiring promptly using appropriate gauge wire and connectors.
4. Monitor Charging System Performance
- Dashboard Gauges: Train drivers to pay attention to the voltmeter or battery warning light on the dashboard. Any abnormal readings (e.g., voltage consistently too high or too low) or illuminated warning lights should be reported immediately for investigation.
- Diagnostic Scans: Utilize diagnostic tools during routine service to monitor charging system voltage and current output, and check for any related diagnostic trouble codes (DTCs). This can provide early warnings of impending alternator issues before they lead to a breakdown.
5. Keep Alternator Clean and Ventilated
-
Periodically clean the exterior of the alternator to remove dirt, dust, oil, and debris. Excessive buildup can impede cooling and lead to overheating of internal components. Ensure that the cooling vents on the alternator housing are clear and unobstructed to allow for proper airflow.
6. Avoid Overloading the Electrical System
-
While heavy-duty alternators are designed for high output, excessive electrical loads (e.g., numerous aftermarket accessories, powerful inverters) can put undue strain on the alternator, forcing it to operate at its maximum capacity for extended periods, leading to premature failure. Ensure any additional electrical components are properly installed and do not exceed the alternator’s rated capacity. Consider installing additional batteries or a secondary alternator if electrical demands are consistently very high.
The Advantage of Sourcing from a Specialized Exporter
For heavy-duty truck owners and fleet managers globally, securing reliable, high-quality replacement parts is a cornerstone of operational success. As a specialized exporter of Chinese heavy-duty truck components, we offer a distinct advantage in providing alternators and related electrical system parts for prominent brands like Sinotruk (HOWO), Shacman, FAW (Jiefang), Foton, and Dongfeng. Our commitment extends beyond merely supplying parts; we provide a comprehensive service designed to meet the rigorous demands of the international heavy-duty trucking industry.
We pride ourselves on offering products that adhere to stringent quality standards, ensuring that every alternator or component you receive is built for durability, precise fitment, and optimal performance. Our extensive inventory means that you can find the exact part you need, minimizing search time and reducing vehicle downtime. Furthermore, our efficient global logistics network guarantees prompt and reliable delivery to your location, anywhere in the world. We understand that in the heavy-duty sector, time is money, and our streamlined supply chain is designed to keep your operations moving.
Beyond product supply, we offer expert technical support, assisting with part identification, providing detailed specifications, and offering troubleshooting advice. This holistic approach ensures that you not only receive the correct part but also have the knowledge to install and maintain it effectively. Explore our Product Brand Page to see our full range of offerings tailored for specific truck manufacturers, and delve into our Product System Page for components categorized by vehicle system. Our Cooperative Cases section showcases our successful partnerships and our unwavering dedication to client satisfaction and long-term collaboration. For any direct inquiries, technical consultations, or to discuss your specific needs, please do not hesitate to Contact Us. Learn more about our company philosophy, our dedication to quality, and our mission to support global heavy-duty trucking operations on our About Us page, or visit our Homepage for a complete overview of our services and products.
Frequently Asked Questions (FAQ) about Truck Alternator Repair
Q1: What are the most common signs of a failing truck alternator?
A1: Common signs include the battery warning light illuminating on the dashboard, dim or flickering headlights and interior lights, electrical accessories malfunctioning, a dead battery, and unusual noises (growling, whining, or squealing) coming from the alternator. A burning rubber or electrical smell can also indicate a serious issue.
Q2: Can I repair an alternator myself, or should I replace the whole unit?
A2: Many alternator failures can be resolved by replacing individual components like the voltage regulator, brushes, or rectifier, which is often more economical than replacing the entire unit. However, this requires specific tools, technical knowledge, and careful attention to detail. If you lack the experience, it's best to consult a professional or consider a new/remanufactured unit.
Q3: How do I test if my truck's alternator is charging properly?
A3: You can perform a simple voltage output test using a multimeter. With the engine running, connect the multimeter to the multimeter to the battery terminals. A healthy charging system should show a reading between 13.5 and 14.8 volts (or 27.0-29.6V for 24V systems). If the voltage is consistently outside this range, the alternator or voltage regulator may be faulty.
Q4: What causes alternator brushes to wear out?
A4: Alternator brushes are made of carbon-graphite and are designed to wear down over time as they make continuous contact with the rotating slip rings. This wear is a normal part of their operation. Factors like high mileage, excessive heat, and contamination can accelerate brush wear, leading to poor electrical contact and reduced charging output.
Q5: What is the rectifier's role, and what happens if it fails?
A5: The rectifier (or diode bridge) converts the alternating current (AC) produced by the alternator's stator into direct current (DC) that the truck's electrical system and battery require. If the rectifier fails (e.g., a diode shorts or opens), it can lead to undercharging, overcharging, or the presence of AC ripple voltage in the DC system. This can cause flickering lights, premature battery failure, and interference with sensitive electronics.
Q6: How can I prolong the life of my truck's alternator?
A6: Regular maintenance is key. This includes ensuring the serpentine belt is properly tensioned and in good condition, maintaining battery health, keeping electrical connections clean and tight, avoiding overloading the electrical system, and promptly addressing any warning lights or unusual noises. For **HOWO**, **Shacman**, and **FAW** trucks, using high-quality replacement parts from reputable suppliers is also crucial.
Q7: Is it possible for an alternator to overcharge the battery?
A7: Yes, an alternator can overcharge the battery if its voltage regulator fails and allows too much voltage to be sent to the battery. Overcharging can severely damage the battery, causing it to overheat, swell, and potentially leak or even explode. It can also damage other electrical components in the truck. Symptoms include a strong sulfur smell, battery swelling, or consistently high voltage readings.
Q8: What are slip rings, and why are they important?
A8: Slip rings are copper rings mounted on the rotor shaft of the alternator. They provide a continuous electrical connection for the carbon brushes to transfer the small field current to the rotor windings, which creates the magnetic field necessary for electricity generation. Smooth, clean slip rings are essential for efficient current transfer and brush longevity. Excessive wear or contamination on the slip rings can lead to poor brush contact and reduced alternator performance.


