In the demanding world of heavy-duty trucking, engine reliability is paramount. The engine oil cooler, a seemingly unassuming component, plays a critical role in maintaining optimal engine performance and extending its lifespan. For fleet operators and owners of robust Chinese trucks such as Sinotruk (HOWO), Shacman, FAW (Jiefang), Foton, and Dongfeng, understanding the intricacies of the oil cooler—its function, common problems, underlying causes, and effective repair strategies—is essential. A compromised oil cooler can lead to severe engine damage, from accelerated wear to catastrophic failure, directly impacting operational costs and vehicle downtime. As a specialized exporter of high-quality heavy-duty truck parts, we are committed to providing comprehensive knowledge to help you diagnose, address, and prevent these issues, ensuring your fleet operates efficiently and reliably.
Understanding the Truck Oil Cooler: A Vital Component
The engine oil cooler is an integral part of a heavy-duty truck’s lubrication system, designed to maintain engine oil at its optimal operating temperature. While engine oil lubricates moving parts, it also absorbs a significant amount of heat generated by friction and combustion. Without effective cooling, this heat can degrade the oil, reducing its lubricating properties and leading to premature engine wear.
Function and Importance
The primary functions of the oil cooler include:
- Heat Dissipation: The oil cooler transfers excess heat from the engine oil to a cooler medium, typically engine coolant or ambient air. This prevents the oil from overheating and breaking down.
- Maintaining Oil Viscosity: By keeping oil within its optimal temperature range, the cooler helps maintain the oil’s designed viscosity. Overheated oil becomes too thin, reducing its ability to lubricate and protect engine components. Conversely, excessively cold oil can be too thick, leading to increased pumping losses and reduced flow to critical areas during cold starts.
- Preventing Oil Degradation: High temperatures accelerate the oxidation and breakdown of engine oil, leading to sludge formation, varnish deposits, and reduced effectiveness of vital additives. An efficient oil cooler prolongs the life of the engine oil, ensuring it performs its protective functions for longer.
- Supporting Engine Longevity: Optimal oil temperature ensures consistent lubrication, minimizing friction and wear on critical engine parts like bearings, pistons, camshafts, and turbocharger components. This directly contributes to extending the overall service life of the engine and reducing the frequency of major overhauls.
For heavy-duty trucks, which often operate under sustained high loads, prolonged idling, and in varying environmental conditions (from scorching deserts to freezing tundras), the oil cooler is subjected to immense thermal and pressure stresses. Its continuous, reliable operation is crucial for preventing costly engine repairs and ensuring the vehicle’s operational readiness and compliance with emission standards.
Types of Oil Coolers in Heavy-Duty Trucks
Heavy-duty trucks typically employ one of two main types of oil coolers, each with distinct advantages and applications:
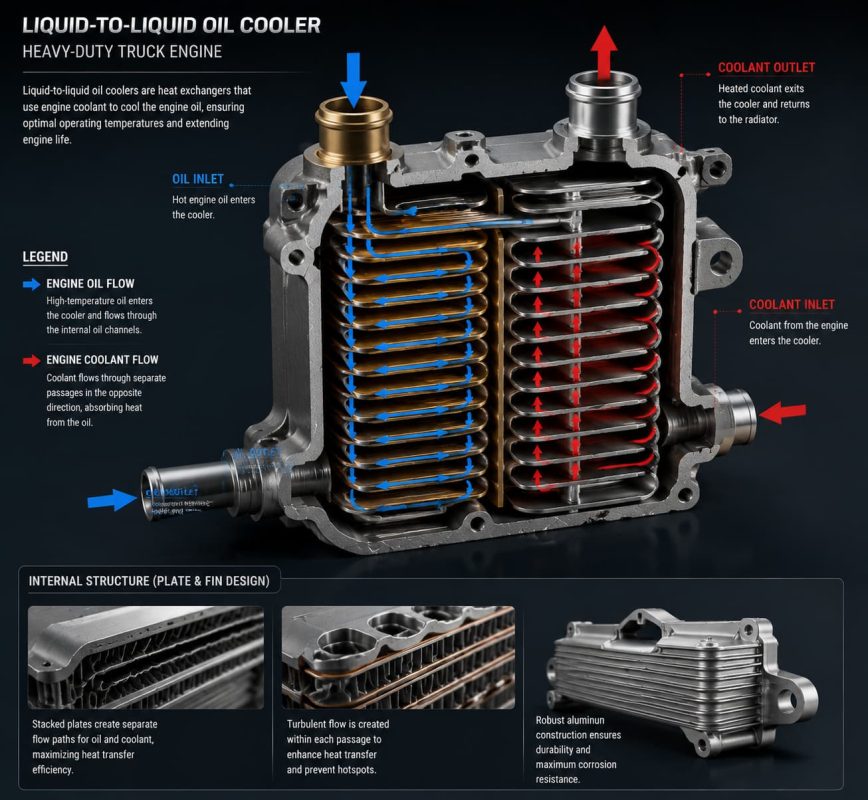
- Liquid-to-Liquid (Coolant-to-Oil) Coolers: These are the most common type in modern heavy-duty engines, especially in Chinese trucks like Sinotruk (HOWO), Shacman, FAW, Foton, and Dongfeng. They consist of a series of plates or tubes (often a plate-type heat exchanger) through which engine oil flows on one side and engine coolant flows on the other. Heat is efficiently exchanged directly between the hotter oil and the cooler engine coolant. These coolers are often integrated into the engine block, mounted beneath the oil filter housing, or located nearby, utilizing the engine’s existing cooling system. A key advantage is their ability to help the oil warm up faster during cold starts by transferring heat from the already warming coolant to the oil, improving fuel efficiency and reducing wear during the critical warm-up phase.
- Air-to-Liquid (Air-to-Oil) Coolers: Less common as primary coolers in modern heavy-duty trucks but sometimes used as auxiliary coolers for transmissions, power steering, or in older engine designs. These resemble small radiators, typically mounted in front of the main engine radiator or in the airflow path. Engine oil flows through fins and tubes, and heat is dissipated directly into the ambient air. They are effective in applications where additional cooling capacity is needed or where a separate cooling circuit is preferred. However, they can be more susceptible to damage from road debris and their efficiency is dependent on ambient air temperature.
The design and material of the oil cooler, whether a compact plate-type or a more traditional tube-and-fin, are meticulously engineered to withstand the harsh operating conditions of heavy-duty truck engines, including high pressures, corrosive fluids, and constant vibration. However, even these robust components are not immune to failure, and understanding their vulnerabilities is key to effective maintenance.
Common Problems Affecting Truck Oil Coolers
Despite their robust construction, oil coolers in heavy-duty trucks are susceptible to several common problems that can severely impact engine health and lead to costly repairs. Early identification of these issues is key to preventing catastrophic engine damage and maintaining fleet operational efficiency.
1. Internal Leaks (Oil-Coolant Mixing)
This is arguably the most serious and common problem, particularly with liquid-to-liquid oil coolers. An internal leak occurs when the internal passages separating the oil and coolant fail, allowing the two fluids to mix. This can happen due to:
- Corrosion: Over time, especially with neglected coolant maintenance, the use of incompatible coolants, or the presence of electrolysis, the internal metal surfaces of the cooler can corrode. This leads to the formation of pinholes, cracks, or weakened areas in the thin walls separating the oil and coolant passages.
- Thermal Stress and Fatigue: Constant exposure to extreme temperature differentials (hot oil on one side, cooler coolant on the other) and rapid temperature changes (thermal cycling) can cause the cooler’s internal structure, particularly the brazed joints or thin plates, to fatigue and crack over time. This is a common failure mode in high-mileage or hard-working engines.
- Pressure Differentials: While both oil and coolant systems operate under pressure, a significant and sustained pressure differential across a weakened internal barrier can cause it to rupture. If the oil pressure is significantly higher than the coolant pressure, oil can be forced into the coolant system. Conversely, if coolant pressure is higher (e.g., due to a faulty radiator cap or head gasket issue), coolant can enter the oil.
- Manufacturing Defects: Although less common with reputable brands, inherent flaws in the manufacturing process, such as poor brazing, thin material sections, or improper assembly, can create weak points that lead to premature internal leaks.
Symptoms: The most tell-tale sign is the appearance of a milky, frothy, or chocolate-milk-like substance in the engine oil (often visible on the dipstick or inside the oil filler cap) or an oily slick, sludge, or greasy film in the coolant reservoir. This mixture is highly detrimental to both systems: oil loses its lubricating properties, leading to accelerated wear on bearings, camshafts, and other critical components, while coolant loses its heat transfer capabilities, causing severe overheating. This can lead to rapid engine wear, bearing failure, and ultimately, catastrophic engine failure. For Sinotruk (HOWO) and Shacman trucks, which often operate in demanding conditions, internal leaks can quickly escalate into major issues, necessitating immediate attention.
2. External Leaks
External leaks are more visible but can still lead to significant coolant or oil loss if not addressed promptly. These typically occur due to:
- Damaged Gaskets or O-rings: The seals (gaskets or O-rings) between the oil cooler and the engine block, or between the cooler and its adapter/housing, are wear items. They can degrade, harden, shrink, or crack over time due to prolonged exposure to heat, pressure, and chemical attack from fluids. Once compromised, they lose their sealing integrity.
- Cracked Cooler Housing: Physical impact (e.g., road debris for air-to-oil coolers), extreme thermal cycling, or material fatigue can cause cracks in the cooler housing itself, allowing oil or coolant to escape externally. These cracks are often visible upon inspection.
- Loose Connections: Mounting bolts, hose connections, or threaded fittings can loosen over time due to constant engine vibration and thermal expansion/contraction. This reduces the clamping force on seals, leading to external leaks.
- Corrosion: External corrosion, often exacerbated by road salt, moisture, or chemical spills, can compromise the integrity of the cooler’s outer casing, leading to leaks.
Symptoms: Visible oil or coolant puddles under the truck, streaks of fluid on the engine block around the cooler, a noticeable drop in oil or coolant levels, and a burning smell if fluids drip onto hot exhaust components. While less immediately catastrophic than internal leaks, persistent external leaks can lead to insufficient lubrication, engine overheating, environmental contamination, and potential fire hazards.
3. Restricted Flow / Clogging
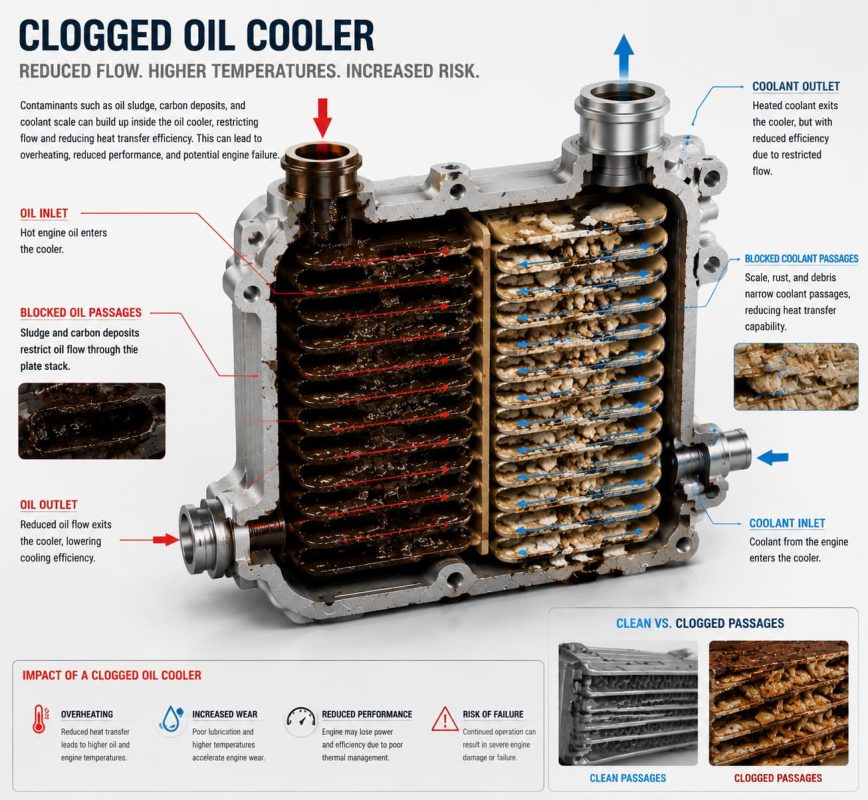
The intricate internal passages within the oil cooler, whether for oil or coolant, can become restricted or completely clogged, impeding the efficient flow of fluids and reducing heat transfer. This can be caused by:
- Sludge Buildup: Degraded engine oil, especially from extended oil change intervals, the use of incorrect oil types, or prolonged overheating, can form thick sludge and varnish deposits that accumulate in the oil passages of the cooler. This significantly reduces the cooler’s ability to dissipate heat from the oil.
- Coolant Contamination: Rust, scale, mineral deposits from hard water, or debris from a neglected cooling system (e.g., deteriorating hoses, failed water pump impeller) can clog the coolant passages of the cooler. This restricts coolant flow and reduces the cooler’s efficiency.
- Debris from Engine Failure: In some cases, metallic debris or carbon particles from a failing engine component (e.g., turbocharger, bearings) can circulate through the oil system and become trapped within the fine passages of the oil cooler, leading to severe blockages.
Symptoms: Elevated engine oil temperature (often indicated by a dashboard gauge or diagnostic scanner), engine overheating (if coolant flow is restricted), reduced engine performance, and potentially a
drop in oil pressure if the restriction is severe. A clogged oil cooler can lead to oil starvation in critical engine components, accelerating wear and potentially causing catastrophic engine failure. This is a particular concern for FAW and Foton trucks that might be subjected to varying fuel and oil qualities, or operate in environments with high dust and debris, which can accelerate oil degradation.
4. Over-cooling of Oil
While less common and often less immediately damaging than overheating, an oil cooler can sometimes be too efficient or the engine thermostat can fail, leading to the engine oil running consistently too cold. This can happen if the oil cooler is oversized for the application, if the engine operates in extremely cold climates without proper winterization (e.g., a winter front or block heater), or if the engine thermostat is stuck open, causing the coolant to remain too cold. Modern engines are designed to operate within a specific temperature range for optimal efficiency and longevity.
Symptoms: Engine oil not reaching optimal operating temperature (often indicated by a dashboard gauge reading below normal), reduced fuel efficiency (as the ECU keeps the fuel mixture richer to compensate for a cold engine), increased emissions, and accelerated sludge formation due to moisture and combustion byproducts not burning off from the oil. Persistent under-cooling can also lead to increased engine wear over the long term. While less critical for immediate breakdown, it impacts operational efficiency and engine lifespan.
Diagnosing Truck Oil Cooler Problems: A Systematic Approach
Accurate diagnosis is crucial for identifying oil cooler issues and preventing further engine damage. A systematic approach involving visual inspections, fluid analysis, and pressure testing is often required to pinpoint the exact nature and location of the problem.
1. Visual Inspection
- Check for External Leaks: Begin with a thorough visual inspection of the oil cooler and its connections. Look for any visible signs of oil or coolant leaks, which can manifest as fresh fluid, dried residue, or staining on the cooler body, hoses, and surrounding engine components. Pay close attention to the mating surfaces where the cooler attaches to the engine block or adapter, and around hose connections. Use a powerful flashlight to illuminate hard-to-reach areas.
- Examine Oil and Coolant: This is a critical and often definitive step for internal leaks. Remove the engine oil dipstick and check the oil for a milky, frothy, or discolored appearance (often described as
chocolate milk”), which indicates coolant contamination. Open the radiator cap (when the engine is completely cool) and inspect the coolant for oil slicks, sludge, or a greasy film. Also, check the inside of the oil filler cap for milky residue, which is a strong indicator of oil-coolant mixing. For Sinotruk (HOWO) and Shacman trucks, regularly checking these fluid conditions is a simple yet effective preventive measure. - Inspect Hoses and Connections: Check all oil and coolant lines connected to the cooler for cracks, bulges, hardening, or softening. Ensure all hose clamps are tight and properly secured. Loose or damaged hoses and connections are common sources of external leaks.
2. Cooling System Pressure Test [1]
A cooling system pressure test is an invaluable tool for identifying internal leaks in a liquid-to-liquid oil cooler. With the engine completely cool, attach a cooling system pressure tester to the radiator neck and pressurize the cooling system to its specified operating pressure (usually indicated on the radiator cap). Monitor the pressure gauge for any drops. A consistent drop in pressure over a period (e.g., 15-30 minutes) indicates a leak somewhere in the system. While the system is pressurized, carefully observe the oil cooler for any external leaks. More importantly, check the engine oil dipstick and oil filler cap for signs of coolant entering the oil. If coolant is entering the oil, the pressure test will often push coolant into the oil pan, which can be seen as an increase in oil level or a change in oil appearance. This test is particularly effective for detecting hairline cracks or gasket failures that only leak under pressure.
3. Oil System Pressure Test
In some cases, an oil system pressure test can be performed to check the integrity of the oil cooler. This involves applying pressure to the oil side of the cooler and checking for leaks into the coolant system or externally. This test is more complex and usually requires specialized tools and expertise. It can help differentiate between an oil cooler failure and other sources of oil leaks or pressure issues. For example, if oil is leaking into the coolant, pressurizing the oil system might force more oil into the coolant, confirming the cooler as the source.
4. Oil Analysis
Sending a sample of engine oil for professional laboratory analysis can provide definitive proof of coolant contamination, even in minute quantities that might not be visible to the naked eye. The analysis will detect the presence of glycol (a primary component of antifreeze) in the oil, as well as other contaminants and wear metals. This is a highly reliable diagnostic method, especially for subtle internal leaks or when visual signs are ambiguous. It can also provide insights into the overall health of the engine and other potential issues.
5. Temperature Monitoring and Diagnostics
- Engine Oil Temperature Gauge: Monitor the engine oil temperature gauge on the dashboard or via an OBD-II scanner. Consistently high oil temperatures, especially under normal operating conditions or after a recent oil change, can indicate a restricted or failing oil cooler. Modern heavy-duty trucks often have dedicated oil temperature sensors that provide precise readings.
- Infrared Thermometer: An infrared thermometer can be used to measure the temperature difference across the oil cooler. A significant temperature drop across the cooler (i.e., oil entering hot and exiting cooler) indicates efficient heat transfer. A minimal temperature drop suggests restricted flow or a malfunctioning unit that is not effectively cooling the oil. This can be particularly useful for diagnosing air-to-oil coolers.
- OBD-II Scanner for DTCs: For modern heavy-duty trucks like FAW and Dongfeng , an OBD-II scanner can retrieve diagnostic trouble codes (DTCs) related to engine oil temperature or cooling system performance. While there might not be a direct code for
a failed oil cooler, codes related to high oil temperature or engine overheating can point towards a cooler issue.
Causes of Oil Cooler Failure in Heavy-Duty Trucks
Understanding the root causes of oil cooler failure is crucial for effective prevention and maintenance strategies. Several factors, often interconnected, contribute to the degradation and eventual failure of these critical components in heavy-duty truck engines.
1. Coolant System Neglect and Contamination
This is a leading cause of liquid-to-liquid oil cooler failure. The quality and maintenance of the engine coolant directly impact the longevity of the oil cooler. Neglecting regular coolant changes or using incorrect coolant types can lead to:
- Corrosion: Over time, engine coolant loses its vital anti-corrosive additives. When these inhibitors deplete, the coolant becomes acidic and aggressively attacks the internal metal surfaces of the oil cooler, particularly the thin plates or tubes separating oil and coolant passages. This leads to the formation of pinholes, cracks, and general material degradation, resulting in internal leaks.
- Scale and Sediment Buildup: Contaminated coolant, often from using tap water instead of distilled water, or from neglecting system flushes, can deposit hard mineral scale and other sediments within the fine passages of the oil cooler. This buildup restricts coolant flow, significantly reducing the cooler’s heat transfer efficiency. The reduced heat transfer can lead to localized hot spots and increased thermal stress on the cooler’s structure, accelerating fatigue and cracking.
- Electrolysis: This is an often-overlooked but highly destructive phenomenon. Stray electrical currents in the cooling system, often due to poor engine grounding, faulty electrical components, or incompatible metals within the system, can accelerate electrochemical corrosion. This process can rapidly deteriorate the oil cooler’s metal components, creating pinholes and leaks in a relatively short period.
2. Thermal Stress and Fatigue
Heavy-duty truck engines operate under extreme thermal conditions, with oil temperatures often exceeding 100°C (212°F). The oil cooler is constantly subjected to significant temperature differentials between the hot engine oil and the cooler engine coolant. Repeated heating and cooling cycles (thermal cycling) cause the cooler’s internal structure, particularly the brazed joints, welds, and thin plates, to expand and contract. Over hundreds of thousands of these cycles, the metal fatigues, leading to microscopic cracks that eventually propagate into full-blown leaks. This is a common failure mode in high-mileage or hard-working engines, especially those in Sinotruk (HOWO) and Shacman trucks that endure long hauls and heavy loads.
3. High Engine Oil Pressure
While the oil cooler is designed to withstand normal engine oil pressures, excessively high oil pressure can put undue stress on its internal components. This can be caused by several factors:
- Malfunctioning Oil Pressure Relief Valve: If the oil pressure relief valve sticks closed or is improperly adjusted, it can cause oil pressure to spike beyond safe limits.
- Clogged Oil Filter: A severely clogged oil filter can create back pressure in the oil system, forcing oil through the cooler at higher than normal pressures.
- Incorrect Oil Viscosity: Using engine oil that is too thick for the operating conditions, especially during cold starts, can temporarily create very high oil pressures.
Sustained high pressure can lead to ruptures in the cooler’s internal walls, causing internal leaks where oil is forced into the coolant system.
4. Physical Damage and External Factors
External oil coolers (air-to-oil type) are particularly vulnerable to physical damage from road debris, rocks, or minor collisions. Even integrated coolers can be damaged during other engine repairs if not handled carefully (e.g., dropping tools on them, improper prying). This can lead to external leaks or internal damage that compromises the cooler’s integrity. Additionally, exposure to harsh environmental elements like road salt, chemicals, or extreme temperatures can accelerate external corrosion and material degradation.
5. Manufacturing Defects
Although less common with reputable brands and certified parts, manufacturing defects can occur. These might include poor brazing of internal plates, thin material sections, improper welding, or assembly errors. Such defects create inherent weak points that can lead to premature oil cooler failure, even under normal operating conditions. This underscores the importance of sourcing high-quality replacement parts from trusted suppliers for brands like FAW and Dongfeng.
6. Improper Installation
Incorrect installation is a significant cause of premature oil cooler failure. Common installation errors include:
- Overtightening Mounting Bolts: This can warp the cooler housing, crack plastic components, or strip threads, leading to immediate or premature leaks.
- Failing to Properly Clean Mating Surfaces: Residual old gasket material, dirt, or corrosion on mating surfaces prevents a proper seal, leading to leaks.
- Reusing Old Gaskets/O-rings: Gaskets and O-rings are designed for single use and should always be replaced during an oil cooler service. Reusing them almost guarantees a leak.
- Incorrect Torque Sequence: If multiple bolts are used, an incorrect tightening sequence can lead to uneven clamping force and warping.
- Improper Bleeding of Air: Failing to properly bleed air from the cooling system after installation can lead to air pockets, localized overheating, and increased stress on the cooler.
Oil Cooler Replacement Guide for Heavy-Duty Trucks
Replacing a faulty oil cooler is a critical repair that, if done correctly, can prevent catastrophic engine damage and restore optimal engine performance. Due to the complexity, location, and importance of this component, it is often recommended to have this procedure performed by a qualified heavy-duty truck technician. However, for those with the necessary skills, tools, and access to detailed service manuals, here is a comprehensive guide. Always refer to your specific heavy-duty truck’s service manual for detailed, model-specific instructions, torque specifications, and critical safety warnings relevant to yourSinotruk (HOWO), Shacman, FAW (Jiefang), Foton, or Dongfeng model.
When to Replace the Oil Cooler
- Confirmed Internal Leak: Any definitive evidence of oil in the coolant or coolant in the oil (e.g., milky oil, oily coolant, positive glycol test in oil) is a clear indication that the oil cooler has failed internally and must be replaced immediately.
- Persistent External Leaks: If external leaks from the oil cooler persist after replacing gaskets or O-rings, or if the cooler housing itself is visibly cracked, warped, or severely corroded beyond repair.
- Clogging/Restricted Flow: If diagnostic tests (e.g., temperature differential across the cooler, oil analysis showing high wear metals due to oil starvation) confirm significant restriction within the oil cooler that cannot be effectively flushed out, leading to consistently high oil temperatures or reduced oil pressure.
- Preventive Maintenance: In some high-mileage engines (e.g., over 500,000 km) or during major engine overhauls (e.g., cylinder head replacement, engine rebuild), replacing the oil cooler as a preventive measure can be a wise investment. This is especially true if the engine model has a known history of oil cooler issues or if the truck operates in extreme conditions.
- Contamination Beyond Repair: If the cooler is severely contaminated with sludge, debris, or corrosion that cannot be thoroughly cleaned, replacement is the only viable option.
Selecting the Right Replacement Oil Cooler
Choosing a high-quality replacement oil cooler is paramount for ensuring the long-term reliability and performance of your heavy-duty truck. Inferior parts can lead to repeat failures, further engine damage, and significant downtime.
- OEM or High-Quality Aftermarket: While OEM (Original Equipment Manufacturer) parts guarantee exact fit, material quality, and performance, high-quality aftermarket options from reputable suppliers can offer comparable performance at a competitive price. Always ensure the aftermarket part meets or exceeds original equipment specifications and comes with a comprehensive warranty. Look for certifications or quality assurance marks from recognized industry bodies.
- Material and Design: Consider the material (e.g., aluminum, stainless steel) and internal design (plate-type, tube-and-fin) of the replacement cooler. For applications in Sinotruk (HOWO), Shacman, or FAW trucks, ensure the cooler is specifically designed to withstand the unique thermal and pressure demands of these engines. Some aftermarket coolers may offer improved designs or materials for enhanced durability.
- Complete Kit: Many replacement oil coolers are sold as a complete kit, including the cooler itself, new gaskets, O-rings, and sometimes even mounting hardware or adapter plates. Opting for a complete kit ensures you have all necessary components for a proper, leak-free installation and can simplify the ordering process.
- Brand Compatibility and Part Number Verification: Always verify that the replacement oil cooler is specifically designed for your truck’s exact make, model, engine type, and year (e.g., Foton, Dongfeng). Cross-reference part numbers carefully using your truck’s VIN or engine serial number to avoid fitment issues. An incorrect part can lead to improper cooling system function, leaks, and potentially severe engine damage.
- Reputation of Supplier: Purchase from a specialized exporter or supplier with a proven track record of providing reliable heavy-duty truck parts.
Step-by-Step Replacement Procedure (General Guide)
Disclaimer: This is a general overview. The actual procedure can vary significantly depending on the truck’s make, model, and engine configuration. Always refer to your heavy-duty truck’s specific service manual for detailed, model-specific instructions, torque specifications, and critical safety warnings. If you are not comfortable performing this repair, or lack the necessary specialized tools and experience, seek professional assistance. Improper installation can lead to severe engine damage and safety hazards.
- Safety First:
- Ensure the engine is completely cool before starting any work to prevent burns from hot fluids or components.
- Disconnect the negative terminal of the battery to prevent electrical hazards and accidental activation of cooling fans or other electrical systems.
- Wear appropriate personal protective equipment (PPE), including safety glasses, chemical-resistant gloves, and long sleeves.
- Place large drain pans beneath the engine to catch both engine oil and coolant.
- Ensure the truck is on a level surface, the parking brake is engaged, and the wheels are chocked to prevent accidental movement.
- Work in a well-ventilated area to avoid inhaling fluid fumes.
- Drain Fluids:
- Completely drain both the engine oil and the engine coolant. If there was oil-coolant mixing, a thorough flush of both systems will be required later to remove all contamination.
- Properly dispose of all drained fluids according to local environmental regulations. Engine oil and coolant are toxic and must not be poured down drains or onto the ground.
- Access the Oil Cooler:
- Locate the oil cooler. Its position varies; it is often mounted on the engine block, sometimes beneath the oil filter housing, or in some cases, remotely mounted with dedicated lines.
- You will likely need to remove other components to gain clear access to the oil cooler. This could include intake manifolds, turbochargers, exhaust components, various hoses, wiring harnesses, or brackets. Carefully label any disconnected hoses, electrical connectors, or removed components to ensure correct reassembly. Taking photos before and during disassembly can be extremely helpful.
- Disconnect Lines and Sensors:
- Carefully disconnect all oil and coolant lines connected to the cooler. Be prepared for residual fluid to spill out, even after draining. Use appropriate plugs or caps to prevent contamination of the lines.
- Disconnect any electrical connectors for sensors (e.g., oil temperature, oil pressure) if they are integrated into the cooler assembly or mounted on it. Be gentle with plastic clips and wiring to avoid breakage.
- Remove the Old Oil Cooler:
- Unbolt the oil cooler from its mounting points. Note the type and length of bolts used.
- Gently remove the old cooler, along with its gaskets and O-rings. If the cooler is stuck, use a plastic pry tool to avoid damaging mating surfaces on the engine.
- Clean Mounting Surfaces:
- Thoroughly clean all mating surfaces on the engine block, any adapter plates, and the new oil cooler. This is a critical step for ensuring a leak-free seal. Use a plastic scraper or a soft wire brush to remove all traces of old gasket material, sealant, corrosion, and debris. Avoid using metal scrapers that can gouge or scratch the aluminum or cast iron surfaces.
- Inspect the surfaces for any damage, pitting, or corrosion. Any imperfections can compromise the new seal.
- Install the New Oil Cooler:
- Install new gaskets and O-rings onto the new oil cooler. Always use new seals; never reuse old ones. Apply a thin layer of RTV sealant (if recommended by the manufacturer, typically a high-temperature, oil-resistant type) to the gaskets to aid in sealing and prevent them from sticking or tearing during installation.
- Carefully position the new oil cooler onto its mounting points, ensuring proper alignment.
- Insert the mounting bolts and hand-tighten them to ensure they are properly threaded and seated.
- Using a calibrated torque wrench, tighten the bolts to the manufacturer’s specified torque sequence and values. Follow a crisscross pattern if multiple bolts are present to ensure even clamping pressure across the gasket. Overtightening can warp the cooler or strip threads; undertightening can lead to leaks.
- Reconnect Lines and Sensors:
- Reconnect all oil and coolant lines, ensuring they are properly seated and secured with new clamps if the old ones are worn or corroded.
- Reconnect any electrical connectors to sensors. Ensure they click into place securely.
- Reinstall any components that were removed for access (e.g., intake manifold, turbocharger, brackets). Double-check that all connections are secure and all fasteners are tightened to specification.
- Refill Fluids and Bleed Systems:
- Refill the engine with the manufacturer-recommended engine oil (correct type and viscosity).
- Refill the cooling system with the correct coolant mixture (typically a 50/50 blend of antifreeze/coolant and distilled water).
- Thoroughly bleed both the oil and cooling systems to remove any trapped air. This is especially critical for the cooling system to prevent air locks, which can cause localized overheating. Follow the truck’s specific bleeding procedure, which may involve using a specialized coolant funnel or vacuum fill tool.
- Test for Leaks and Functionality:
- Start the engine and allow it to reach operating temperature. Monitor oil pressure and engine temperature gauges closely for normal operation.
- Visually inspect the new oil cooler and all connections for any signs of leaks (oil or coolant).
- Perform a cooling system pressure test again to confirm no leaks.
- If there was oil-coolant mixing, run the engine for a period (e.g., 30 minutes), then drain and flush both systems again to remove any residual contamination. This may need to be repeated multiple times until fluids are clean.
- Take the truck for a test drive, monitoring all gauges. After the test drive, allow the engine to cool completely and recheck fluid levels, topping up if necessary.
Preventive Maintenance for Oil Cooler Longevity
Proactive maintenance is the most effective strategy to extend the life of your oil cooler and prevent costly engine damage. Implementing a robust maintenance schedule can significantly reduce downtime and repair expenses for your heavy-duty trucks, especially those from Sinotruk (HOWO), Shacman, FAW (Jiefang), Foton, and Dongfeng.
1. Adhere to Coolant Maintenance Schedules
- Regular Coolant Changes: Strictly follow the manufacturer’s recommended coolant change intervals. Old coolant loses its corrosion inhibitors, becoming acidic and attacking metal components, including the oil cooler.
- Use Correct Coolant Type: Always use the specific type of coolant (e.g., OAT, HOAT, IAT) recommended for your heavy-duty truck’s engine. Mixing incompatible coolants can lead to chemical reactions, gel formation, and severe corrosion.
- Monitor Coolant Condition: Routinely check the coolant for clarity, color, and the presence of oil. Use test strips to check the pH and additive levels, ensuring they are within specification.
2. Follow Engine Oil Maintenance Schedules
- Regular Oil Changes: Adhere to the manufacturer’s recommended engine oil change intervals. Old, degraded oil can form sludge that clogs the oil cooler passages, reducing its efficiency.
- Use Correct Oil Type and Viscosity: Always use the engine oil type and viscosity specified by the manufacturer. Incorrect oil can lead to improper lubrication and increased engine temperatures, putting more strain on the oil cooler.
- Monitor Oil Condition: Regularly check the engine oil for level, color, and any signs of contamination (e.g., milky appearance). Consider periodic oil analysis for early detection of issues.
3. Monitor Engine Temperatures
- Dashboard Gauges: Train drivers to pay close attention to both engine oil temperature and coolant temperature gauges. Any consistent readings above normal operating ranges (overheating) or below normal (over-cooling) should be investigated promptly.
- Diagnostic Scans: Utilize OBD-II scanners during routine service to monitor real-time oil and coolant temperatures and check for any related diagnostic trouble codes. This can provide early warnings of impending cooler issues.
4. Inspect for Leaks Regularly
During routine inspections and pre-trip checks, visually inspect the oil cooler and its connections for any signs of oil or coolant leaks. Even minor leaks should be addressed promptly to prevent them from escalating into major failures.
5. Ensure Proper Engine Grounding
Good engine grounding is essential to prevent electrolysis in the cooling system, which can rapidly corrode metal components like the oil cooler. Periodically check the condition of engine ground straps and connections, ensuring they are clean and secure.
6. Use High-Quality Replacement Parts
When replacement is necessary, always opt for high-quality OEM or reputable aftermarket oil coolers and associated gaskets/seals. Investing in quality parts upfront can prevent recurrent failures and save significant costs in the long run.
The Advantage of Sourcing from a Specialized Exporter
For heavy-duty truck owners and fleet managers globally, securing reliable, high-quality replacement parts is a cornerstone of operational success. As a specialized exporter of Chinese heavy-duty truck components, we offer a distinct advantage in providing oil coolers and related engine parts for prominent brands like Sinotruk (HOWO), Shacman, FAW (Jiefang), Foton, and Dongfeng. Our commitment extends beyond merely supplying parts; we provide a comprehensive service designed to meet the rigorous demands of the international heavy-duty trucking industry.
We pride ourselves on offering products that adhere to stringent quality standards, ensuring that every oil cooler you receive is built for durability and precise fitment. Our extensive inventory means that you can find the exact part you need, minimizing search time and reducing vehicle downtime. Furthermore, our efficient global logistics network guarantees prompt and reliable delivery to your location, anywhere in the world. We understand that in the heavy-duty sector, time is money, and our streamlined supply chain is designed to keep your operations moving.
Beyond product supply, we offer expert technical support, assisting with part identification, providing detailed specifications, and offering troubleshooting advice. This holistic approach ensures that you not only receive the correct part but also have the knowledge to install and maintain it effectively. Explore our Product Brand Page to see our full range of offerings tailored for specific truck manufacturers, and delve into our Product System Page for components categorized by vehicle system. Our Cooperative Cases section showcases our successful partnerships and our unwavering dedication to client satisfaction and long-term collaboration. For any direct inquiries, technical consultations, or to discuss your specific needs, please do not hesitate to Contact Us. Learn more about our company philosophy, our dedication to quality, and our mission to support global heavy-duty trucking operations on our About Us page, or visit our Homepage for a complete overview of our services and products.
Frequently Asked Questions (FAQ) about Truck Oil Coolers
Q1: What is the main function of an oil cooler in a heavy-duty truck?
A1: The main function of an oil cooler is to dissipate excess heat from the engine oil, maintaining it at an optimal operating temperature. This prevents oil degradation, preserves its lubricating properties, and protects critical engine components from premature wear, especially in high-stress heavy-duty applications like HOWO and Shacman trucks.
Q2: How can I tell if my truck’s oil cooler is failing internally?
A2: The most definitive sign of an internal oil cooler failure is the mixing of oil and coolant. Look for a milky, frothy substance on the engine oil dipstick or inside the oil filler cap, or an oily slick/sludge in the coolant reservoir. A sudden increase in engine oil level can also indicate coolant entering the oil system.
Q3: Is it safe to drive with a failing oil cooler?
A3: No, it is highly unsafe and inadvisable to drive with a failing oil cooler, especially if there’s oil-coolant mixing. Contaminated oil loses its lubricating properties, leading to rapid engine wear and potential catastrophic engine failure. Contaminated coolant loses its heat transfer capabilities, causing severe overheating. Immediate repair is crucial.
Q4: What causes oil coolers to fail?
A4: Common causes include neglected coolant maintenance (leading to corrosion and scale buildup), thermal stress and fatigue from constant temperature fluctuations, excessively high oil pressure, physical damage, and sometimes manufacturing defects. Improper installation can also lead to premature failure.
Q5: How often should I replace my truck’s oil cooler?
A5: Oil coolers do not have a fixed replacement interval and are typically replaced when they fail. However, proactive replacement might be considered during major engine overhauls for high-mileage trucks, especially if the engine model is known for oil cooler issues. Regular maintenance of both oil and coolant systems is the best way to prolong its life.
Q6: Can a clogged oil cooler cause engine overheating?
A6: Yes, a clogged oil cooler can indirectly cause engine overheating. If the oil cooler’s passages are restricted, it cannot effectively dissipate heat from the engine oil. This leads to elevated oil temperatures, which in turn can transfer more heat to the engine’s cooling system, potentially overwhelming it and causing overall engine overheating.
Q7: What is the role of coolant quality in oil cooler longevity?
A7: Coolant quality is paramount for liquid-to-liquid oil coolers. Using the correct type of coolant and maintaining its proper concentration ensures adequate corrosion protection. Degraded or incompatible coolant can become acidic, leading to accelerated corrosion and erosion of the oil cooler’s internal metal components, significantly shortening its lifespan and increasing the risk of internal leaks.
Q8: Are there any upgrades available for oil coolers?
A8: Depending on the truck model (e.g., Foton, Dongfeng), aftermarket upgrades might be available, such as coolers made from more durable materials (e.g., stainless steel) or with improved designs for better heat exchange. These upgrades can offer enhanced reliability and performance, especially for trucks operating in extreme conditions or those with a history of recurrent oil cooler failures.


