
Intake Manifold Replacement Guide for Heavy-Duty Trucks
Why the Air Distribution System Matters in Heavy-Duty Trucks
In commercial diesel and gasoline powertrains, the component responsible for distributing the air fuel mixture to each cylinder plays a mission-critical role. When this part fails on a Class 6–8 truck, the consequences extend far beyond a check-engine light — they translate into lost revenue, roadside breakdowns, and potential engine damage. This guide draws on over a decade of hands-on fleet maintenance experience to walk you through failure causes, diagnostic approaches, repair procedures, and high-quality replacement options from Mettlead.
Heavy-duty applications subject these components to extreme thermal cycling, constant vibration, and corrosive exhaust gas recirculation (EGR) byproducts. Understanding how and why failures occur is the first step toward minimizing costly downtime.
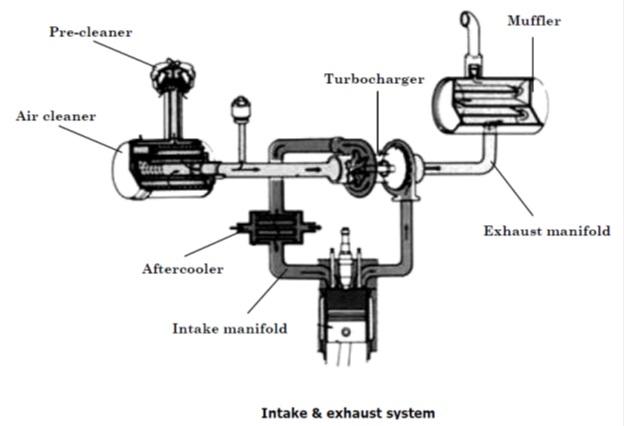
The Intake Manifold is one of the most critical components in a heavy-duty diesel engine. It distributes clean, compressed air evenly to each cylinder, ensuring efficient combustion, optimal fuel economy, and maximum engine performance.
In heavy-duty trucks, especially Chinese truck brands such as SINOTRUK, SHACMAN, FAW, FOTON, and DongFeng, the intake manifold operates under extreme temperatures, pressure fluctuations, and constant exposure to soot and carbon deposits. Over time, cracks, leaks, gasket failures, and carbon buildup can develop, leading to reduced engine efficiency and increased operating costs.
This guide explains when and why an Intake Manifold should be replaced, the symptoms of failure, and the complete replacement process used by professional technicians.
What Does an Intake Manifold Do?
The Intake Manifold is responsible for distributing air from the turbocharger and intercooler into the engine's cylinders.Its main functions include:
- Delivering equal airflow to each cylinder
- Supporting efficient combustion
- Improving engine performance
- Reducing fuel consumption
- Maintaining proper air-fuel ratios
- Supporting EGR system operation
Without a properly functioning intake manifold, the engine cannot achieve optimal combustion efficiency.
Understanding the Role of the Air Distribution Component
Basic Function and Design
The Intake Manifold sits between the throttle body and the cylinder head, channeling metered air (or an air-fuel charge in gasoline engines) into individual combustion chamber ports. In turbocharged diesel trucks, it also manages boost pressure distribution across all cylinders evenly.
Modern heavy-duty designs are engineered from cast aluminum or composite polymers to withstand temperatures exceeding 200 °C while maintaining precise internal geometry. Runners are tuned in length and diameter to optimize volumetric efficiency across the engine's operating RPM range.
Why Heavy-Duty Applications Are More Demanding
Unlike passenger-car engines that spend much of their life at partial load, commercial truck powertrains frequently operate under sustained high-load conditions — climbing grades fully loaded, idling for extended PTO operations, or running at governed speed for hours. This constant thermal and mechanical stress accelerates gasket degradation and can induce fatigue cracking in the casting itself.
EGR systems route hot, soot-laden exhaust gases back through the air distribution passages, depositing carbon that restricts airflow and creates corrosive hot spots. Fleets running pre-2010 EPA-compliant engines without diesel particulate filters are especially vulnerable to accelerated soot buildup.
Why Heavy-Duty Applications Are More Demanding
Thermal Fatigue and Cracking
Repeated heating and cooling cycles cause microscopic fractures in aluminum castings over time. These cracks propagate under continued stress, eventually breaching the wall and creating an external or internal leak. Turbocharged applications experience more severe thermal cycling because compressed intake air temperatures can spike above 150 °C before intercooler correction.
Plastic or composite designs are not immune. While they resist corrosion, polymer components can warp or delaminate at mounting flanges after prolonged heat exposure, breaking the seal integrity.
Gasket Degradation
The sealing gaskets between the air distribution component and the cylinder head are subjected to clamping force, vibration, and thermal cycling simultaneously. Over time, the gasket material compresses beyond its elastic recovery limit, creating pathways for air leakage. Symptoms of a bad intake manifold gasket typically include rough idle, misfires, and unexplained coolant loss in designs that route coolant through the assembly.
In heavy-duty applications, gasket failures often correlate with improper torque procedures during previous service events. Uneven clamping creates stress concentrations that accelerate localized gasket failure.
EGR Carbon Fouling
Carbon deposits from the EGR system accumulate inside the runners and plenum over tens of thousands of miles. This buildup restricts airflow, reduces engine performance, and creates uneven cylinder-to-cylinder distribution. In severe cases, chunks of carbon can break free and damage valves or turbocharger components downstream.
A 2024 study by the Technology & Maintenance Council (TMC) found that EGR-related carbon buildup was the primary cause of air distribution system replacement in approximately 38% of Class 8 trucks surveyed at or before 400,000 miles.
Diagnostic Approach: Identifying the Problem
Intake Manifold Replacement Step 1: Prepare the Truck
Safety should always come first.
Procedure
- Park the truck on a level surface.
- Engage the parking brake.
- Shut down the engine.
- Allow the engine to cool completely.
- Disconnect the battery negative terminal.
This prevents accidental electrical shorts and injuries.
Intake Manifold Replacement Step 2: Remove Air Intake Components
To access the Intake Manifold, several components must be removed.
Components Typically Removed
- Air filter housing
- Intake pipes
- Charge air cooler hoses
- Turbocharger outlet piping
- Engine covers
Label all hoses and connections during removal to simplify reassembly.
Intake Manifold Replacement Step 3: Disconnect Sensors and Hoses
Modern heavy-duty trucks use multiple sensors connected to the intake system.These may include:
- MAP sensor
- Intake air temperature sensor
- Pressure sensors
- EGR connections
Carefully disconnect and label each component.Avoid pulling on wires directly.
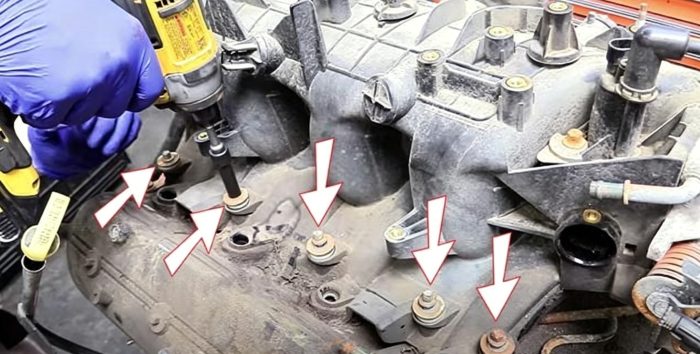
Intake Manifold Replacement Step 4: Remove the Old Intake Manifold
After removing surrounding components, the manifold can be detached.
Important Tips
- Loosen bolts gradually.
- Follow the manufacturer's recommended sequence.
- Prevent debris from entering intake ports.
Once removed, inspect the manifold for:
- Cracks
- Carbon buildup
- Warping
- Damaged mounting surfaces
Intake Manifold Replacement Step 5: Clean the Intake Ports
This step is often overlooked but is critical for long-term reliability.
Areas to Clean
- Cylinder head intake ports
- Mating surfaces
- EGR passages
- Bolt holes
Removing old gasket material and carbon deposits helps ensure a proper seal.Failure to clean thoroughly can result in future air leaks.
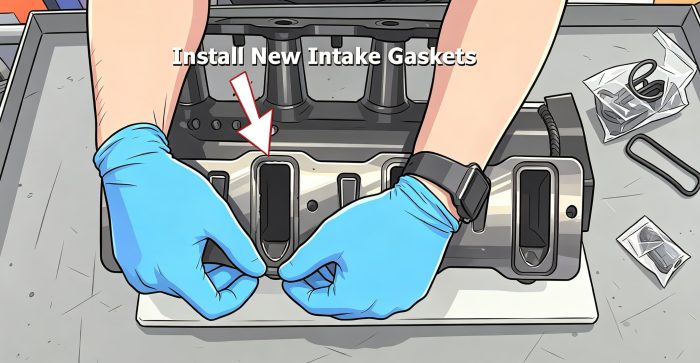
Intake Manifold Replacement Step 6: Install a New Intake Manifold Gasket
Always use a new gasket during installation.Reusing an old gasket increases the risk of:
- Air leaks
- Boost pressure loss
- Reduced engine efficiency
Carefully position the gasket according to manufacturer specifications.
Intake Manifold Replacement Step 7: Install the New Intake Manifold
Position the new Intake Manifold onto the cylinder head.
Best Practices
- Align mounting holes correctly.
- Install bolts by hand first.
- Tighten bolts in a cross-pattern sequence.
- Follow the specified torque values.
Proper bolt torque helps prevent future warping and leaks.
Intake Manifold Replacement Step 8: Reconnect Components
Reconnect all previously removed parts.
Reinstallation Checklist
✔ Intake pipes
✔ Charge air cooler hoses
✔ MAP sensor
✔ Temperature sensors
✔ EGR connections
✔ Wiring harnesses
✔ Air filter assembly
Double-check every connection before proceeding.
Intake Manifold Replacement Step 9: Start and Test the Engine
After installation is complete:
- Reconnect the battery.
- Start the engine.
- Let the engine idle.
- Inspect for air leaks.
- Check boost pressure readings.
- Verify smooth engine operation.
A successful replacement should restore normal airflow and engine performance.
DIY Repair Guide: Addressing Leaks Without Full Replacement
When a Leak Repair Makes Sense
Not every leak requires complete component replacement. If the casting itself is sound and the failure is limited to the gasket interface, a targeted intake manifold leak repair DIY guide approach can save significant cost — particularly for owner-operators managing their own maintenance.
Gasket-only replacement is appropriate when:
- The leak is confirmed at the gasket surface (not through the casting)
- The mating surfaces are within flatness specification
- No coolant contamination or internal passage failure exists
- The component has fewer than 300,000 miles and shows no stress cracking
Gasket Replacement Procedure
Follow the removal procedure outlined earlier in this guide, but with particular attention to surface preparation. Use a straightedge and feeler gauge to verify mating surface flatness. If warpage exceeds 0.003 inches on aluminum surfaces, light machining (resurfacing) may restore the sealing surface — but this adds cost and requires a machine shop.
Apply gaskets dry unless the manufacturer specifies an anaerobic sealant. Some heavy-duty applications call for a thin bead of RTV silicone at specific locations (typically around coolant passages); follow the gasket manufacturer's instructions precisely.
Temporary Sealant Solutions
In emergency roadside situations, specialty intake sealants can provide a temporary repair to limp to a service facility. These products are introduced into the air stream and polymerize at the leak point. However, this is strictly a temporary measure — the sealant material degrades under sustained boost pressure and heat. Plan for a proper repair within 500–1,000 miles of applying any temporary sealant.
Real-World Case Study: Fleet Maintenance Success
Background
A regional LTL carrier operating 180 Class 8 trucks (primarily Freightliner Cascadia with Detroit DD15 engines) experienced a pattern of air distribution system failures beginning around 380,000 miles. The failures presented as boost leaks at the gasket surface, progressing to casting cracks in approximately 30% of cases.
Problem Analysis
Investigation revealed that the fleet's extended PM interval (20,000 miles) combined with aggressive EGR duty cycles in their regional haul profile accelerated carbon accumulation. The carbon created localized hot spots that stressed gaskets beyond their design limits, eventually inducing thermal fatigue in the castings themselves.
Solution Implemented
The fleet implemented a three-part strategy:
- Proactive replacement program — replacing all air distribution components at 350,000 miles during scheduled major PMs, using Mettlead aftermarket parts cross-referenced to OEM specifications
- EGR system service interval reduction — adding EGR valve cleaning every 100,000 miles instead of waiting for failure
- Telematics monitoring — configuring boost pressure trend alerts to catch early-stage leaks before they caused roadside failures
Common Mistakes to Avoid During Replacement
Installation Errors
- Reusing old gaskets — even if a gasket looks serviceable, compressed gasket material loses its recovery properties. Always install new gaskets.
- Skipping the torque sequence — tightening bolts in a random pattern or single-pass creates uneven clamping force, guaranteeing premature gasket failure.
- Using impact tools on mounting bolts — impact wrenches cannot deliver precise torque and risk cracking bolt bosses in aluminum castings.
- Leaving debris in ports — even small gasket fragments or paper towel fibers can damage valves or turbocharger blades if ingested.
- Ignoring coolant system bleeding — trapped air creates hot spots and foam that accelerates corrosion in coolant passages.
Diagnostic Errors
- Assuming a boost leak is always at the gasket — charge-air cooler pipes, intercooler connections, and turbocharger outlet seals are equally common leak sources. Verify the exact leak location before disassembly.
- Ignoring root causes — replacing the component without addressing the underlying EGR contamination, coolant neglect, or over-torque condition that caused the original failure guarantees repeat failure.
- Misreading fault codes — lean condition codes can originate from many sources (fuel system, MAF sensor, exhaust leaks). Confirm the air distribution system as the source before committing to replacement.
Frequently Asked Questions
How do I know if my air distribution component needs replacement versus just a gasket change?
The determining factor is the condition of the casting itself. If a pressure test reveals leakage through the casting material (rather than at the gasket surface), or if visual inspection shows cracks, porosity, or coolant passage erosion, full replacement is necessary. Gasket-only replacement is appropriate when the casting is structurally sound and mating surfaces are within flatness specifications. When in doubt, have a qualified technician measure surface flatness with a straightedge and feeler gauge — warpage exceeding 0.003 inches typically requires either machining or full replacement.
What is the expected service life of this component on a Class 8 truck?
Under normal operating conditions with proper maintenance, the air distribution assembly on a heavy-duty diesel engine typically provides 400,000–700,000 miles of service life. However, several factors can significantly shorten this range: aggressive EGR duty cycles, neglected coolant maintenance, extended oil drain intervals that increase crankcase blow-by contamination, and operation in extreme temperature environments. Fleets that implement proactive inspection programs (boost pressure testing every 50,000 miles) can reliably predict replacement timing and avoid unexpected failures.
Can I install a component from a different engine variant in the same family?
This is risky and generally not recommended. Even within the same engine family (e.g., DD13 vs. DD15, or ISX12 vs. ISX15), the air distribution assemblies often differ in runner length, plenum volume, port geometry, sensor boss locations, and EGR connection orientation. Installing a mismatched component can cause uneven cylinder filling, boost distribution problems, and ECM fault codes. Always verify the exact OEM part number for your engine's serial number range and emissions certification level before ordering.
How does altitude affect the air distribution system and its failure modes?
Trucks operating frequently at high altitude (above 5,000 feet) experience unique challenges. The turbocharger works harder to maintain boost pressure in thinner air, increasing compressor outlet temperatures and thermal loading on the air distribution assembly. Additionally, the greater pressure differential between boosted intake pressure and ambient atmospheric pressure increases stress on gaskets and potential leak paths. Fleets operating primarily in mountainous regions (Rocky Mountain corridor, Appalachian routes) should consider reducing proactive replacement intervals by approximately 15–20% compared to flatland operations.
What warranty coverage should I expect from an aftermarket replacement part?
Quality aftermarket manufacturers typically offer 12–24 months or 100,000–200,000 miles of warranty coverage on air distribution components for heavy-duty applications. The warranty should cover manufacturing defects including casting porosity, dimensional non-conformance, and material composition failures. It typically does not cover failures caused by improper installation (incorrect torque), external damage, or system-related issues (EGR contamination, coolant system failures). When evaluating suppliers, request the full warranty terms in writing and confirm whether the warranty covers parts only or includes labor reimbursement. Mettlead provides comprehensive warranty support backed by engineering analysis of any returned components.