
In the intricate electrical system of a heavy-duty truck, battery cables often go unnoticed until a problem arises. Nevertheless, these seemingly simple components are absolutely critical. They serve as the primary conduits for electrical current, connecting the battery to the starter motor, the alternator, and the vehicle’s main electrical distribution. A robust and efficient electrical connection is paramount for starting the engine, powering essential systems, and ensuring the overall reliability of your fleet. For operators and maintenance professionals managing Chinese trucks such as **Sinotruk (HOWO)**, **Shacman**, **FAW (Jiefang)**, **Foton**, and **Dongfeng**, understanding battery cable issues is not merely beneficial; it is essential for preventing costly downtime and maintaining operational efficiency. This comprehensive guide will delve into the vital role of battery cables, detail common problems and their underlying causes, provide step-by-step diagnostic procedures, and offer practical advice for replacement and preventive maintenance. Our aim is to empower you with the knowledge to ensure your heavy-duty vehicles remain reliably powered. For more general company information, please visit our Mettlead homepage or learn more about us on our about us page.
The Unsung Heroes: Understanding the Function of Truck Battery Cables
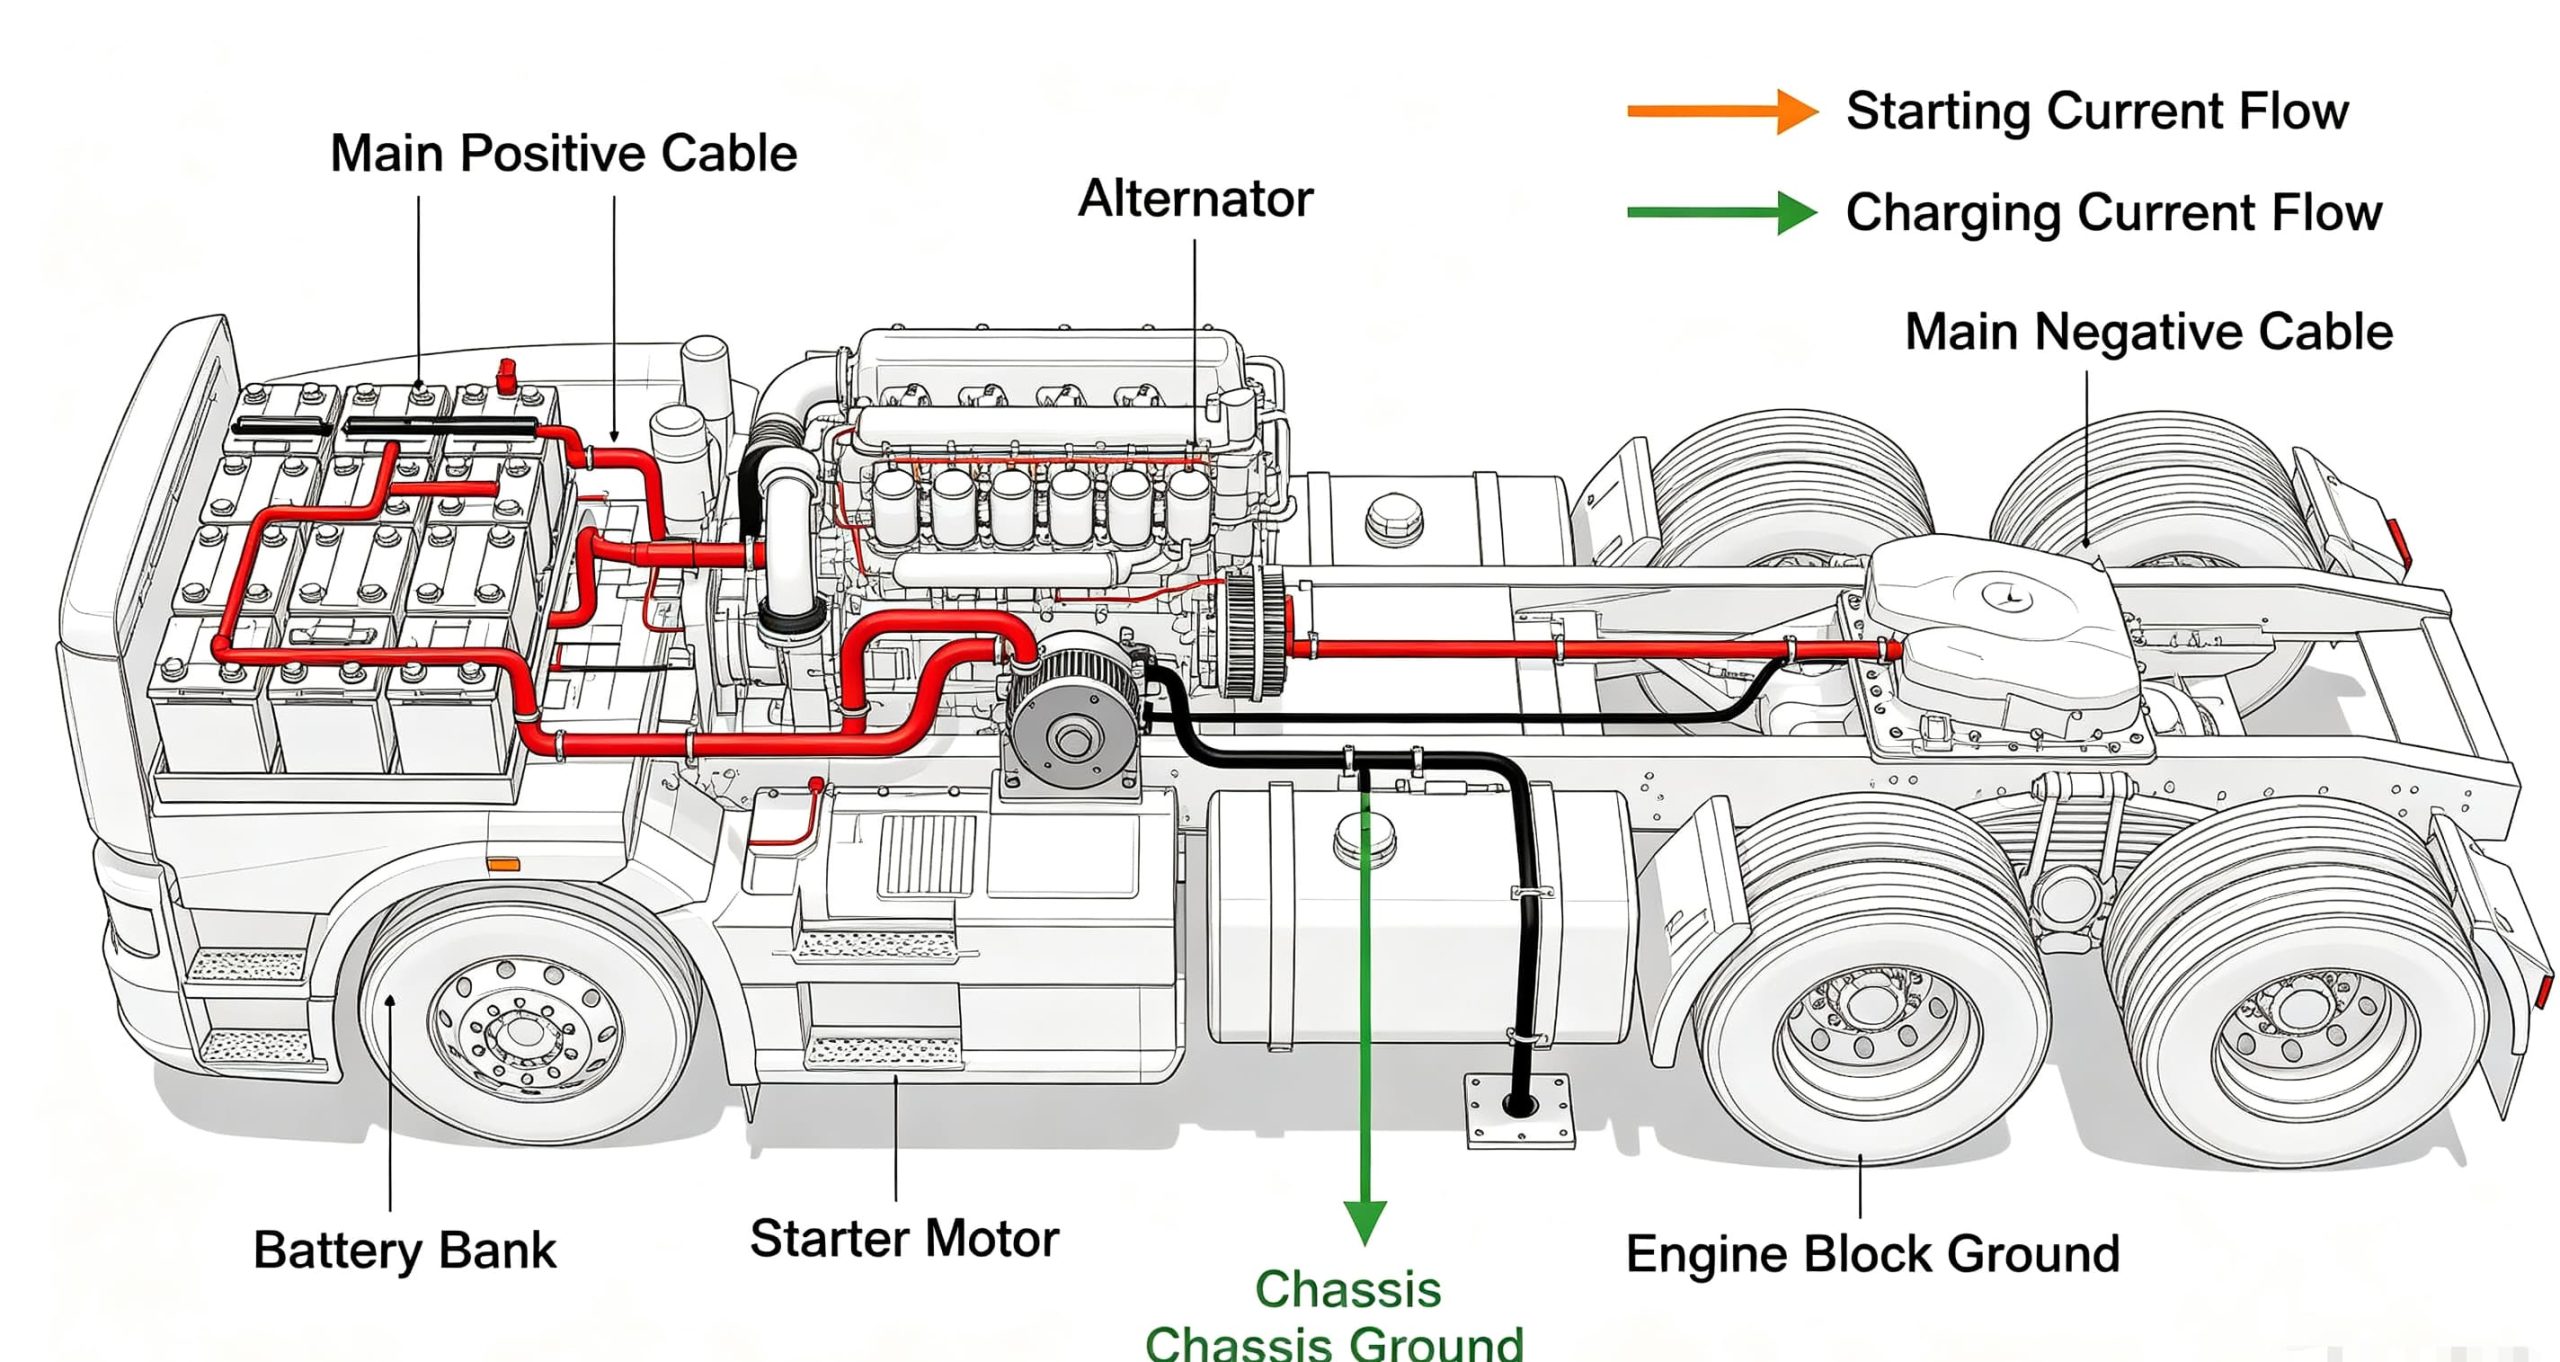
Battery cables are far more than just wires; they are engineered to handle immense electrical loads. Their primary function is to transfer high currents efficiently and safely throughout the truck’s electrical system. Specifically, they facilitate the flow of electricity from the battery to the starter motor during engine cranking, and from the alternator back to the battery during charging. Furthermore, they provide essential ground connections for various electrical components. You can find more details on specific product systems on our product system page.
1. High Current Delivery for Starting
The starter motor in a heavy-duty truck requires hundreds of amperes of current to crank the engine. Consequently, battery cables must be thick (low gauge) to minimize resistance and voltage drop, ensuring that sufficient power reaches the starter. Any impedance in this path can lead to slow cranking or a no-start condition.
2. Charging System Integration
In addition to starting, battery cables are integral to the charging process. They carry the current generated by the alternator back to the battery, replenishing its charge. A healthy charging system, therefore, relies heavily on intact and efficient battery cables. This is particularly true for **FAW** and **Foton** trucks, where consistent charging is vital for long-haul operations.
3. Grounding and Electrical Stability
Battery cables also provide the crucial ground path for the entire electrical system. A strong, clean ground connection is essential for all electrical components to function correctly. Without proper grounding, circuits can become unstable, leading to erratic electrical behavior and potential damage to sensitive electronics. This aspect is critical for the complex systems found in **Sinotruk (HOWO)** and **Shacman** vehicles.
💡 Pro-Tip: Gauge Matters
The gauge (thickness) of a battery cable is inversely proportional to its number; a lower gauge number indicates a thicker cable. Heavy-duty trucks typically require 0-gauge or 00-gauge (2/0) cables for their main battery-to-starter and battery-to-ground connections to handle the high current demands. Using an undersized cable can lead to excessive heat, voltage drop, and premature failure.
Common Problems Affecting Truck Battery Cables
Despite their robust construction, battery cables are susceptible to several issues that can compromise their performance and the truck’s overall electrical health. Recognizing these problems early is key to effective maintenance. For further assistance, our technical support page is always available.
1. Corrosion: The Silent Killer
Corrosion is arguably the most prevalent problem affecting battery cables. It typically appears as a white, blue, or greenish powdery substance around the battery terminals and cable ends. This is primarily caused by battery acid fumes reacting with the copper in the cables and terminals. Furthermore, moisture and road salt can accelerate this process. Consequently, corrosion acts as an electrical insulator, significantly increasing resistance and impeding current flow. This leads to reduced cranking power and inefficient charging, a common issue observed in **Dongfeng** trucks operating in harsh environments.
2. Loose Connections: A Simple Yet Critical Flaw
Vibration, a constant companion in heavy-duty truck operation, can gradually loosen battery cable connections at the terminals, starter, or ground points. In addition, improper installation can also lead to loose connections from the outset. A loose connection creates high resistance, generating heat and causing voltage drops. This can manifest as intermittent electrical problems or a complete loss of power. Specifically, a loose connection at the starter can prevent the engine from cranking, even if the battery is fully charged.
3. Internal Cable Damage: Hidden Resistance
While the outer insulation of a battery cable might appear intact, the internal copper strands can suffer damage. This can occur due to:
- Fatigue and Vibration: Constant vibration can cause individual strands to break over time, reducing the cable’s effective cross-sectional area.
- Corrosion Creep: Acid fumes can wick up inside the cable insulation, corroding the copper strands from within, making the cable brittle and increasing resistance.
- Physical Damage: Pinching, bending, or abrasion against chassis components can damage the internal conductors.
Consequently, internal damage leads to increased resistance, heat generation, and reduced current carrying capacity, often without visible external signs. This is a particularly insidious problem for **HOWO** and **Shacman** trucks, where cables are often routed through tight spaces.
4. Incorrect Cable Gauge: A Fundamental Mismatch
Using battery cables that are too thin (high gauge number) for the truck’s electrical demands is a fundamental problem. This often occurs during aftermarket replacements where the correct specifications are overlooked. An undersized cable cannot handle the high current required by the starter motor or charging system without excessive voltage drop and heat generation. Furthermore, this can lead to premature failure of the cable itself, as well as strain on the battery and starter motor. Always refer to manufacturer specifications or consult our product brand page for appropriate cable gauges.
5. Damaged Insulation: Exposure and Short Circuits
The outer insulation protects the cable from physical damage, moisture, and short circuits. However, over time, insulation can become brittle, crack, or be abraded by rubbing against other components. Consequently, damaged insulation exposes the copper conductors to the elements, leading to corrosion and the risk of short circuits, especially if the exposed wire touches a grounded metal surface. This can cause severe electrical faults and even fires. Therefore, regular inspection of cable insulation is crucial for all heavy-duty trucks.
⚠️ Caution: Fire Hazard
Damaged or corroded battery cables can generate significant heat due to high resistance. This heat can melt insulation, ignite nearby flammable materials, and lead to an electrical fire. Always address battery cable issues promptly and with extreme caution. For urgent assistance, please contact us.
Symptoms of Faulty Truck Battery Cables
Identifying the symptoms of failing battery cables is the first step toward effective troubleshooting. These symptoms often overlap with other electrical issues, making accurate diagnosis crucial. Here are the most common indicators:
| Symptom | Primary Indication | Possible Cable Problem |
|---|---|---|
| Slow Engine Cranking / No Start | Insufficient power reaching starter motor. | Corrosion, loose connections, internal damage, undersized cable. |
| Clicking Noise from Starter Solenoid | Solenoid engages but insufficient current for starter motor. | High resistance in positive cable to starter. |
| Dim Headlights / Interior Lights | Low system voltage, especially under load. | High resistance in main power or ground cables. |
| Hot Battery Cables / Terminals | Excessive resistance generating heat. | Corrosion, loose connections, internal damage, undersized cable. |
| Corrosion on Battery Terminals | Visible chemical reaction, often white/blue/green powder. | Acid leaks, poor sealing, environmental exposure. |
| Electrical System Malfunctions | Erratic gauges, flickering lights, ECU errors. | Poor ground connections, intermittent opens/shorts. |
1. Slow Engine Cranking or No Start Condition
This is the most common and frustrating symptom. When the engine cranks slowly, it indicates that the starter motor is not receiving enough current to turn the engine over effectively. In a more severe scenario, the engine may not crank at all, producing only a single click from the starter solenoid. This often points to high resistance in the positive battery cable leading to the starter, or a compromised ground cable. Consequently, the starter cannot draw the necessary amperage. This issue is frequently reported in **FAW** and **Foton** trucks when battery cables are neglected.
2. Clicking Noise from the Starter Solenoid
A rapid clicking sound from the starter solenoid without the engine cranking is a classic sign of insufficient voltage reaching the starter. The solenoid receives enough power to engage, but the main contacts cannot close or pass the high current required by the starter motor due to excessive voltage drop across the battery cables. Therefore, while the battery might seem charged, the cables are failing to deliver the power effectively. For troubleshooting this, our technical support page can offer valuable insights.
3. Dim Headlights and Interior Lights
If your truck’s headlights, dashboard lights, or interior lights appear dim, especially during cranking or when other electrical accessories are on, it suggests a general drop in system voltage. This can be attributed to high resistance in either the main positive or negative battery cables, preventing the charging system from maintaining optimal voltage. This symptom is particularly noticeable in **Shacman** trucks, where consistent lighting is crucial for safety.
4. Hot Battery Cables or Terminals
Heat is a direct indicator of excessive electrical resistance. If you notice that your battery cables or their terminals are unusually warm or hot to the touch after attempting to start the truck or after a period of operation, it’s a clear sign of a problem. This heat is generated as electrical energy is converted into thermal energy due to high resistance, often caused by corrosion, loose connections, or internal cable damage. This is a critical warning sign that should not be ignored, as it can lead to further damage or fire.
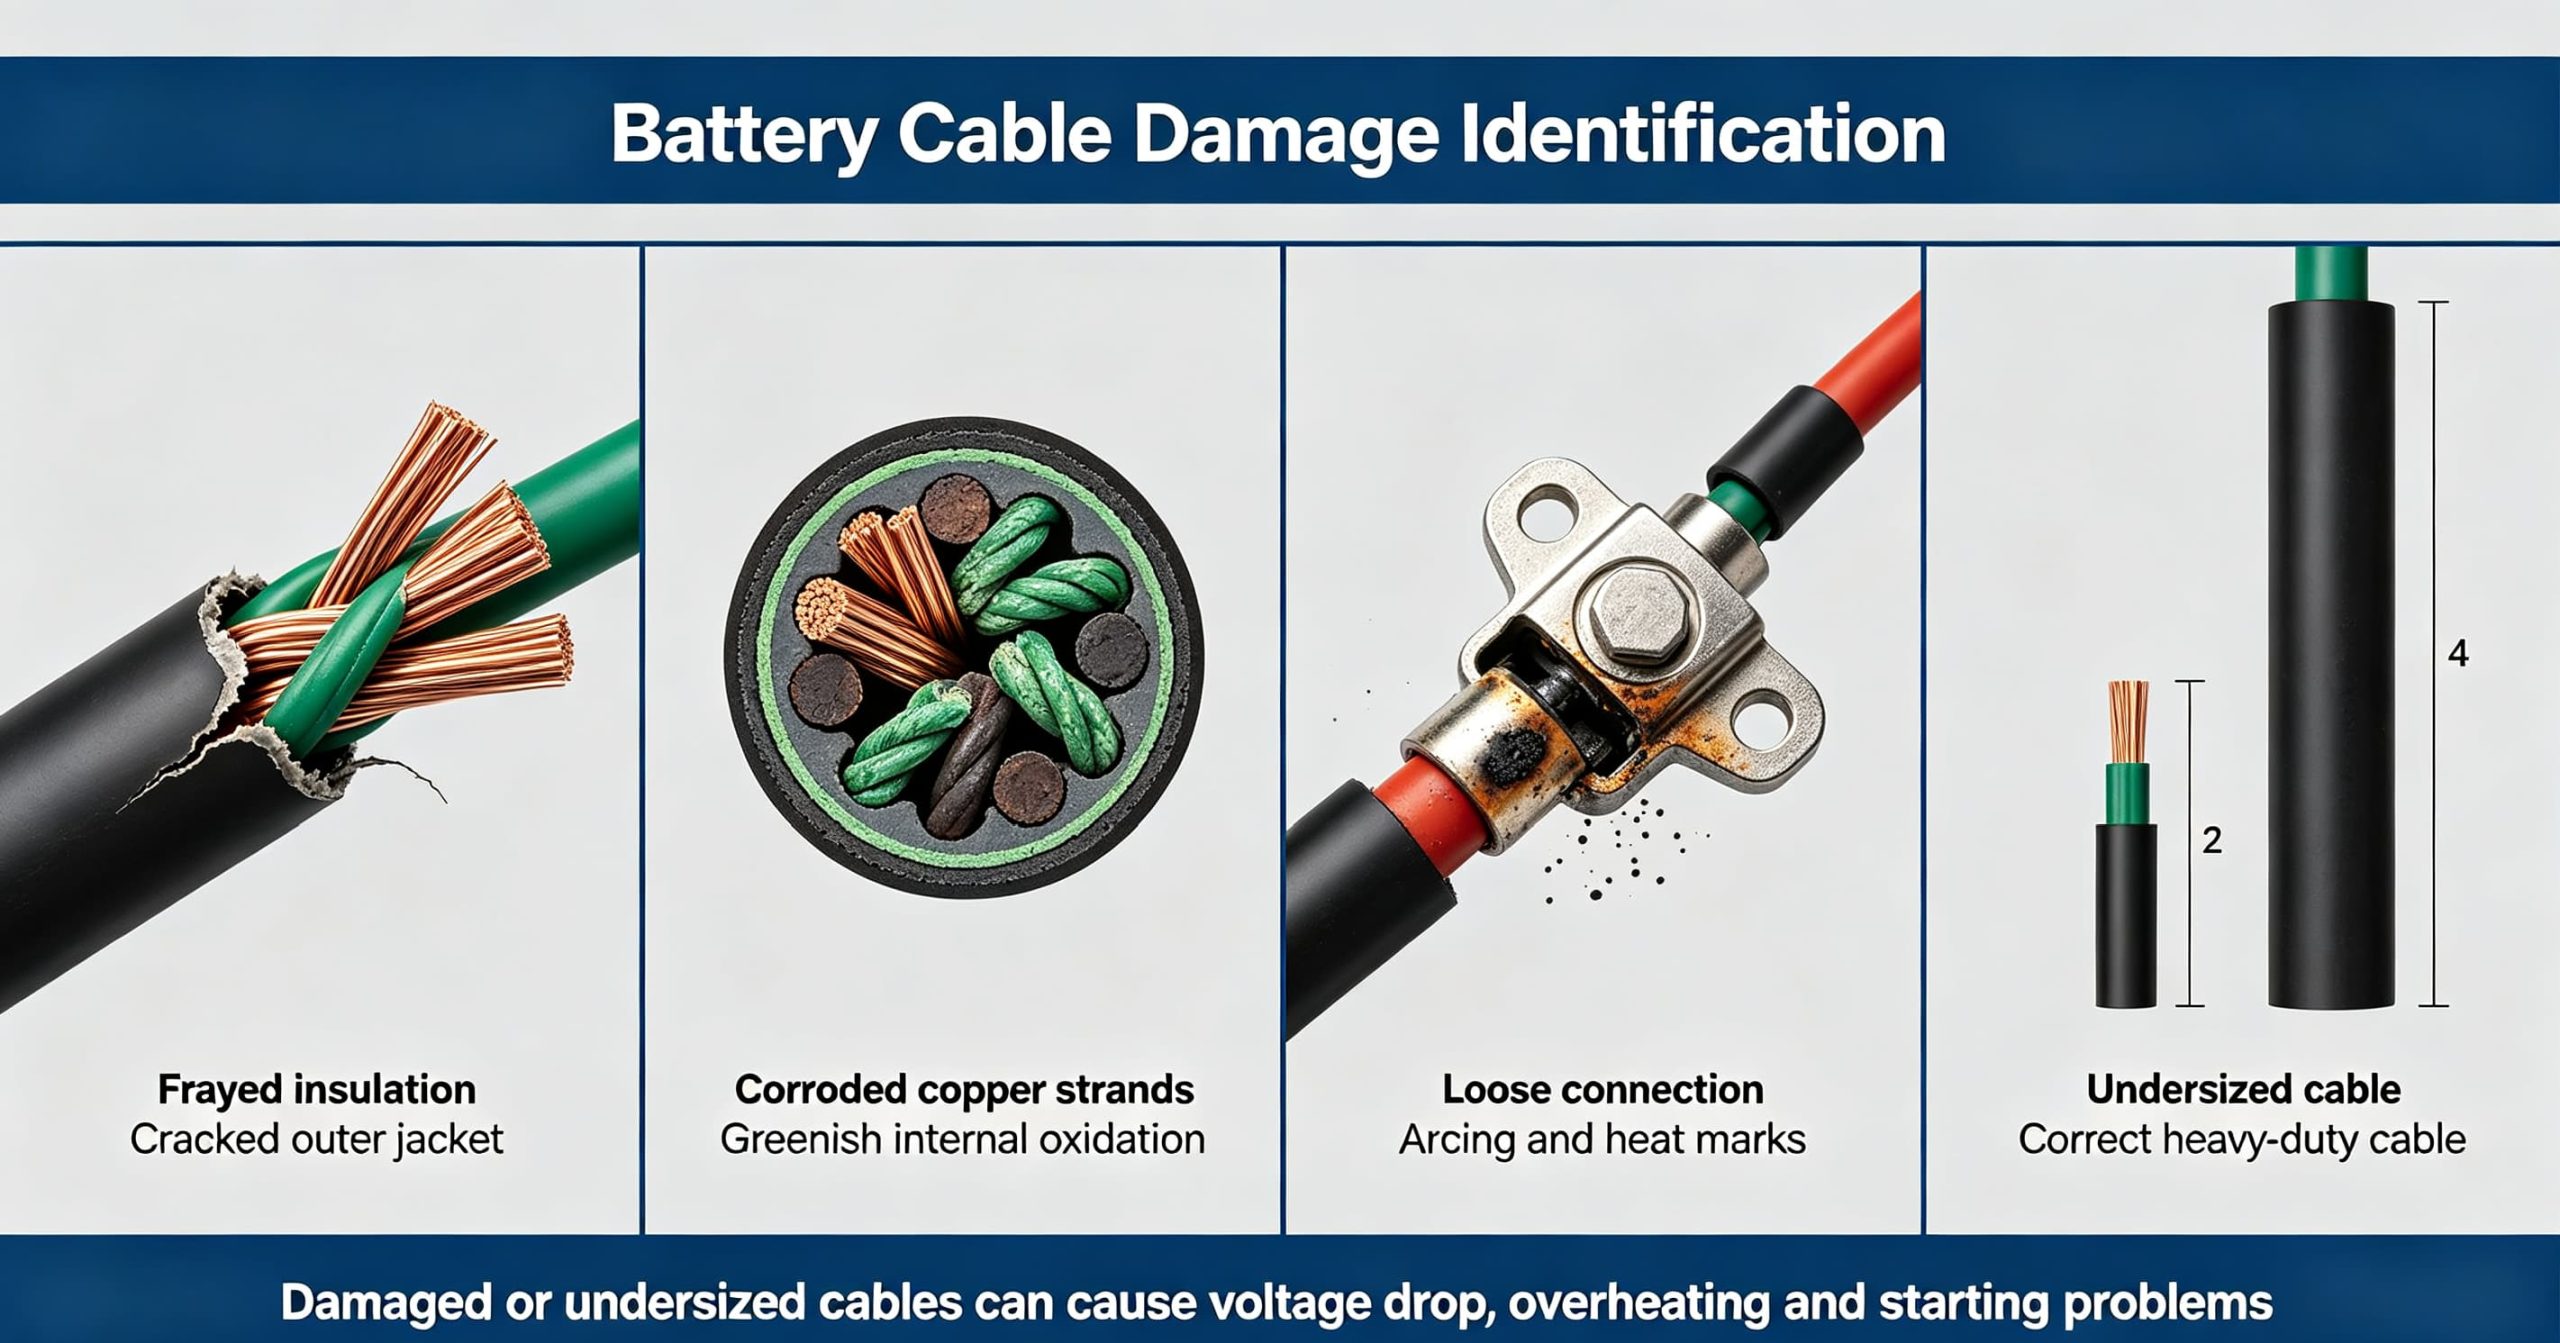
5. Visible Corrosion on Battery Terminals
While visible corrosion is a problem in itself, it’s also a symptom of underlying issues. The white, blue, or green powdery buildup on battery terminals indicates that battery acid fumes are escaping and reacting with the metal. This corrosion not only impedes electrical flow but also suggests potential issues with battery sealing or ventilation. Regular inspection for corrosion is a simple yet effective preventive measure for all heavy-duty trucks, including **Sinotruk (HOWO)** models.
6. Electrical System Malfunctions
Poor battery cable connections or damaged cables can lead to unstable voltage throughout the electrical system. Consequently, this can cause a myriad of issues, including erratic gauge readings, flickering lights, and even diagnostic trouble codes (DTCs) from the Engine Control Unit (ECU). Modern trucks, such as those from **Dongfeng**, are highly sensitive to voltage fluctuations, making healthy battery cables indispensable for stable operation.
⚠️ Caution: Don’t Ignore the Signs
Ignoring symptoms of faulty battery cables can lead to a complete electrical system failure, leaving your truck stranded. Moreover, the increased resistance can damage other components like the starter motor, alternator, and even the battery itself due to excessive heat and strain. Address these warnings promptly to prevent more extensive and costly repairs.
Diagnosing Truck Battery Cable Problems: A Systematic Approach
Accurate diagnosis is paramount to avoid unnecessary part replacement and ensure efficient repairs. A systematic approach will help pinpoint whether the problem lies with the cables themselves or other components. For heavy-duty trucks, especially those from **Sinotruk (HOWO)**, **Shacman**, **FAW**, **Foton**, and **Dongfeng**, a robust diagnostic process is essential. Our customer success cases often highlight the importance of thorough diagnostics.
⚠️ Caution: Safety First!
Before attempting any diagnostic or repair work on your truck’s electrical system, always disconnect the negative battery terminal first. This prevents accidental short circuits, electrical shocks, and potential damage to sensitive electronic components. Wear appropriate personal protective equipment (PPE), including safety glasses and gloves. When testing, be aware of rotating parts and high current.
1. Initial Visual Inspection: The First Line of Defense
Begin with a thorough visual inspection of all battery cables and their connections. This is often the simplest yet most effective diagnostic step. Specifically, look for:
- Corrosion: Check battery terminals, cable ends, and ground points for any white, blue, or green powdery buildup.
- Loose Connections: Gently try to wiggle each cable connection at the battery, starter, and ground points. Any movement indicates a loose connection.
- Physical Damage: Inspect the entire length of the cables for fraying, cuts, cracks in the insulation, bulges, or signs of burning. Pay close attention to areas where cables might rub against the chassis or engine components.
- Battery Condition: While inspecting cables, also check the battery for signs of swelling, cracks, or leakage, which could indicate internal battery issues contributing to cable problems.
2. Battery Test: Confirming the Power Source
Before condemning the cables, it’s crucial to ensure the battery itself is in good health. A weak or faulty battery can mimic cable problems. Use a professional battery load tester to assess its capacity. A fully charged 12V battery should read around 12.6 volts (or 25.2 volts for a 24V system) with the engine off. If the battery is weak or fails the load test, recharge it fully and retest. If it still fails, replace the battery. You can explore various battery options on our product brand page.
3. Voltage Drop Test: Pinpointing Resistance
The voltage drop test is an indispensable diagnostic tool for identifying excessive resistance in high-current circuits, such as battery cables. This test measures the voltage lost across a section of the circuit while current is flowing. A significant voltage drop indicates high resistance, often due to corrosion, loose connections, or internal cable damage. Perform this test with a digital multimeter:
| Test Point | Multimeter Connection | Expected Voltage Drop (Max) | Indication |
|---|---|---|---|
| Positive Cable (Battery to Starter) | Positive lead on battery positive post, negative lead on starter motor B+ terminal. Crank engine. | 0.5V (12V system) / 1.0V (24V system) | Higher drop indicates high resistance in positive cable. |
| Negative Cable (Battery to Engine Block) | Positive lead on engine block, negative lead on battery negative post. Crank engine. | 0.5V (12V system) / 1.0V (24V system) | Higher drop indicates high resistance in negative cable/ground. |
| Alternator Output Cable (Alternator to Battery) | Positive lead on alternator B+ terminal, negative lead on battery positive post. Engine running. | 0.2V (12V system) / 0.4V (24V system) | Higher drop indicates high resistance in charging cable. |
- Prepare for Test: Ensure the battery is fully charged. Disconnect the negative battery terminal before connecting the multimeter for safety.
- Connect Multimeter: Set your multimeter to DC voltage (VDC).
- Perform Test: Connect the multimeter leads as described in the table above. Have an assistant crank the engine for 5-10 seconds (or turn on high electrical loads for the alternator output cable test).
- Read Voltage Drop: Observe the voltage reading on the multimeter. Any reading above the specified maximum indicates excessive resistance in that section of the cable or its connections.
🔍 Technical Deep-Dive: Why Voltage Drop Matters
Voltage drop is a direct consequence of Ohm’s Law (V=IR). When current (I) flows through a resistance (R), a voltage drop (V) occurs, and power (P) is dissipated as heat. In high-current circuits like battery cables, even a small increase in resistance due to corrosion or damage can lead to a significant voltage drop. This means less voltage and current reach the intended component (e.g., starter), resulting in poor performance. Consequently, this can put undue strain on other electrical components. For more detailed technical insights, explore our product system page.
4. Resistance Test (Continuity)
While a voltage drop test is preferred for high-current circuits under load, a simple resistance (continuity) test can help identify open circuits or extremely high resistance in a disconnected cable. However, it’s less effective at detecting subtle resistance increases caused by corrosion or internal damage that only manifest under load. To perform this test:
- Disconnect Cable: Completely disconnect the cable from both ends.
- Set Multimeter: Set your multimeter to the ohms (Ω) setting.
- Test Resistance: Touch one probe to each end of the cable. A healthy cable should show very low resistance, ideally close to 0 ohms. A reading of ‘OL’ (open loop) or very high resistance indicates a broken or severely damaged cable.
💡 Pro-Tip: Visual Inspection is Key
Always combine electrical tests with a thorough visual inspection. Often, the root cause of a voltage drop or high resistance can be visually identified as corrosion, loose connections, or physical damage. This integrated approach ensures a more accurate and efficient diagnosis for your **Dongfeng** or **Foton** trucks.
Replacement Guide: How to Replace Truck Battery Cables
Replacing battery cables is a straightforward process, but it requires careful attention to safety and proper procedures. Following these steps will ensure a safe and effective replacement, restoring optimal electrical performance to your heavy-duty truck. For high-quality replacement parts, always check our product brand page.
⚠️ Caution: Electrical Safety
Always disconnect the negative battery terminal first and reconnect it last. This prevents accidental short circuits and electrical shocks. Wear safety glasses and gloves. Ensure no tools or metal objects can bridge the positive terminal to ground. High amperage can cause severe burns or damage. If you are unsure, consult a professional or refer to our technical support page.
1. Gather Tools and Materials
Before you begin, ensure you have all the necessary tools and replacement parts. This typically includes:
- New battery cables (correct gauge and length for your truck, e.g., **HOWO** or **Shacman**).
- Wrenches or socket set (for battery terminals, starter, and ground connections).
- Wire brush and battery terminal cleaner.
- Dielectric grease or battery terminal protector.
- Cable cutters (if making custom cables).
- Hydraulic crimper (if making custom cables with new lugs).
- Heat shrink tubing (for custom cables).
- Safety glasses and gloves.
2. Disconnect Batteries
This is the most critical safety step. First, locate all batteries in your heavy-duty truck. Then, disconnect the negative (-) terminal from each battery. Subsequently, disconnect the positive (+) terminal from each battery. Remove the batteries if necessary for better access to cables. This ensures the entire electrical system is de-energized.
3. Document Cable Routing
Before removing any cables, take photos or make a diagram of how the existing cables are routed and connected. This is especially important for complex multi-battery systems found in many heavy-duty trucks. Pay attention to which terminals connect to the starter, alternator, and chassis ground. This step is crucial for ensuring correct reinstallation.
4. Remove Old Cables
Carefully unbolt and remove the old battery cables from the battery terminals, starter motor, alternator, and all ground points. Be mindful of any clips or ties that secure the cables along their path. If corrosion is severe, you may need to use a battery terminal puller or a specialized tool to remove stubborn connections. Dispose of old cables responsibly.
5. Clean Connection Points
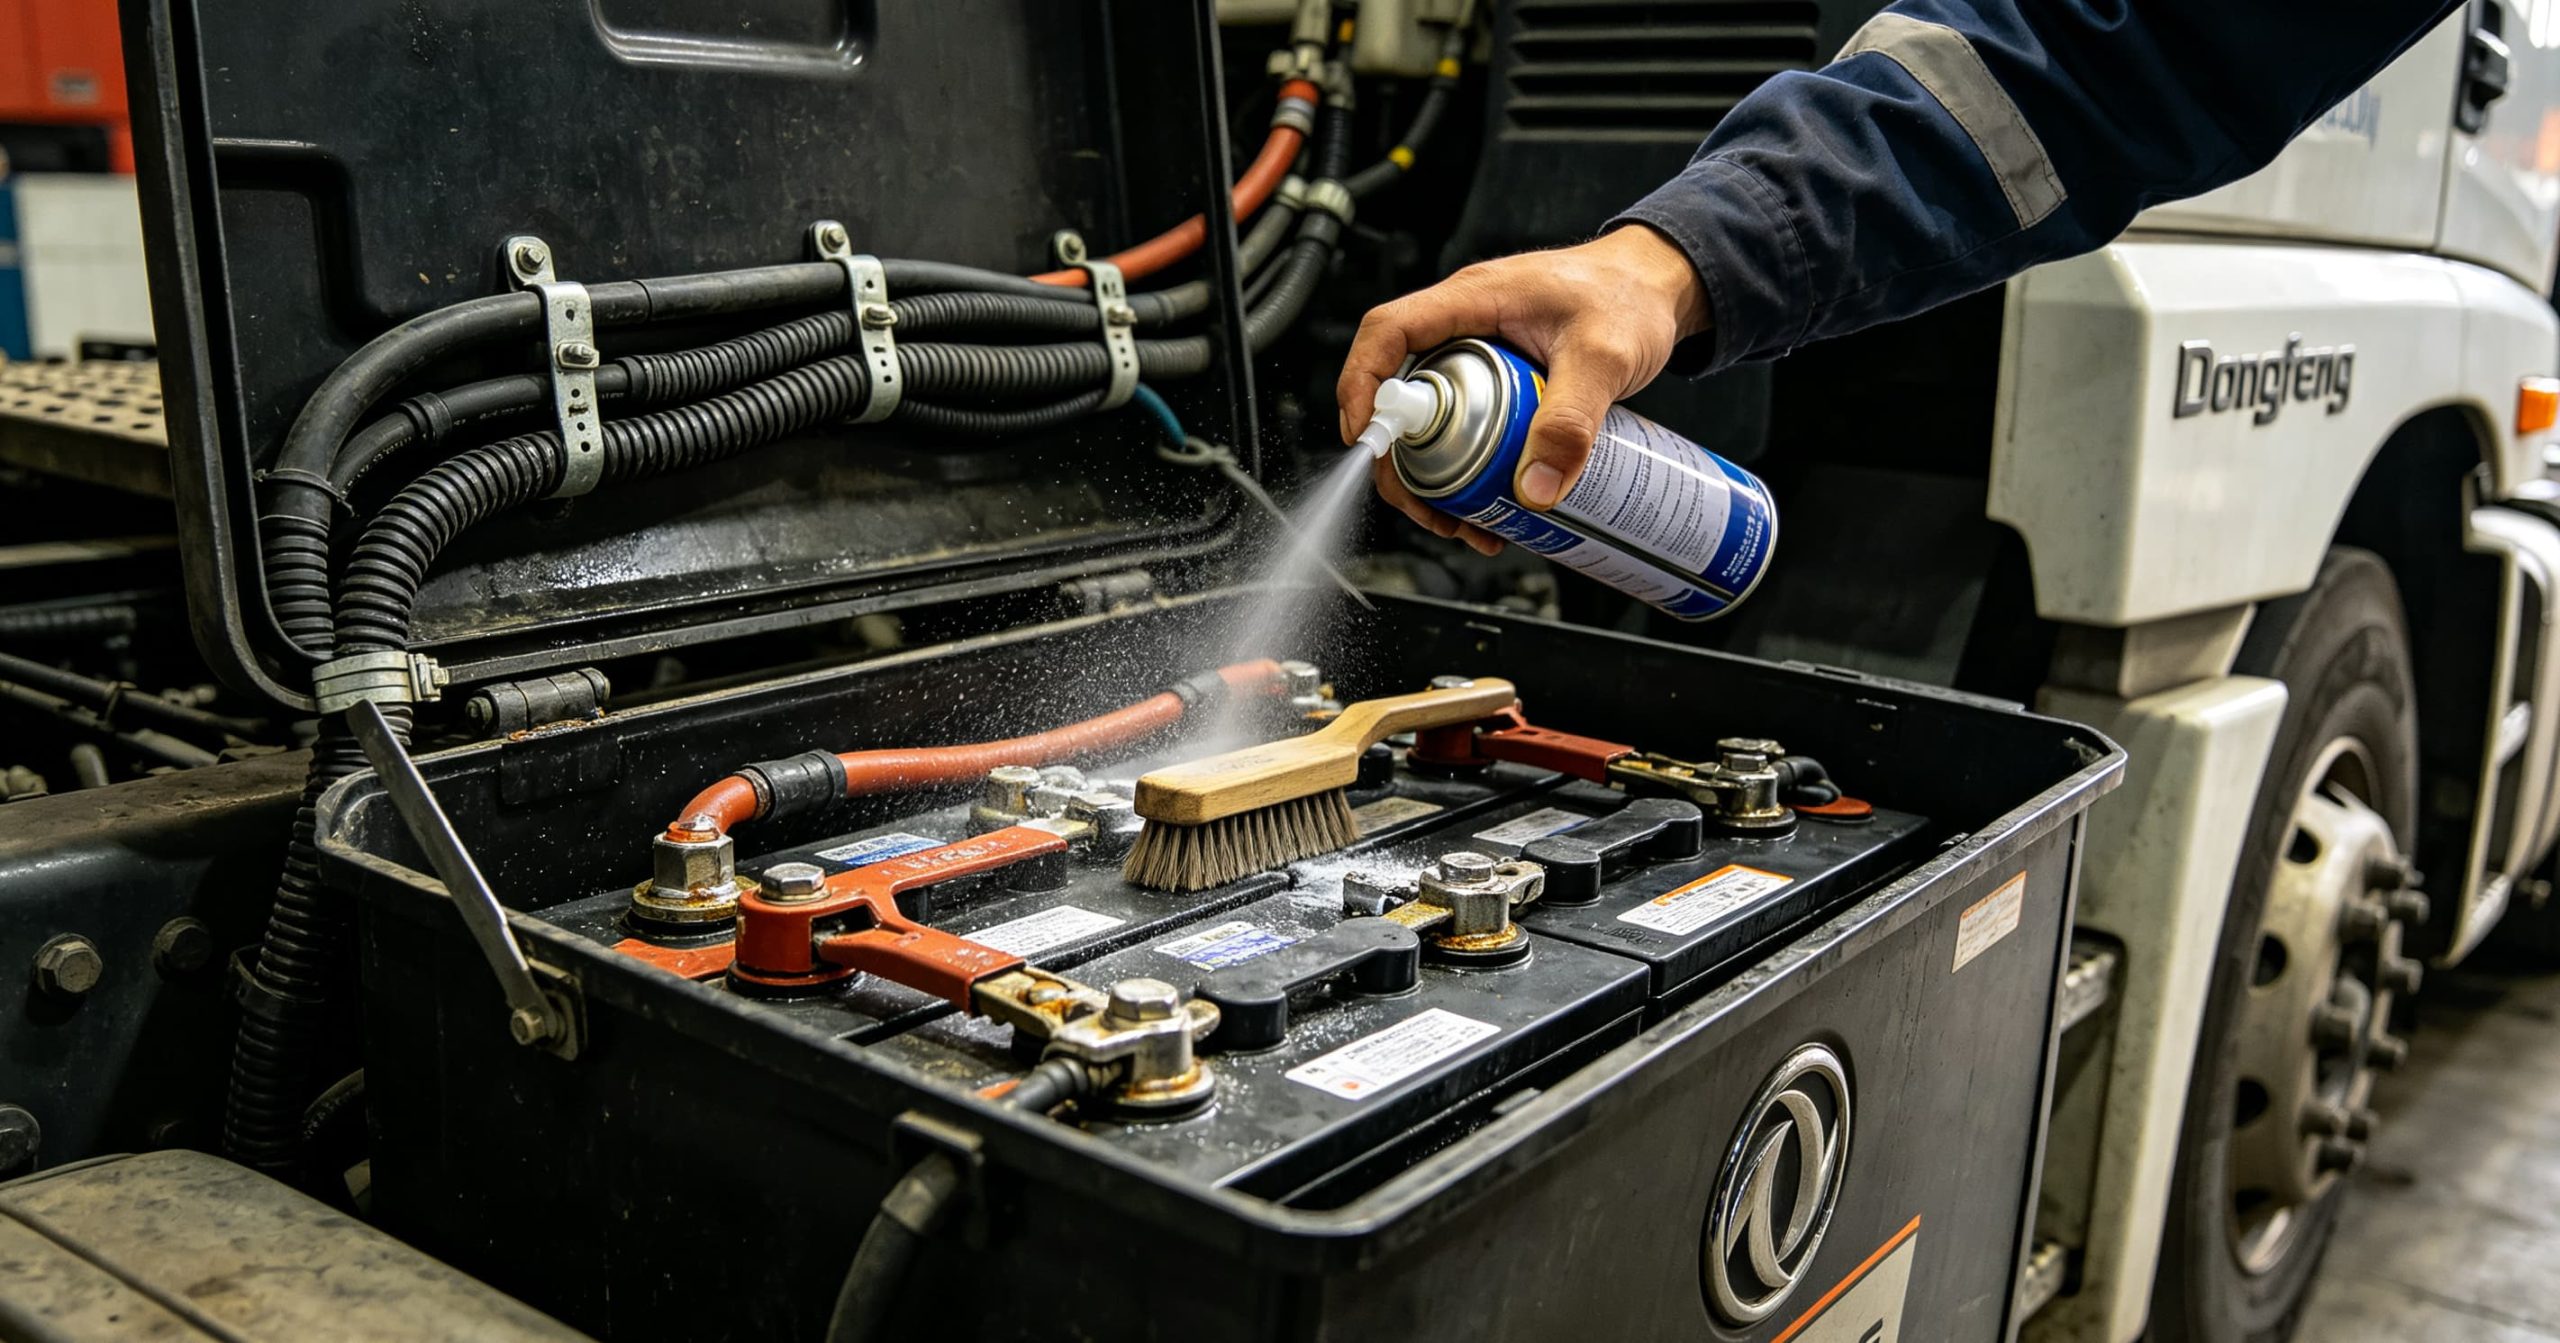
Before installing new cables, thoroughly clean all connection points. Use a wire brush and battery terminal cleaner to remove any corrosion or dirt from the battery posts, starter motor terminals, alternator B+ post, and all ground points on the chassis and engine block. A clean, bare metal surface is essential for a low-resistance connection. Furthermore, this step is often overlooked but is vital for optimal performance.
6. Install New Cables
Route the new cables exactly as the old ones were, referring to your photos or diagrams. This prevents chafing or interference with moving parts. Connect the cables in the reverse order of removal:
- Connect Positive Cables: Attach the positive cables to the starter motor, alternator, and any other positive distribution points.
- Connect Ground Cables: Attach the negative (ground) cables to the engine block and chassis ground points.
- Connect to Batteries: Finally, connect the positive (+) terminals to the batteries, followed by the negative (-) terminals. Ensure all connections are snug and tight.
💡 Pro-Tip: Anti-Corrosion Measures
After making all connections, apply a thin layer of dielectric grease or battery terminal protector to the battery posts and cable ends. This helps prevent future corrosion and maintains a clean, low-resistance connection. This simple step can significantly extend the life of your new cables, especially for **FAW** and **Dongfeng** trucks operating in humid climates.
7. Test the System
Once all cables are installed and secured, reconnect the negative battery terminals. Start the truck and perform a voltage output test (as described in the diagnostic section) to ensure the charging system is functioning correctly. Check for any warning lights on the dashboard. Furthermore, attempt to start the truck several times to confirm consistent cranking power.
Preventive Maintenance for Battery Cables
Proactive maintenance is the best defense against unexpected battery cable failures. Regular checks and good practices can significantly extend the lifespan of your truck’s components and ensure reliable operation, especially for heavy-duty trucks that endure demanding operational cycles. For more insights into maintaining your fleet, explore our customer success cases.
1. Regular Visual Inspections
Periodically inspect all battery cables for signs of corrosion, fraying, cracks in the insulation, or loose connections. This should be part of your routine pre-trip inspections and scheduled maintenance. Pay particular attention to the areas around the battery terminals and where cables are routed through the chassis.
2. Keep Connections Clean and Tight
Clean battery terminals and cable ends regularly using a wire brush and battery terminal cleaner. Apply anti-corrosion grease or spray after cleaning. Ensure all connections at the battery, starter, alternator, and ground points are tight and secure. Loose connections are a primary cause of resistance and heat buildup.
3. Secure Cable Routing
Ensure all battery cables are properly routed and secured with clips or ties, preventing them from rubbing against sharp edges, hot engine components, or moving parts. Proper routing minimizes physical damage and extends cable life. This is particularly important for **Sinotruk (HOWO)** and **Shacman** trucks, which often operate in rugged conditions.
4. Battery Health Management
Maintain your batteries properly. A healthy battery is less likely to off-gas corrosive fumes. Ensure batteries are fully charged, and for serviceable batteries, check electrolyte levels regularly. A failing battery can put undue stress on cables and other charging system components. For reliable battery options, visit our product brand page.
5. Use Correct Replacement Cables
When replacement is necessary, always use cables of the correct gauge and length as specified by the truck manufacturer. Never use undersized cables, as they will lead to premature failure and potential safety hazards. High-quality cables with robust insulation and properly crimped terminals are a worthwhile investment. Furthermore, consider cables with tinned copper conductors for enhanced corrosion resistance.
💡 Pro-Tip: Custom Cable Fabrication
For specific applications or to ensure the highest quality, consider custom-fabricated battery cables. This allows for precise length, correct gauge, and the use of high-quality lugs and heat shrink. A hydraulic crimper ensures a solid, low-resistance connection that outperforms many off-the-shelf options. This level of customization can be particularly beneficial for specialized **Dongfeng** or **Foton** truck configurations.
Advanced Diagnostic Tools and Techniques for Battery Cables
While visual inspections and voltage drop tests are fundamental, certain advanced tools and techniques can provide even deeper insights into battery cable health, especially for intermittent or hard-to-diagnose issues in complex heavy-duty truck electrical systems.
1. Thermal Imaging for Hotspots
Infrared thermal imaging cameras are excellent for quickly identifying areas of excessive heat, which directly correlate to high resistance. When a battery cable or connection point is experiencing high resistance, it generates heat as electrical energy is converted into thermal energy. By scanning the battery cables, terminals, and connection points (especially during cranking or heavy load), a thermal camera can reveal hotspots that are invisible to the naked eye. This is particularly useful for detecting internal cable damage or subtle loose connections that might not show up clearly on a voltage drop test until the problem is severe. For **HOWO** and **Shacman** trucks, where robust electrical systems are critical, thermal imaging can be a game-changer in preventive maintenance.
2. Millivolt Drop Testing
A more precise version of the voltage drop test, millivolt drop testing uses a multimeter capable of reading very small voltage differences (in millivolts). This allows for an even more sensitive detection of resistance in a circuit. While standard voltage drop tests look for drops of 0.2V to 0.5V, a millivolt drop test can identify issues where the drop is only a few millivolts, indicating a very slight increase in resistance that could still be problematic in high-current applications. This level of precision is often employed in diagnosing subtle performance issues in **FAW** and **Foton** truck electrical systems.
3. Inductive Ammeter (Current Clamp)
An inductive ammeter, or current clamp, allows you to measure the current flowing through a cable without breaking the circuit. This is invaluable for:
- Verifying Starter Current Draw: Measure the actual current flowing to the starter motor during cranking. If the current draw is excessively high, it might indicate a faulty starter, but if it’s too low despite a healthy battery, it points to high resistance in the battery cables.
- Parasitic Drain Detection: While not directly a cable problem, an ammeter can help identify if a component is drawing current when the truck is off, which can lead to a dead battery and put undue stress on the cables during subsequent starts.
🔍 Technical Deep-Dive: The Relationship Between Current, Resistance, and Heat
The fundamental principle governing electrical circuits is Ohm’s Law (V=IR) and Joule’s Law (P=I²R). When current (I) flows through a conductor with resistance (R), a voltage drop (V) occurs, and power (P) is dissipated as heat. In battery cables, which carry very high currents, even a small increase in resistance (e.g., from corrosion or internal damage) can lead to a significant increase in heat generation (P=I²R). This heat further increases resistance, creating a vicious cycle that can quickly degrade the cable and pose a fire risk. Therefore, minimizing resistance in these critical pathways is paramount for safety and efficiency. For more detailed technical insights, explore our product system page.
Conclusion
Battery cables, though often overlooked, are foundational to the reliable operation of any heavy-duty truck’s electrical system. Problems such as corrosion, loose connections, and internal damage can lead to a cascade of issues, from frustrating no-start conditions to dangerous electrical fires. By understanding their critical function, recognizing the symptoms of failure, and implementing systematic diagnostic and replacement procedures, you can significantly enhance your fleet’s uptime and safety. Furthermore, adhering to a regimen of preventive maintenance, including regular inspections and using high-quality, correctly gauged cables, will ensure the longevity and optimal performance of your **Sinotruk (HOWO)**, **Shacman**, **FAW**, **Foton**, or **Dongfeng** trucks. For more information about our company and commitment to quality, visit our about us page.
Frequently Asked Questions (FAQs) about Truck Battery Cables
A1: The most common problems include corrosion at the terminals, loose connections due to vibration, internal damage to the copper strands (often from corrosion creep or fatigue), and using cables of an incorrect or undersized gauge. These issues all lead to increased electrical resistance.
A2: Common symptoms include slow engine cranking, a clicking noise from the starter solenoid without the engine turning over, dim headlights, or hot battery cables/terminals after attempting to start the truck. Visible corrosion on the terminals is also a clear sign. A voltage drop test is the most reliable diagnostic method.
A3: For heavy-duty truck battery cables, replacement is almost always recommended over repair. Repairs, especially to the main power cables, can introduce points of high resistance, leading to heat buildup and potential fire hazards. Furthermore, internal corrosion or damage is often difficult to fully repair. Replacing the entire cable ensures optimal conductivity and safety.
A4: Heavy-duty trucks typically require very thick cables, often 0-gauge (1/0) or 00-gauge (2/0), for the main battery-to-starter and battery-to-ground connections. The exact gauge depends on the truck’s electrical demands and cable length. Always refer to the truck manufacturer’s specifications or consult a qualified technician. Using an undersized cable can lead to performance issues and overheating.
A5: Battery cables should be visually inspected as part of your routine pre-trip checks and during every scheduled maintenance interval (e.g., every 3-6 months). Pay close attention to the terminals for corrosion and the cable insulation for any signs of damage. Promptly clean any corrosion and tighten loose connections.
A6: Both bad positive and negative (ground) cables can cause significant problems. A poor ground cable can lead to a wide range of electrical issues, as all electrical circuits rely on a clean return path to the battery. Symptoms can include erratic electronics, dim lights, and starting problems. In some cases, a bad ground can be harder to diagnose than a bad positive cable, as its effects can be more widespread and less direct.
A7: For reliable, high-quality replacement battery cables for **HOWO**, **Shacman**, **FAW**, **Foton**, and **Dongfeng** trucks, you should source from reputable suppliers like Mettlead. We offer a wide range of genuine and OEM-equivalent components designed to meet the demanding specifications of heavy-duty applications. Visit our product brand page to explore our offerings.


